

Pro 501st Airless Paint Sprayer - Graco Inc.
Pro 501st Airless Paint Sprayer - Graco Inc.
Pro 501st Airless Paint Sprayer - Graco Inc.

You also want an ePaper? Increase the reach of your titles
YUMPU automatically turns print PDFs into web optimized ePapers that Google loves.
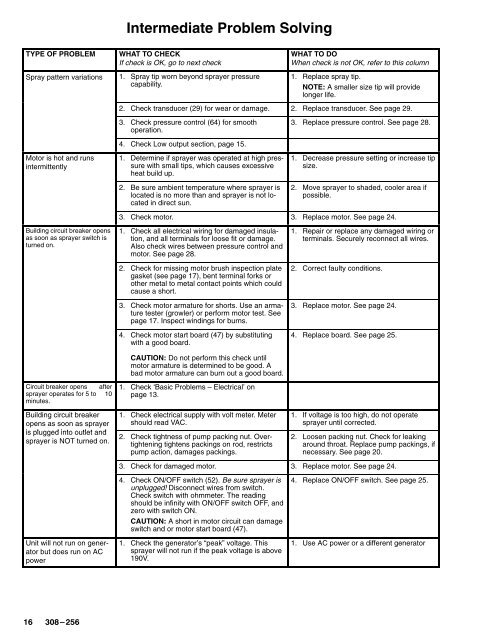
Intermediate <strong>Pro</strong>blem Solving<br />
TYPE OF PROBLEM<br />
WHAT TO CHECK<br />
If check is OK, go to next check<br />
Spray pattern variations 1. Spray tip worn beyond sprayer pressure<br />
capability.<br />
Motor is hot and runs<br />
intermittently<br />
WHAT TO DO<br />
When check is not OK, refer to this column<br />
1. Replace spray tip.<br />
NOTE: A smaller size tip will provide<br />
longer life.<br />
2. Check transducer (29) for wear or damage. 2. Replace transducer. See page 29.<br />
3. Check pressure control (64) for smooth<br />
operation.<br />
4. Check Low output section, page 15.<br />
1. Determine if sprayer was operated at high pressure<br />
with small tips, which causes excessive<br />
heat build up.<br />
3. Replace pressure control. See page 28.<br />
1. Decrease pressure setting or increase tip<br />
size.<br />
2. Be sure ambient temperature where sprayer is<br />
located is no more than and sprayer is not located<br />
in direct sun.<br />
2. Move sprayer to shaded, cooler area if<br />
possible.<br />
3. Check motor. 3. Replace motor. See page 24.<br />
Building circuit breaker opens<br />
as soon as sprayer switch is<br />
turned on.<br />
Circuit breaker opens after<br />
sprayer operates for 5 to 10<br />
minutes.<br />
Building circuit breaker<br />
opens as soon as sprayer<br />
is plugged into outlet and<br />
sprayer is NOT turned on.<br />
1. Check all electrical wiring for damaged insulation,<br />
and all terminals for loose fit or damage.<br />
Also check wires between pressure control and<br />
motor. See page 28.<br />
2. Check for missing motor brush inspection plate<br />
gasket (see page 17), bent terminal forks or<br />
other metal to metal contact points which could<br />
cause a short.<br />
3. Check motor armature for shorts. Use an armature<br />
tester (growler) or perform motor test. See<br />
page 17. Inspect windings for burns.<br />
4. Check motor start board (47) by substituting<br />
with a good board.<br />
CAUTION: Do not perform this check until<br />
motor armature is determined to be good. A<br />
bad motor armature can burn out a good board.<br />
1. Check ‘Basic <strong>Pro</strong>blems – Electrical’ on<br />
page 13.<br />
1. Check electrical supply with volt meter. Meter<br />
should read VAC.<br />
2. Check tightness of pump packing nut. Overtightening<br />
tightens packings on rod, restricts<br />
pump action, damages packings.<br />
1. Repair or replace any damaged wiring or<br />
terminals. Securely reconnect all wires.<br />
2. Correct faulty conditions.<br />
3. Replace motor. See page 24.<br />
4. Replace board. See page 25.<br />
1. If voltage is too high, do not operate<br />
sprayer until corrected.<br />
2. Loosen packing nut. Check for leaking<br />
around throat. Replace pump packings, if<br />
necessary. See page 20.<br />
3. Check for damaged motor. 3. Replace motor. See page 24.<br />
Unit will not run on generator<br />
but does run on AC<br />
power<br />
4. Check ON/OFF switch (52). Be sure sprayer is<br />
unplugged! Disconnect wires from switch.<br />
Check switch with ohmmeter. The reading<br />
should be infinity with ON/OFF switch OFF, and<br />
zero with switch ON.<br />
CAUTION: A short in motor circuit can damage<br />
switch and or motor start board (47).<br />
1. Check the generator’s “peak” voltage. This<br />
sprayer will not run if the peak voltage is above<br />
190V.<br />
4. Replace ON/OFF switch. See page 25.<br />
1. Use AC power or a different generator


