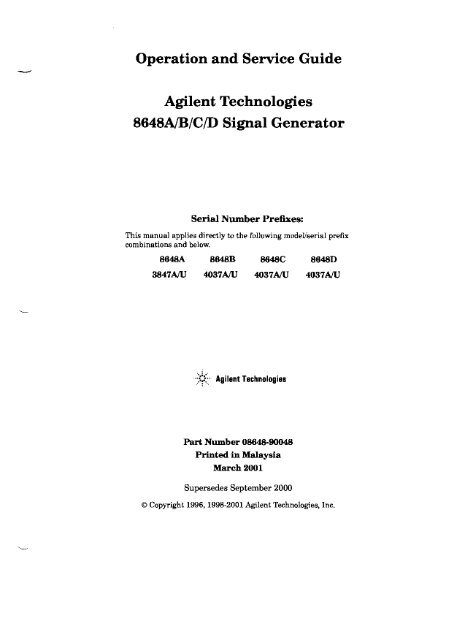
Operation and Service Guide Agilent Technologies 8648A/B/C/D ...
Operation and Service Guide Agilent Technologies 8648A/B/C/D ...
Operation and Service Guide Agilent Technologies 8648A/B/C/D ...

You also want an ePaper? Increase the reach of your titles
YUMPU automatically turns print PDFs into web optimized ePapers that Google loves.
<strong>Operation</strong> <strong>and</strong> <strong>Service</strong> <strong>Guide</strong><br />
<strong>Agilent</strong> <strong>Technologies</strong><br />
<strong>8648A</strong>/B/C/D Signal Generator<br />
Serial Number Prefixes:<br />
This manual applies directly to the following model/serial prefix<br />
combinations <strong>and</strong> below.<br />
<strong>8648A</strong> 8848B 8648C 8648D<br />
3847AIU 4037AIU 4037AIU 4037AIU<br />
..)?:::- <strong>Agilent</strong> <strong>Technologies</strong><br />
Part Number 08648·90048<br />
Printed in Malaysia<br />
March 2001<br />
Supersedes September 2000<br />
© Copyright 1996, 1998-2001 <strong>Agilent</strong> <strong>Technologies</strong>, Inc.
Notice<br />
The information contained in this document is subject to change without notice.<br />
<strong>Agilent</strong> <strong>Technologies</strong> makes no warranty of any kind with regard to this material,<br />
including but not limited to, the implied warranties of merchantability <strong>and</strong> fitness for a<br />
particular purpose. <strong>Agilent</strong> <strong>Technologies</strong> shall not be liable for errors contained herein or<br />
for incidental or consequential damages in connection with the furnishing, performance, or<br />
use of this material.<br />
FLEX <strong>and</strong> Motorola are trademarks of Molorola, Inc.<br />
Windows® <strong>and</strong> MS Winclows® are U.S. registered trademarks of Microsoft Corporation<br />
Windows NT® is a U.S. registered trademark of Microsoft Corporation.<br />
Certification<br />
<strong>Agilent</strong> <strong>Technologies</strong> certifies that this product met its published specifications at the time<br />
of shipment from the factory. <strong>Agilent</strong> <strong>Technologies</strong> further certifies that its calibration<br />
measurements are traceable to the United States National Institute of St<strong>and</strong>ards <strong>and</strong><br />
Technology, to the extent allowed by the Institute's calibration facility, <strong>and</strong> to the<br />
calibration facilities of other International St<strong>and</strong>ards Organization members.<br />
Regulatory Information<br />
The regulatory information is in Chapter 4, "Specifications."<br />
Warranty<br />
This <strong>Agilent</strong> <strong>Technologies</strong> instrument product is warranted against defects in material<br />
<strong>and</strong> workmanship for a period of one year from date of shipment. During the warranty<br />
period, <strong>Agilent</strong> <strong>Technologies</strong> will, at its option, either repair or replace products which<br />
prove to be defective.<br />
For warranty service or repair, this product must be returned to a service facility<br />
designated by <strong>Agilent</strong> <strong>Technologies</strong>. Buyer shall prepay shipping charges to <strong>Agilent</strong><br />
<strong>Technologies</strong> <strong>and</strong> <strong>Agilent</strong> <strong>Technologies</strong> shall pay shipping charges to return the product to<br />
Buyer. However, Buyer shall pay all shipping charges, duties, <strong>and</strong> taxes for products<br />
returned to <strong>Agilent</strong> <strong>Technologies</strong> from another country.<br />
u
<strong>Agilent</strong> <strong>Technologies</strong> warrants that its software <strong>and</strong> firmware designated by <strong>Agilent</strong><br />
<strong>Technologies</strong> for use with an instrument will execute its programming instructions when<br />
properly installed on that instrument. <strong>Agilent</strong> <strong>Technologies</strong> does not warrant that the<br />
operation of the instrument, or software, or firmware will be uninterrupted or error-free.<br />
LIMITATION OF WARRANTY<br />
The foregoing warranty shall not apply to defects resulting from improper or inadequate<br />
maintenance by Buyer, Buyer-supplied software or interfacing, unauthorized modification<br />
or misuse, operation outside of the environmental specifications for the product, or<br />
improper site preparation or maintenance,<br />
NO OTHER WARRANTY IS EXPRESSED OR IMPLIED. AGILENT TECHNOLOGIES<br />
SPECIFICALLY DISCLAIMS THE IMPLIED WARRANTIES OF MERCHANTABILITY<br />
AND FITNESS FOR A PARTICUl.AR PURPOSE.<br />
EXCLUSIVE REMEDIES<br />
THE REMEDIES PROVIDED HEREIN ARE BUYER'S SOLE AND EXCLUSIVE<br />
REMEDIES. AGILENT TECHNOLOGIES SHALL NOT BE LIABLE FOR ANY DIRECT,<br />
INDIRECT, SPECIAL, INCIDENTAL, OR CONSEQUENTIAL DAMAGES, WHETHER<br />
BASED ON CONTRACT, TORT, OR ANY OTHER LEGAL THEORY.<br />
Assistance<br />
Product maintenance agreements <strong>and</strong> other customer assistance agreements are available<br />
for <strong>Agilent</strong> <strong>Technologies</strong> products, For any assistance, contact your nearest <strong>Agilent</strong><br />
<strong>Technologies</strong> Sales <strong>and</strong> <strong>Service</strong> Office. Refer to the list of Sales <strong>and</strong> <strong>Service</strong> Offices on the<br />
next page.<br />
iii
Instrument Support Center<br />
<strong>Agilent</strong> <strong>Technologies</strong><br />
(800) 403-0801<br />
UNITED STATES<br />
I<br />
EUROPEAN FIELD OPERATIONS<br />
Headquarters France Germany<br />
<strong>Agilent</strong> <strong>Technologies</strong> SA <strong>Agilent</strong> <strong>Technologies</strong> France AgiLent <strong>Technologies</strong> GmbH<br />
150, Route du Nant-d'Avril 1 Avenue Du Canada <strong>Agilent</strong> <strong>Technologies</strong> Strasse<br />
1217 Meyr-in 2/ Geneva Zone D'Activite De 61352 Bad Homburg vd.H<br />
Switzerl<strong>and</strong> Courtaboeuf Germany<br />
(4122) 780.8111 F-91947 Les U1is Cedex (496172) 16-0<br />
France<br />
(33 1) 69 82 60 60<br />
Great Britain<br />
<strong>Agilent</strong> <strong>Technologies</strong> Ltd.<br />
Eskdale Road, Winnersh<br />
Triangle Wokingham, Berkshire<br />
RG41 5DZ Engl<strong>and</strong><br />
(44 118) 9696622<br />
INTERCON FIELD OPERATIONS<br />
Headquarters Australia Canada<br />
<strong>Agilent</strong> <strong>Technologies</strong> <strong>Agilent</strong> <strong>Technologies</strong>Australia <strong>Agilent</strong> <strong>Technologies</strong> (Canada)<br />
3495 Deer Creek Rd. Ltd. Ltd.<br />
Palo Alto, CA 94304-1316 31-41 Joseph Street 17500 South <strong>Service</strong> Road<br />
USA Blackburn, Victoria 3130 Trans-Canada Highway<br />
(415) 857-5027 (61 3) 895-2895 Kirkl<strong>and</strong>, Quebec H9J 2X8<br />
Canada<br />
(514) 697-4232<br />
Japan<br />
<strong>Agilent</strong> <strong>Technologies</strong> Japan, Ltd. Singapore Taiwan<br />
Measurement Assistance Center <strong>Agilent</strong> <strong>Technologies</strong> <strong>Agilent</strong> <strong>Technologies</strong> Taiwan<br />
9-1, Takakura-Cho, Hachioji-Shi, Singapore (Pte.) Ltd. 8th Floor, H-P Building<br />
Tokyo 192-8510, Japan 150 Beach Road 337 Fu Heing North Road<br />
TEL (81) -426-56-7832 #29-00 Gateway West Taipei, Taiwan<br />
FAX (81) -426-56-7840 Singapore 0718 (886 2) 712-0404<br />
(65) 291-9088<br />
China<br />
China <strong>Agilent</strong> <strong>Technologies</strong><br />
38 Bei San Huan Xl Road<br />
ShuangYu Shu<br />
Hai Dian District<br />
Beijing, China<br />
(861) 256-6888<br />
iv
Safety Notes<br />
The following safety notes are used throughout this manual. Familiarize yourself with<br />
each of the notes <strong>and</strong> its meaning before operating this instrument.<br />
CAUTION<br />
Caution denotes a hazard. It calls attention to a procedure that, if not<br />
correctly performed or adhered to, would result in damage to or destruction of<br />
the instrument. Do not proceed beyond a caution sign until the indicated<br />
conditions are fully understood <strong>and</strong> met.<br />
WARNING<br />
Warning denotes a hazard. It calls attention to a procedure whtch, if<br />
not correctly performed or adhered to, could result in injury or loss<br />
of life. Do not proceed beyond a warning note until the indicated<br />
conditions are fully understood <strong>and</strong> met.<br />
The instruction manual symbol. The product is<br />
marked with this symbol when it is necessary for the<br />
user to refer to the instructions in the manual.<br />
CE<br />
~.<br />
The CE mark is a registered trademark of the<br />
European Community (if accompanied by a year, it is<br />
the year when the design was proven).<br />
The eSA mark is the Canadian St<strong>and</strong>ards Association<br />
safety mark.<br />
The C·Tick Mark is a trademark registered to the<br />
Australian Communications Authority <strong>and</strong> indicates<br />
compliance with the St<strong>and</strong>ard which limits<br />
electromagnetic radiation from computing hardware.<br />
This symbol is used to mark the on position of the<br />
power line switch.<br />
v
This symbol is used to mark the st<strong>and</strong>by position of<br />
the power line switch.<br />
This symbol indicates that the input power required is<br />
AC.<br />
ISM I-A<br />
This is a symbol of an Industrial Scientific <strong>and</strong><br />
Medical Group 1 Class A product. (CISPER 11,<br />
Clause 4)<br />
Instrument Markings<br />
The following markings <strong>and</strong> caution <strong>and</strong> warning labels are used on the instrument. Be<br />
sure to observe all cautions <strong>and</strong> warnings.<br />
WARNING<br />
Hazardous voltage always present in this area with instrument<br />
power cord connected to ac line.<br />
WARNING<br />
Do not remove this screw when removing cover from Instrument,<br />
WARNING<br />
Hazardous VoItaage<br />
CAUTION<br />
Hazardous electrical shock. Heat sink is live. Disconnect power supply before<br />
servicing.<br />
General Safety Considerations<br />
WARNING<br />
No operator serviceable parts inside. Refer servicing to qualified<br />
personnel. To prevent electrical shock, do not remove covers.<br />
WARNING<br />
If this instrument is used in a manner not specified by <strong>Agilent</strong><br />
<strong>Technologies</strong>, the protection provided by the instrument may be<br />
impaired.<br />
vi
- WARNING For continued protection against fire hazard replace line fuse only<br />
with same type <strong>and</strong> rating (3 A 250 V type F). The use of other fuses<br />
or material is prohibited.<br />
CAUTION<br />
Always use the three-prong ec power cord supplied with this instrument.<br />
Failure to ensure adequate earth grounding by not using this cord may cause<br />
instrument damage.<br />
Conventions<br />
Keycaps This font represents a key press on the instrument.<br />
Display This font represents text which appears on the instrument display<br />
Documentation Description<br />
This guide contains the information required to operate, calibrate, <strong>and</strong> repair the signal<br />
generator to the assembly level. Included are the following:<br />
• a quick overview of the signal generator<br />
• examples of typical operation<br />
• a reference section that describes all operation features<br />
explanations of error messages displayed on the signal generator<br />
• installation instructions<br />
• tables of specifications<br />
• tables of post-repair information <strong>and</strong> recommended equipment required<br />
• theory of operation of the signal generator<br />
troubleshooting procedures for removal <strong>and</strong> replacement of assemblies<br />
• replaceable part numbers<br />
adjustments required after repair or performance test failure<br />
• performance tests to test the instrument to specifications<br />
• supplemental verification tests to test some unspecified parameters of the instrument<br />
vII
Contents<br />
1. <strong>Operation</strong><br />
Quick Overview '" , 1-2<br />
1. Power Key " , " 1-2<br />
2.Di~1~ 1-2<br />
3. Function <strong>and</strong> Data Keys 1-3<br />
4. Increment Set Keys 1-4<br />
5. Knobs 1-4<br />
6. MEMORY 1-4<br />
7. Modulation Source , .. ' , .1-5<br />
In. <strong>Operation</strong> Examples<br />
Setting the RF Output Signal. . . . . . . . . . . . . . . . . . . . . . . . . . . . . . . . . la-3<br />
Setting the Frequency. . . . . . . . . . . . . . . . . . . . . . . . . . . . . . . . . . . . . . la-3<br />
Setting the Amplitude<br />
La-S<br />
Turn on the RF Output......... . , . la-3<br />
Setting the Modulation. . . . . . . . . . . . . . . . . . . . . . . . . . . . . . . . . . . . . . . . . . . .. . la-4<br />
Incrementing or Decrementing the RF output Signal 1a-5<br />
Preliminary Steps , , , la-5<br />
Using the Knob _ la-5<br />
Using the Increment Keys<br />
La-S<br />
Using the Memory Registers<br />
La-?<br />
Saving Instrument Setting in Register Sequences<br />
la-8<br />
Deleting a Register from the Sequence. . . . . . .. . . . . . . . . . . . . . . . . . . . . . . . . . .1a-11<br />
Renumbering the Registers in a Sequence , .. ' .. . .. . . . . . .. . .. . la-12<br />
Inserting a Register in a Sequence<br />
la-13<br />
Offsetting the RF Output from a Reference<br />
la-16<br />
Setting the Reference Value<br />
la-16<br />
Offsetting the RF Output<br />
La-L?<br />
Holding the Output Attenuator Range. . . . . . . . . . . . . . . . . . . . . . . . . . . . . . . . . . .1a-19<br />
Set the Amplitude Level<br />
la-19<br />
Holding the Attenuator<br />
la-19<br />
Adjusting the Amplitude<br />
la-20<br />
Setting a User Selectable Modulated Frequency <strong>and</strong> Waveform<br />
(Option lE2 orlEP Only) 1a-21<br />
Setting the Modulation Level<br />
la-21<br />
Setting the Modulated Waveform<br />
la-21<br />
Setting the Modulated Frequency , la-22<br />
Signaling a Numeric-Type FLEX Pager (Option lEP Only)<br />
la-23<br />
Setting Up Pager Encoding<br />
la-23<br />
Entering Pager Encoding Settings<br />
la.-24<br />
Selecting the Format Settings<br />
la-24<br />
Selecting the Data Rate <strong>and</strong> Pager Type Settings<br />
la-25<br />
Selecting the Message Settings<br />
la-26<br />
Selecting the Transmission Repetitions <strong>and</strong> Amplitude.. '<br />
la-26<br />
Selecting the Pager Capcode (Address) _ la-27<br />
Selecting the Protocol Settings 1a-28<br />
Selecting the Roaming Mode Settings<br />
la-29<br />
Encoding ' la-29<br />
ix
Contents<br />
lb. <strong>Operation</strong> Reference<br />
Frequency <strong>and</strong> Amplitude. . . . . . . . . . . . . . . . . . . . . . . . 1b-2<br />
LKnob . lb-2<br />
2. Digit-Select Arrow Keys. . . . . . . . . . . . . . . . . . . . . . . . . . 1b-2<br />
3. REF SET......................................................... . .lb-2<br />
4. REF ON/OFF. . . . . . . . . . . . . . . . . . . . . . . . . . . . . . . . . . . . . . . . . . . . . . . . . . . . 1b-3<br />
Function. . . . . . . . . . . . . . . . . . . . . . . . . . . . . . . . . . . . . . . . . . . . . . . . . . .<br />
. 1b-4<br />
1. FREQUENCY lb-4<br />
2. AMPLITUDE 1b-5<br />
3. FM, AM, M lb-5<br />
Setting Up the Pager Encoder<br />
lb-6<br />
Pulse Modulation 1b-29<br />
Increment Set 1b-31<br />
Data. . . . . . . . . . . . . . . . . . . .. . . . . . . . lb-32<br />
Instrument Preset<br />
lb-34<br />
GPIB<br />
lb-38<br />
Memory. . . . . . . . . . . . . . . . . . . . . . . . . . . . . . . . . . . . . . . . . . . . . . . . . . lb-39<br />
Modulation Source<br />
lb-43<br />
RF Output<br />
lb-47<br />
Rear Panel.<br />
lb-49<br />
Remote Interface (Accessory)<br />
lb-5l<br />
Memory Interface (Accessory)<br />
lb-53<br />
Ic, <strong>Operation</strong> messages<br />
Front Panel <strong>Operation</strong> Messages. . . lc-2<br />
GPIB Comm<strong>and</strong> Messages. . . . . . . . . .. .<br />
lc-5<br />
GPIB Execution Errors<br />
lc-8<br />
GPIB Device-Specific Errors. . . . . . . . . . . lc-9<br />
GPIB Query Errors. . . .. . . . . . lc-lO<br />
<strong>Service</strong> Messages. . . . . . . . . . . . . . . . . . . . . . . . . . . . . . . . . . . . . . . . Ie-II<br />
2. GPm Programming<br />
Background 2-1<br />
Programming <strong>Guide</strong>liues 2-2<br />
GPIB Definition 2-2<br />
What is Programmable 2-2<br />
GPIB Address. . . . . . 2-2<br />
Error Messages. . . . . 2-2<br />
Programming Language 2-2<br />
Query 2-2<br />
Advanced Programming. . . . . . .. . . . . . . . . . . . . . . . . . . . . . . . . . . . . . . 2-2<br />
Programming Examples. . . . . . . . . . . 2-3<br />
Programming RF Frequency 2-3<br />
Programming RF Frequency <strong>and</strong> FM Modulation 2-3<br />
Querying RF Frequency 2-4<br />
Programming RF Amplitude. . . . . . . . . . . . . . . . . . . . . . . . . . . . . . . . . . . . . . . 2-4<br />
Programming Pulse Modulation (Option lEG) . . . . . . . . . . . . . . . . . . . . . . . . . . . . . . . .2-4<br />
Programming Pager Encoder (Option lEP) 2-5<br />
x
Contents<br />
CPIB Status Reporing. . . . . . . . . . . . . .. . . . . . . . . . . . . . .. . . . . . . . . . . . . . . . . . . . . . ..2-12<br />
External Modulation Input Level Status 2-14<br />
Reverse Power Protection Status. . . . . . . .. .. . . . . . . . . . . . . . . . . . . . . .. . . . . . . . ..2-16<br />
Unspecified Power (Amplitude) Entry Status 2·17<br />
Pager Encoding Status (Option lEP Only) . .. . . .. . . . . . . . . . . . . . . . . . . . 2-18<br />
SCPI Comm<strong>and</strong> Reference 2-20<br />
ABORt Subsystem (Option lEP Only) 2-21<br />
AM Subsystem 2-21<br />
CAL Subsystem. . . .. . . . . . . . . . .. . . . . .. . . .. . . . . . . . . . . . . . . 2-22<br />
DM Subsystem (Option lEP Only) . 2-22<br />
FM Subsystem... . 2-23<br />
FREQuency Subsystem. . . . . . . . . . . . . . . . . . . . . . . .. . . . .. . . 2·24<br />
INITiate Subsystem (Option lEP Only) .. . . . . . . . . .. . . . . . . . 2-24<br />
OUTPut Subsystem 2-24<br />
PAGing Subsystem (Option 1EP Only) 2-25<br />
PM Subsystem. . . . . . . . . . . . . . . . . . . . . . . . . . .. . . ..2-37<br />
POWer Subsystem. . . . . . . . . . . . . . . . . . . . . . . . . . . . . . . . . . . . . 2-38<br />
PUIM Subsystem. . . . . . . . . . . . . . . . . . . . . . . . . . . . . . . . . . . . . 2-38<br />
STATus Subsystem. . . . . . . . . . . . . . . . . . . . . . . . . . . . . . . . . . . . . . . . . . 2·39<br />
SYSTem Subsystem 2-40<br />
TRIGger Subsystem (Option 1EP Only) 2-40<br />
Changing Parameters While Encoding (Option lEP Only) 2-41<br />
Using the Buffer Memory for the Arbitrary Messages 2-41<br />
GPIB Capabilities 2-43<br />
GPIB Connector Information 2-44<br />
8656/57 Compatible Language 2-45<br />
Program Code implementation 2·46<br />
Receiving the Clear Message. . . . . . . . . . . . . . . . . . . . . . . . . . . . . . . . . . . . . . . . . . . . . .2-48<br />
Additional Programming Information 2-48<br />
3. Installation<br />
Unpacking Yonr Signal Generator 3·2<br />
Connecting AC Power 3-3<br />
Power Requirements. . . . . . . . . . . . . . . . . . . . 3-3<br />
Replacing the Fuse 3-3<br />
Turning On the Signal Generator 3-6<br />
Connecting to Other Instruments. . . 3·7<br />
Storing the Signal Generator. . . . . . . . . . . . . 3-8<br />
Shipping the Signal Generator... .. . 3-9<br />
4. Specifications<br />
Options. . . . . . . . . . . . . . . . . . . . . . . . . . . . . .. . . . . . 4-1<br />
Option Specifications. . . . . . . . . . . . . . . . . . . . . . . .4-1<br />
Frequency Specifications. . . . . . . . . . . . . . . . . . . . . . .4-2<br />
Internal Reference Oscillator. . . . . . . . . . . . . . . . .4-2<br />
Output 4-3<br />
Spectral Purity. . . . . . . . . . . . . . . . . . . . . . . . . . . . . . . . . . . . . .4-4<br />
Frequency Modulation. . . . . . . . . . . . . . . . . . . . . . . . . . . . . . . . . . . . . . . . . . .4-5<br />
xi
Contents<br />
Phase Modulation 4-6<br />
Amplitude Modulation .. . . . . . . . . . . . . . . . . . . . . . . . . . . . . 4-7<br />
Modulation Source. . . . . . . . . . . . . . . . . . . . . . . . . . . . 4-8<br />
Remote Programming 4-8<br />
Environmental. . . , 4-9<br />
G-eneral. . . . . . . . . . . . . . . . . . . . . . . . . . . . . . . . . . . . . . . . . . . . . . . . . . . . . . . . . . . . . .. 4-9<br />
Modulation Generator Option lE2. . . . . . .. . . . .. . . . . . . . . . . . .. .. . . . . . 4-10<br />
Pulse Modulation Option lE6 4-11<br />
Pager Encoder/Signalling Option lEP. . . . . . . . . . .. . . . . . . . . . . . . . 4-11<br />
Frequency Modulation. .. . . .. . . . . . . . . . . .. . . . . . . . .. . . . . . . . . . . . , .. 4-12<br />
Paging Signaling 4-12<br />
Modulation Source. . . . .. . . . . . . . . . . . . . . . . . . . . . . . . . . . . . 4-12<br />
General 4-12<br />
Regulatory Information 4-13<br />
ISO 9002 Compliant 4-13<br />
Statement of Compliance . . . . . . . . . . . . . . . . . . . . . . . . . . . . . . . . . . . . . . . . . . 4-13<br />
Noise Declaration. . . . . . . . . . . . . . . . . . . . . . . . . . . . . . . . 4-13<br />
5.<strong>Service</strong><br />
Shipping Your Instrument Back to <strong>Agilent</strong> <strong>Technologies</strong> 5-2<br />
Recommended Test Equipment 5-3<br />
Post-Repair. . . . 5-6<br />
Safety Notes. . . . . . . . . . . . . . . . . . . . . . . . . . . . . . 5-9<br />
50. Theory of <strong>Operation</strong><br />
Overview , 5a-4<br />
Al Front Panel. 5a-5<br />
A2 Power Supply , 5a-7<br />
A3 Motherboard 5a-8<br />
A4 Reference 5a-9<br />
A5 Sig Gen Synth . .. .. . . . . . . . . .. . . . . . 5a-l0<br />
A6 Output (<strong>8648A</strong>). . . . . . . . . .. . .. .. .. . . . . .. . . . . .. . . . .. . . . . . . . . . . . .. . .. 5a-11<br />
A6 Output (8648B/GiD). . . . . . . . . . . . . . . . . . . . . . . . . . . .. .. . . . . . . . . . . 5u-12<br />
A7 Attenuator (<strong>8648A</strong>) 5a-13<br />
AlO Frequency Extension (8648B/C/D) . , , .. . . . . . . . . . . . .. .. 5a-14<br />
All Attenuatcr (8648B/C/Dl. .. . . . . . . . . . . . . . . . 5a-15<br />
A12 Reverse Power Protection(8648B/C/D) 5a-16<br />
A13 Pulse Modulator (8648B/C/D Option lE6) 5a-17<br />
A14 Modulation Generator (Option lE2). , . .. . . . . . . . .. . . . . . . . 5a-18<br />
A30 Pager Encoder (<strong>8648A</strong> Option lEPl 5a-19<br />
5b. Troubleshooting Information<br />
Troubleshooting Checklist . 5b-2<br />
AC Mains (Line) Fuse Removal 5b-3<br />
To Remove the Fuse. . . . . . . . . . . . . . . . . . . . . . . . . . . . . . . . . . . . . . . . . . . . . . . . . . . .5b-3<br />
Modulation Test Points <strong>and</strong> Power Supply LEOs. . . . . . . . . . . . . . . . . . . . . . . . . . .5b-4<br />
Power Supply Distribution , 5b-5<br />
xII
Contents<br />
5c. <strong>Service</strong> Error Messages<br />
6. Replaceable Paris<br />
.Assembly Replacements 6-1<br />
<strong>8648A</strong> Replaceable Parts 6-3<br />
8648B/C/D Replaceable Parts 6-9<br />
7. Adjustments<br />
Test Equipment 7-2<br />
Equipment Setup for Automated Tests 7-2<br />
Test Point Extender 7-2<br />
Manual Adjustments 7-4<br />
Internal Reference Oscillator Adjustment 7-5<br />
Pager Encoder Timebase Frequency Adjustment 7-7<br />
Automated Adjustments 7-9<br />
AM Level <strong>and</strong> Distortion (<strong>8648A</strong> Only) 7-10<br />
AM Level (8648B/C/D Only) 7-12<br />
Detector Offset (<strong>8648A</strong> Only) 7-14<br />
Output Level (<strong>8648A</strong> Only) 7-15<br />
AM Level: FE (8648B/C/D Only) 7-16<br />
Predistortion <strong>and</strong> Detector Offset (8648B/C/D Only)<br />
.7-18<br />
Prelevel (8648B/C/D Only) 7-19<br />
Output level: Frequency Extension Calibration (8648B/C/D Only) 7-20<br />
AM Modulator (<strong>8648A</strong> Only) . .. .. .. . . .. . . .. .. .. .. . . . .. . . .. . . . .. . . . . . . . . . . .7-21<br />
Time Base DAC (All <strong>8648A</strong>IB/C/D) 7-23<br />
Motherboard Audio Path (All <strong>8648A</strong>JBIC/D) 7·24<br />
DCFM (All <strong>8648A</strong>/B/C/D) 7-26<br />
Audio Generator (Options 1E2 <strong>and</strong> 1EP Only)............................. .7-27<br />
HF Power Level Accuracy (All <strong>8648A</strong>IB/C/D) . . . . . . . . . . . . . . . . . . . . . . . . .<br />
.7-28<br />
LF Output Level (Most 8648B/C/D). . . . . . . . . . . . . . . . . . . . . . . . . . . . . . . . . . . . . . . .7-31<br />
LF Power Level Accuracy (Most 8648B/C/D). .. . . . . .. . . . . . . . .. . . . . . . . . . .. . . . .. .7-32<br />
FSK Deviation (Option 1EP Only). 7-34<br />
Filter Path (Option 1EP Only) 7-35<br />
<strong>Agilent</strong> <strong>Service</strong> Support Software 7-36<br />
Required Test Equipment. . . . . . . . . . . . . . . . . .7-36<br />
Installing the Software. . . . . . . . . . . . . . . . . . . . . . . . . . . . . . . . .7-37<br />
Uninstallingthe Software............<br />
.7-41<br />
<strong>Service</strong> Support Software Administration. . . . . . . . . . . . . . 7-42<br />
Running the <strong>Service</strong> Support Software... . 7-53<br />
Motherboard Repair Utility 7-58<br />
8. Performance Tests<br />
Calibration Cycle . . . . . . . . . . . . . . . . . . . . . . . . ..8-2<br />
Required Test Equipment. . . . . . . . . . . . . . .8-3<br />
Performance Test Descriptions . . . . . . . . . . . . . . . . . .8-6<br />
Manual Performance Tests. . . . . . . . . . . . . . . . . . . . . . . . . .8-6<br />
Automated Performance Tests . .8-6<br />
FM Accuracy Performance Test . .8-7<br />
xiii
Contents<br />
Connect the Test Equipment. . . . . . . . . . . . . . . . . . . . . . . . . . . . . . . 8-7<br />
Configure the Measuring Receiver. . . . . . . . . . . . . . . . . . . 8-7<br />
Configure the 8648. . . . . . . . . . . . . . . . . . . . . . . 8-7<br />
Measure Deviations. . . . . . . . . . . . . . . . . . . . . . . . . . . . . . 8-7<br />
Test Record. . . . . . . . . . . . . . . . . . . . . . . . . . . . . . . . 8-7<br />
8648B/C/D Only. . . . . . . . . . . . . . . . . 8-8<br />
Connect the Test Equipment , 8-8<br />
Configure the Synthesized Signal Generator. . . . . . . . . . . . . . . . . . . . .8-8<br />
Measure Deviations ' 8-8<br />
Test Record _. . . . . . . . . . . . . . . . . . . . . . 8-9<br />
FM Accuracy Performance Test (Option 1E2 Only), .. . . . . . 8-10<br />
Connect the Test Equipment. . . . . _ 8-10<br />
Configure the Measuring Receiver. . . . . . . . . . . . . . . . . . . . . . . . . .. .. . . . . .. 8-10<br />
Configure the 8648. . .. . . . . . . . . . . . . . 8-10<br />
Measure Deviations. . . . . . . . . . . . .. . . .. .. .. . " 8-10<br />
Test Record. . .. . . . . . . . . . . . . . .. . . . . .. .. . . . . . 8-11<br />
8648B/CID Option 1E2 Only. . . .. .. . . . . . . . .. . . . . . . . . . .. _ 8-11<br />
Connect the Test Equipment 8-11<br />
Configure the Synthesized Signal Generator 8-11<br />
Measure Deviations 8-12<br />
Test Record 8-12<br />
FM Distortion Performance Test.. .. . . . . . .. . . . . . . . . .. .. . . . . . . . . . 8-13<br />
Connect the Test Equipment. . . . . . . . . . . . . . . . . . . . . . . . . . . . . . . . . . . 8-13<br />
Configure the Measuring Receiver . . . . . . . . . . . . . . . . . . . 8-13<br />
Configure the Audio Analyzer. . . . . . . . . . . . . . . . . . . . . . . . . . . . . . . . .. 8-13<br />
Configure the 8648. . . . . . . .. . .. . . .. . . . . . . . . . . . . . . . . .. . . . . .8-13<br />
Measure Distortion. . . . . . . . . . . . . . . . . . . . . . . . . . . . . . . . . . . . . . . . . . . . . 8-14<br />
Test Record 8-14<br />
8648B/C/D Only 8-14<br />
Connect the Test Equipment. . . . . .. . . .. .. . . 8-14<br />
Configure the Synthesized Signal Generator 8-15<br />
Measure Deviations 8-15<br />
Test Record " 8-15<br />
MI Accuracy Performance Test 8-16<br />
Connect the Test Equipment. . . .. . . . .. . . . . . . . . . . . . .. . . 8-16<br />
Configure the Measuring Receiver 8-16<br />
Configure the 8648. . . . . .. . . . . . . . . . . . . . . . .. . . . .. . . .. . . . .. . . . . . 8-16<br />
Measure Depths 8-16<br />
Test Record 8-16<br />
AM Accuracy Performance Test (Option lE2 Only) 8-17<br />
Connect the Test Equipment . . .. . . . . .. . . . . . . . . . . . 8-17<br />
Configure the Measuring Receiver. .. . . .. . . . . . . . . . 8-17<br />
Configure the 8648 . . . . . . . . . . . . . . . . . . . . . . . . . . 8-17<br />
Measure Depths. . . . . . . . . . . . . . . . . . . . . . . . . . . . . . . . . . . . 8·17<br />
Tpst Record. . . . . . . . . . . . . . . 8-18<br />
AM Distortion Performance Test . . . . . 8-19<br />
Connect the Test Equipment. . . . . . . 8-19<br />
Configure the Measuring Receiver. . . . . . . . . . .. . . . . . . . , .. 8-19<br />
Configure the Audio Analyzer _ , 8-19<br />
xiv
Contents<br />
Configure the 8648 , . . . . . . . . . . . . . . 8-19<br />
Measure Distortion Amplitudes 8-20<br />
Test Record. . . 8-20<br />
Phase Modulation Distortion Performance Test. . . . . . . . . . . . . . . . . . . . . . . . . . . . . . . .8-21<br />
Connect the Test Equipment 8-21<br />
Configure the Measuring Receiver 8-21<br />
Configure the Audio Analyzer 8·21<br />
Configure the 8648 8-21<br />
Measure Distortion. . . . . . . . . . . . . . . . . . . . . . . . . . . . . . . . . . . . . . . . . . 8-22<br />
Test Record. . . . . . . . . . . . . . . . . . . . . . . . . . . . . . . . . . . . . . . . . . . . . . . . . .<br />
. .8-22<br />
8648B/C/D Only.. . . . . .. . . . . .. .. . . .. .. . . . . . . . . . . . . . . . . . . . . . . . . . . . . . . . . .8-22<br />
Connect the Test Equipment. . . . . . . . . . . . . . . . . . . . . . . . . . . . . . . . . . .<br />
. ..8-22<br />
Configure the Synthesized Signal Generator. . . . . . . . . . . . . . . . . . . . . . . . . . . . . .8-23<br />
Measure Deviations 8-23<br />
Test Record 8-23<br />
Residual FM Performance Test 8-24<br />
Connect the Test Equipment 8-24<br />
Configure the Measuring Receiver 8-24<br />
Configure the Audio Analyzer 8-25<br />
Configure the Synthesized Signal Generator 8-25<br />
Configure the 8648 . . . . . . . . . . . . . . . . . 8-25<br />
Measure Deviations . . . . . . . . . . . . . . . . . . . . . . . . . . . . . . . . . . . . . .<br />
. ..8-25<br />
Test Record. . . 8-25<br />
Harmonics Performance Test. . . . . . . . . . . . . . . . . . . . . . . . . . . . . . . . .<br />
. ..8-26<br />
Connect tho Test Equipment. . . . . . . . . . . . . . . . . . . . . . . . . . . . . . . . . .<br />
.8-26<br />
Configure the Spectrum Analyzer. . . . . . . . . . . . . . . . . . . . . . . . . . . . . . . .<br />
.8-26<br />
Configure the 8648 . . . . . . . . . . . . . . . . . . . . . . . . . . . . . . . . . . . . . . . . . . . .<br />
. ..8-26<br />
Measure Harmonic Levels 8-26<br />
Test Record 8-26<br />
Spurious Performance Test 8-27<br />
Connect the Test Equipment 8-27<br />
Configure the Spectrum Analyzer 8-27<br />
Configure the 8648 . . . . . . . . . . . . . . . . . . . . . . . . . . 8-27<br />
Measure Spurious Levels. . . . . . . . . . . . . . . . . . . . . . . . . . . . . . . . . . . . . . . . . . ..8-27<br />
Test Record. . . . . . . . . . . . . . . . . . . . . . . . . . . . . . . . . . . . . . . . . . . . . . . . . . . . . 8-27<br />
DC FM Frequency Error Performance Test. . . . . . . . . . . . . . . . . . . . . . . . . . . . . .8-28<br />
Connect the Test Equipment. . . . . . . . . . . . . . . . . . . . . . . . . . . . . . . . . . . . . . . . .8-28<br />
Configure the Frequency Counter. . . . . . . . . . . . . . . . . . . . . . . . . . . . . . . . . ....8·28<br />
Configure the 8648 . . . . . . . . . . . . . . . . . . . . . . . . . . . . . . . . . . . . . . . . . . . . . . . . . . . .8-28<br />
Measure Deviations 8-28<br />
Test Record. . . . . . . . . . . . . . 8-29<br />
RF level Accuracy Performance Test. . . . . . . . . . . . . . . . . . . . . . . . . . . . . . . . . . 8-30<br />
Description. . . . . . . . . . . . . . . . . . . . . . . . . . . . . . . . . . . . . . . . . . . . . . . . . . . . . . .8-30<br />
Connect the Test Equipment. . . . . . . . . . . . . . . . . . . . . . . . . . . . . . . .<br />
. .8-30<br />
Configure the Measuring Receiver. . . . . . . . . . . . . . . . . . . . . . . . . . . . . .<br />
. .8-30<br />
Configure the 8648 8-31<br />
Measure Amplitudes. . . . . . . . . . . . . . . . . . . . . . . . . . . . . . . . . . . . . . . . . . . . . 8-31<br />
Test Record .. . . . . . . . . . . . . . . . . . . 8·31<br />
8648B/C/D Only. . . . 8-31<br />
xv
Contents<br />
Connect the Test Equipment,. . 8-32<br />
Configure the Power Meter 8-32<br />
Configure the 8648B/CID 8-32<br />
Measure High Level Power Accuracy (s 13 dBrn) 8-32<br />
Test Record 8-32<br />
Configure the 8648 Option lEA 8-33<br />
Measure the High Power Level Accuracy 8-33<br />
Test Record. . . . . 8-34<br />
Configure the Power Meter . . . . . . . . . 8-34<br />
Measure Low Level Power accuracy « -20 dEm) 8-34<br />
Test Record 8-34<br />
Pulse Modulation OnlOffRatio Performance Test (Option lE6 Only) 8-35<br />
Connect the Test Equipment 8-35<br />
Configure the Spectrum Analyzer 8-35<br />
Configure the 8648 . . . . . . . . . . . . . . 8-35<br />
Measure the On/Off Ratio 8-36<br />
Test Record _ 8-36<br />
Pulse Modulation Rise Time Performance Test (Option IE6 Only) 8-37<br />
Connect the Test Equipment 8-37<br />
Configure the Pulse Generator 8-37<br />
Configure the 8648 8-37<br />
Configure the Oscilloscope. . . . . . . . . . . . . . . . . 8-37<br />
Measure the Rise Time 8-38<br />
Test Record 8-38<br />
Pager Encoder 'I'imebase Accuracy Performance Test (Option lEP Only) 8-39<br />
Connect the Test Equipment 8-39<br />
Configure the Frequency Counter 8-39<br />
Configure the 8648 8-39<br />
Measure the Frequency 8-39<br />
Test Record. . . . . . . . . . . . . . . . . . . . . . . . . . . . . . . . . . . . . . . . . . . . . . . . . . . . . . . . . 8-39<br />
FSK Deviation Accuracy Performance Test (Option lEP Only) , 8-40<br />
Conned the Test Equipment 8·40<br />
Configure the Vector Signal Analyzer 8-40<br />
Configure the 8648 8-42<br />
Measure FSK Devia tion , 8-43<br />
Test Record 8-45<br />
Internal 'I'imebase: Aging Rate Performance Test (Option IE5 Only) 8-46<br />
Description. . . . . . 8-46<br />
Connect the Test Equipment 8-47<br />
Configure the Oscilloscope 8-47<br />
Measure the Phase Change Time , 8·48<br />
Test Record 8-48<br />
Power Level Accuracy Performance Test (Automated) 8-49<br />
Description 8-49<br />
Required Test Equipment 8-49<br />
Procedure 8-49<br />
<strong>8648A</strong> Test Record 8-52<br />
8648B Test Record. . . . . . . . . . . . . . .. . 8-72<br />
8648C Test Record 8-96<br />
xvi
Contents<br />
B64BD Test Record , 8·122<br />
9. Supplemental Verification Tests<br />
Required Test Equipment List , . . . . . . . . . . . . . . . . 9·2<br />
CW Frequency Accuracy Supplemental verification Teet. . . . . . . . . . . . . . . . . . . . . . .9-3<br />
Connect the Test Equipment 9·3<br />
Configure the Frequency Counter 9-3<br />
Configure the 8648 9~3<br />
Measure Frequency Accuracy 9-3<br />
Test Record 9·4<br />
9 kHz RF Level Accuracy Supplemental Verification Test .. . . . . . . . . . . . . 9-8<br />
Connect the Te.o:;t Equipment. . . . . . . 9-8<br />
Configure the Multimeter lDMM) . . . . . . . . . . . . . . . . . . . . . . . . . . . . . .. _ 9-8<br />
Configure the 8648 9-8<br />
Measure RF levels. . . . . . . . . . . . . . . . . . . . . . . . . . . . . . . 9-8<br />
Test Record , 9-9<br />
xvII
1 <strong>Operation</strong><br />
"<strong>Operation</strong>" contains the following information:<br />
• 1. <strong>Operation</strong>: Provides a quick overview of the instrument's operation.<br />
• 1a. <strong>Operation</strong> Examples: provides examples to help you learn how to operate the<br />
instrument.<br />
• lb. <strong>Operation</strong> reference: Provides quick access to information about each of the<br />
instrument's functions.<br />
• le. <strong>Operation</strong> Messages: Provides information about both front panel <strong>and</strong> GPIB remote<br />
operation messages.<br />
NOTE<br />
For Information about service messages numbered 500 <strong>and</strong> above, refer to<br />
Chapter 5c, "<strong>Service</strong> Error Messages".<br />
1·1
<strong>Operation</strong><br />
Quick Overview<br />
Quick Overview<br />
Figure 1·1. The 8648 Signal Generator<br />
5<br />
----,'<br />
1. Power Key<br />
Press POWER to power up the instrument. The instrument powers up to the same state it<br />
was in when power was turned off, except that the RF output will be turned ofT <strong>and</strong> the<br />
digit-select arrow keys (e-und =;.) will be reset to the least significant digit.<br />
2. Display<br />
The display can be one of two displays depending on the serial number prefix of your<br />
instrument as illustrated below.<br />
A l..J=[1=====L-JI 1<br />
1·2
<strong>Operation</strong><br />
Quick Overvtew<br />
The following table describes the prefixes that apply to the various 8648 models equipped<br />
with an LCD.<br />
A. LiquidCrystal Display (LCD)<br />
(labels located above the display)<br />
<strong>8648A</strong> Prefix 86488 Prefix 8648C Prefix 8648D Prefix<br />
3636A <strong>and</strong> below 3623A <strong>and</strong> below 3623A <strong>and</strong> below 3613A <strong>and</strong> below<br />
3643U <strong>and</strong> below 3642U <strong>and</strong> below 3642u <strong>and</strong> below 3642U <strong>and</strong> below<br />
The display contrast of the LCD can be achieved using the adjustment that is located on<br />
the rear panel ofthese instruments. Note that this adjustment is only available for<br />
instruments equipped with an LCD. It allows you to adjust the contrast of the LCD. Turn<br />
the adjustment to optimize the display for viewing from most angles. If the display is<br />
blank, first attempt to adjust the display contrast before returning the instrument for<br />
service.<br />
The following table describes the prefixes that apply to the various 8648 models equipped<br />
with a VFD.<br />
A. Vacuum Fluorescent Display (VeD)<br />
(labels located below the display)<br />
<strong>8648A</strong> Prefix 86488 Prefix 8648C Prefix 8648D Prefix<br />
3636A <strong>and</strong> above 3623A <strong>and</strong> above 3623A <strong>and</strong> IIbove 3613A <strong>and</strong> above<br />
3643U <strong>and</strong> above 3642U <strong>and</strong> above 3642u <strong>and</strong> IIbove 3642U <strong>and</strong> above<br />
The VFD is a 2x40 display. The intensity of this display is at 100% <strong>and</strong> cannot be adjusted.<br />
3. Function <strong>and</strong> Data Keys<br />
The keys in the FUNCTION <strong>and</strong> DATA blocks allow you to enter values for setting the<br />
frequency, amplitude, <strong>and</strong> modulation level of the RF output signal.<br />
IfOption lEP is present, the FM (ENCODER) key will toggle between pager encoder<br />
(ENCODER) mode <strong>and</strong> FM mode.<br />
If Option lEP is present <strong>and</strong> the signal generator is in the ENCODER mode, the rae dB,N<br />
key functions as a SHIFT key. This key lets you input alphabetical characters using the<br />
DATA <strong>and</strong> MODULATION SOURCE bloch when you are in pager encoder mode.<br />
If Option lEP is present <strong>and</strong> the signal generator is in the ENCODER mode, the MHz<br />
dB(m) key functions as an ENTER key. The ENTER key must be used to store any numeric<br />
or alphabetic characters entered by way ofthe DATA <strong>and</strong> MODULATION source blocks.<br />
1-3
<strong>Operation</strong><br />
Quick Overview<br />
4. Increment Set Keys<br />
When you press a FUNCTION key, that function becomes the active function. Press INCR<br />
SET to view or change the increment value for the active function. Press ~ or ~ at any time<br />
to change the active function setting by the increment value. (If Option lEP is present <strong>and</strong><br />
the signal generator is in the ENCODER mode, these keys have alternate functions.)<br />
If Option lEP is present <strong>and</strong> the signal generator is in the ENCODER mode, the INCR SET<br />
key functions as a START/STOP key. This key starts or stops any pager encoding activity.<br />
In addition, in this mode, the ~ <strong>and</strong> ~ function as PREY <strong>and</strong> NEXT keys. These keys let<br />
you move the blinking cursor between each parameter when you are entering the pager<br />
encoding settings.<br />
5. Knobs<br />
The knobs are always active when the instrument is in local (front panel) control. Turn<br />
them to increase or decrease the frequency or the amplitude of the RF output. Press e= or<br />
~, next to each knob, to adjust the knobs resolution.<br />
Press REF SET, next to each knob, to set the displayed value as the reference value <strong>and</strong><br />
turn on the reference mode. Press REFON/OFF to turn on <strong>and</strong> off the reference mode<br />
without changing the reference value. When the reference mode is on, the displayed value<br />
indicates the offset between the reference value <strong>and</strong> the RF output signal.<br />
If Option lEP is present <strong>and</strong> the signal generator is in the ENCODER mode, the<br />
AMPLlTUDE/ENCODER knob is used to enter a setting for a pager encoding parameter.<br />
6. MEMORY<br />
memory registers allow you to save instrument setups <strong>and</strong> recall them whenever you wish.<br />
Press SAY <strong>and</strong> enter a two-digit register number to save the instrument's current settings.<br />
To recall the settings, press REG <strong>and</strong> enter the register number. The arrow keys allow you<br />
to recall registers in numerical sequence. You can arrange your registers in up to ten<br />
different sequences.<br />
The number of the currently selected sequence <strong>and</strong> the last register selected are always<br />
displayed in the lower-left corner of the display to help you keep track of where you are in<br />
your testing process. (If Option lEP is present, the sequence <strong>and</strong> register are not displayed<br />
on any pager encoding menu.) The memory register examples provided in Chapter La,<br />
"<strong>Operation</strong> Examples," show you how to create a sequence <strong>and</strong> how to delete or add<br />
registers in your sequence.<br />
1-4
<strong>Operation</strong><br />
Quick Overview<br />
7. Modulation Source<br />
Press MOD ONIOFF to turn on or off the modulation source. Press INT 400 kHz or INT 1 kHz to<br />
select one of the internal source tones for modulating the RF output signal. These tones<br />
are also available as an output signal at the MOD INPUT/OUTPUT port when they are<br />
selected. Press EXT AC or EXT DC to ac- or de-couple an external audio source via the MOD<br />
INPUT/OUTPUT port.<br />
Press 1kHz + EXT DC to frequency modulate the RF signal with the internal! kHz tone <strong>and</strong><br />
an external source at the same time. (Additional internal plus external modulation<br />
capabilities are available for GPlB operation.) 1kHz + EXT DC will also amplitude or phase<br />
modulate the RF signal with the internal! kHz tone but it will not be de-coupled.<br />
IfOption lEP is present, the INT 1kHz (FREQUENCY) key, or if Option lE2 is present, the<br />
INT 1kHz (FREQUENCY/WAVEFORM) key scrolls between five states: a fixed 1 kHz<br />
internal source <strong>and</strong> a variable-frequency internal source with four different waveform<br />
selections. The four modulation waveforms are sine, triangle, square, <strong>and</strong> sawtooth (or<br />
ramp).<br />
1-5
la <strong>Operation</strong> Examples<br />
This section contains operating examples to help you learn how to operate the signal<br />
generator. These examples can be performed without any additional equipment. The pager<br />
testing example can only be performed if Option lEP is present.<br />
Ifthis is the first time you have operated this instrument, perform each of the following<br />
examples for a Quick introduction to general operation. After you have completed the<br />
examples, try operating the instrument's remaining functions on your own. Ifyou have<br />
trouble or want additional information on a function, refer to Chapter Ib, "<strong>Operation</strong><br />
Reference." Ifa message is displayed that you do not underst<strong>and</strong>, refer to Chapter Ic,<br />
"<strong>Operation</strong> Messages."<br />
The item numbers of the following operation examples correspond to the numbers called<br />
out on drawing of the instrument front panel.<br />
1. Setting the RF Output Signal<br />
2. Incrementing or Decrementing the RF Output Signal<br />
3. Using the Memory Registers<br />
4. Offsetting the RF Output from a Reference<br />
5. Holding the Output Attenuator Range<br />
6. Setting a User Selectable Modulated Frequency <strong>and</strong> Waveform (Option lE2 or lEP<br />
Only)<br />
7. Signaling a Numeric-Type FLEX Pager (Option lEP Only)<br />
1a-1
<strong>Operation</strong> Examples ,<br />
2 3<br />
-<br />
MODULATION<br />
__AMPLITUDE<br />
EJ [;8 I ~~fl I ~ON01H: I ! ~ I N~~~<br />
EJ.I{) I I i,;~c I l~~ 00<br />
Y--<br />
MEMC'RY~ MODLLATIONSQIIRCE RFOUTPUT -1IIIIIl<br />
OFiJOFF<br />
6. 50W50\l<br />
4 7 6<br />
5<br />
an622a2d<br />
1a-2
<strong>Operation</strong> Examples<br />
Setting the RF Output Signal<br />
Setting the RF Output Signal<br />
In this example, you will set the frequency, amplitude, <strong>and</strong> modulation level of the RF<br />
output signal.<br />
Setting the Frequency<br />
1. Set the frequency to 100 MHz using the keys shown below the instrument diagram.<br />
Ifyou make a mistake while entering a value, press
~<br />
<strong>Operation</strong> Examples<br />
Setting the RF Output Signal<br />
------- -----<br />
'. FREQUENCY MODULATION<br />
~ 0 c::J000000 0 r-,<br />
,r 0 \1 0[;0 ooooo!u,r..'). rT.IOOO..OOOO.MHz.<br />
_1~;~1:;:1~~~<br />
I I I --=======Ll::===-~r·[<br />
\ ,0c::J0000000\ I<br />
,~./ 0 00 oooooloj L RFOFF I<br />
D<br />
§ 100011000 I I 1 -IOO~ooooo MHz -100.0 dBm<br />
19000000 c<br />
- - -- - - - - - - -<br />
funct3<br />
Setting the Modulation<br />
4. Set the FM deviation to 3 kHz.<br />
The modulation rate is displayed below the deviation setting. Use the MODULATION<br />
SOURCE keys to select a modulation source <strong>and</strong> turn modulation on or off.<br />
rr=-JI '1<br />
0 0 n] I[J 0 d<br />
Iro====I<br />
D,)eOOO 000\0 ~<br />
/ \<br />
--FM~(- cb [:~ ]<br />
funct4.drw<br />
-------- -----....<br />
MODULATION '"'"'""'~~-~- 4<br />
PM 3.00 kHz<br />
I kHz<br />
-100.0 dBm I<br />
I<br />
1a-4
<strong>Operation</strong> Examples<br />
Incrementing orDecrementing the RF output Signal<br />
Incrementing or Decrementing the RF output Signal<br />
In this example, you will increment the amplitude <strong>and</strong> frequency of the RF output signal.<br />
Preliminary Steps<br />
1. Ifthey are not already set, set the frequency to 100 MHz <strong>and</strong> the amplitude to<br />
-100 dEm.<br />
FREOUENCY<br />
[100.000(Jo MHz<br />
MODULATION<br />
Incr1.drw<br />
Using the Knob<br />
2. Increment the amplitude using the knob.<br />
Press when you wish to adjust the increment resolution.<br />
J<br />
FREOUENCY MODULATION AMPUTUDE "iiJp<br />
100.00000 MHz<br />
-101.O~<br />
incr2.drw<br />
Using the Increment Keys<br />
3. Enter a frequency increment of 25 kHz<br />
The ~ symbol is displayed when you press INCR SET to indicate that the displayed<br />
value is the increment set value.<br />
1a-5
<strong>Operation</strong> Examples<br />
Incrementing or Decrementing the RF output Signal<br />
, f<br />
'--<br />
~<br />
FREQUENCY MODULATION AMPUTUDE<br />
----<br />
Ī<br />
25.00000 ~kHz -101.0 dBrn 1I<br />
I<br />
I )<br />
inor3.drw<br />
4. Increment the Rf output frequency in 25 kHz steps.<br />
The increment keys affect the last FUNCTION selected (FREQUENCY, AMPLITUDE,<br />
FM, AM, OR
<strong>Operation</strong> Examples<br />
Using the Memory Registers<br />
Using the Memory Registers<br />
The memory register examples show you how to crate a sequence of registers, delete a<br />
register from that sequence, renumber the registers in the sequence, <strong>and</strong> insert a new<br />
register in the sequence.<br />
Up to 10 register sequences can be defined (0 through 9). A sequence can contain up to 100<br />
registers (00 through 99). There are a total of 300 registers available in the instrument.<br />
The registers can be used in the sequences in any combination 9such as 10 sequences of 30<br />
registers each, or 3 sequences of 100 registers each) as long as the total does not exceed<br />
300 registers. It is not possible to have all 10 sequences each contain 100 registers as that<br />
would be 1000 registers. (If Option 1EP is present, there are a total of 70 registers<br />
available.)<br />
,........ FREQUENCY<br />
I<br />
/<br />
!<br />
I<br />
/--~<br />
/\<br />
"<br />
\<br />
M<br />
l;Y /;<br />
, "-7<br />
I<br />
SEQ 0<br />
[]<br />
\<br />
,........l1li FREQUENCY__ MODULATION _AMPLITUDE<br />
FM 3,OOkKz<br />
1kHz OFF<br />
REG 00<br />
-1360dBm<br />
RF OFF<br />
r:
<strong>Operation</strong> Examples .<br />
Using the Memory Registers<br />
Saving Instrument Setting in Register Sequences<br />
In this ten step example, you will use the memory keys to create a sequence containing<br />
three registers. Each register will contain a different frequency setting.<br />
Selecting the Sequence<br />
1. Select sequence O.<br />
If there are registers saved in sequence 0, the message shown in the display below will<br />
not appear. Note that the steps in this example will cause the settings in registers 00,<br />
01, <strong>and</strong> 02 of sequence 0 to be changed.<br />
--<br />
FREQUENCY MODULATION AMPUTUDE<br />
SEQ 0 has no registers saved in it<br />
:<br />
regseq1.drw<br />
Saving Settings in Registers<br />
2. Set the frequency to 10 MHz.<br />
/------------<br />
[m~_" ._ ')<br />
L:J/ ~~sB·I~~§B<br />
'----;--<br />
Q 1[§[=oJ<br />
__1IIi!!I1!I!III~ FREQUENCY<br />
1-10..00000 MHz<br />
~QO REG-<br />
MODULATION :JIIIIIII~... AMPUTUDEJllllllllIIIIIIIIi-"<br />
[ FREClUENCY J 1 ~ [d~~) ]<br />
regseq2.drw<br />
3. Save the instrument settings in register 00.<br />
FREQUENCY<br />
10.00000 MHz<br />
SEQ 0 REG 00<br />
regseq3.drw<br />
1a-8
<strong>Operation</strong> Examples<br />
Using the Memory Registers<br />
4. Set the frequency setting to 11 MHz.<br />
FREQUENCY<br />
11.00000 MHz<br />
SEQ 0 REG 00<br />
MODULATION<br />
regseq4,drw<br />
5. Save the instrument settings in register 01.<br />
I I<br />
~ IDf<br />
(-\ 0 c:= =:J =:J 0 0 =:J =:J =:J<br />
" )8§qR8:~~R ~()11<br />
~? 0 0 0 rl =:J 0 =:J =:J<br />
I<br />
]8<br />
~lnD=:JI~JDD<br />
D =:J -..:' 0 q [J DO 0<br />
-<br />
FREQUENCY<br />
11.00000 MHz<br />
=:J -, SEQ 0 REG 01<br />
=:J<br />
/<br />
I<br />
MODULATION<br />
AMPUTUDE<br />
I<br />
I<br />
regseq5,drw<br />
6. Set the frequency to 12 MHz.<br />
~ ['<br />
MODULATION<br />
AMPLITUDE<br />
Q]~[d~~)]<br />
regseq6,drw<br />
7. Save the instrument settings in register 02.<br />
1:E~~2------'____________<br />
FREQUENCY MODULATION AMPLITUDE -------<br />
12.00000 MHz<br />
SEQ 0 REG 02<br />
I<br />
regseq7.drw<br />
1a-9
<strong>Operation</strong> Examples .<br />
Using the Memory Registers<br />
Checking the Sequence<br />
8. Recall the registers in sequence O.<br />
The ~ <strong>and</strong> ~ keys recall registers or sequences depending on which key was pressed last<br />
(REG or SEQ).<br />
regseq8.drw<br />
FREQUENCY<br />
10.00000 MHz<br />
SF, a REG 00<br />
11.00000 MHz<br />
SE 0 REG 01<br />
12.00000 MHz<br />
SE aREG 02<br />
10.00000 MHz<br />
SEQ a REG 00<br />
MODULATION<br />
Checking a Different Sequence<br />
9. Select sequence 1.<br />
req9.drw<br />
IO.Step through the registers in sequence I if there are registers saved in it.<br />
NOTE<br />
Sequence I does not contain the settings you saved in sequence O. The<br />
instrument enables you to save different settings in each sequence to create<br />
up to ten different sequences for your testing. Remember when you save or<br />
recall a register, be sure that the correct sequence is also selected.<br />
1a-10
<strong>Operation</strong> Examples<br />
Using the Memory Registers<br />
Irl<br />
()~I ~~=§§-E-§j~~~_~1IL'~r---I---FR-E-QU-E-NC-Y------------<br />
MODULATION<br />
AMPUTUDE~!!!ii_,<br />
l 0 ~~E4~§jR 0 ][[fl] - -----==-~==~=====<br />
B I /u']<br />
o 10 0 ocoool =:J" --<br />
~ =:J lQ].J =:J C =:J =:Jgj =:J SEQ 1 REG 00 _~<br />
reqO.drw<br />
Deleting a Register from the Sequence<br />
In this example, you will delete a register from the sequence you created in the preceding<br />
example.<br />
Selecting the Sequence<br />
1. Select sequence O.<br />
FF==""="",-~."'§..§§--§'--="- - .-~ .--.------ --__<br />
I 1- ..._~--______<br />
l.c=.) ~I a BBB.,~-.§-R [[()rrrIf'Fl'lIRE'Cla!lllUE"'lN.~CYfJlllIIIIIlIIIIIlIIIII~MO[)[)DULATION<br />
- ---------------<br />
AMPUTUDE ----<br />
- _ OJ lU UJ DQD ~ D. '~- U~=S=E=,Q==O===c======:..-==========-<br />
__<br />
u _lB] [B¥~~t 66=~)<br />
[SEO] ~o~<br />
Deleting a Register<br />
~=-9J<br />
uelreqn.drw<br />
2. Delete register 01 from sequence O.<br />
NOTE<br />
The contents of the register are recalled when it is deleted. This allows you to<br />
re-save the contents ifyou need to.<br />
F'j"'=~~~~~_=o.-~_-'_~----,--~-----<br />
_<br />
------==----::~ .y-.~----<br />
- ~----~------<br />
......I11IIII11III FREaUENCY'.......IIIIIIIIIIIIIIIIIIIIII--"MICl0[)lJDULATIO~N'--IIIIIIIIIIIIIIIIIIIIII~ AMPLITUDE.IIIIIIIlllllliI-,<br />
11.00000 MHz<br />
SEQ 0 REG-<br />
delreg1.drw<br />
1a-11
<strong>Operation</strong> Examples<br />
Using the Memory Registers<br />
3. Step through the remaining registers in sequence O.<br />
The deleted register number has been removed from the sequence. Note that the<br />
instrument does not renumber the registers when one is deleted.<br />
~i~iiJ~j''----~==f~~~~~-;::-<br />
fREQUENCY<br />
12.00000 MHz<br />
SE 0 REG 02<br />
10.00000 MHz<br />
SEQ 0 REG 00<br />
MODULATION<br />
A_M_PU_T_UD_'T<br />
~~<br />
delreg2.drw<br />
Renumbering the Registers in a Sequence<br />
In this example, you will eliminate the skip from register 00 to register 02 in sequence 0<br />
caused when you deleted register 01 in the previous example.<br />
Decreasing the Register Number<br />
1. Delete register 02.<br />
The settings saved in register 02 are recalled when it is deleted.<br />
fREQUENCY<br />
12.00000 MHz<br />
SEQ 0 REG --<br />
MODULATION<br />
AMPLITUDE<br />
]<br />
numseq1.drw<br />
2. Save the settings from register 02 into register 01.<br />
FREQUENCY<br />
I 12.00000 MHz<br />
~EQOREG01<br />
MODULATION<br />
AMPLITUDE~<br />
I I<br />
..j j<br />
nemswq2.drw<br />
1a-12
<strong>Operation</strong> Examples<br />
Using the Memory Registers<br />
Checking the Sequence<br />
3. Step through the register sequence.<br />
I'~_, ~ ~~ 0 0000-0r:=J~31 ,<br />
,<br />
'f[iFREQUENCY<br />
(<br />
' ') = LJ 0 LJ LJ ( ')<br />
U c:J LJ U L:I 0 U 0 U I 12,00000 MHz<br />
MODULATION<br />
1<br />
<strong>Operation</strong> Examples<br />
Using the Memory Registers<br />
3. Recall register 00.<br />
Register 01 can now be used to save the settings that are saved in register 00.<br />
Fj="===",,==~~ECL=_ ==:L.-_ ~~~<br />
--'--=r---r<br />
MODULATION<br />
Insseq3.drw<br />
4. Save the recalled settings into register Ol.<br />
Register 00 can now be used to save the new settings.<br />
(--~~;::~~~~==-_~J__~~_ -~~~<br />
"----<br />
l<br />
c><br />
' 1(J,(~)Q~(J'()OlJEO~M::'IHJlZIII,1IIIII1IIIII1IIIIIIIc~~~~IIIIIIIIIIII!IIII.'~,J:flJI~IIIIIIJ~1IIliIl1<br />
I I L_ ~'rnFREOUENCY MODULATION AMPLITUDE <br />
III'jBI ~B 8<br />
8BBBjiB < ')I<br />
l§-gJ 1 r ) LJ DOD 0
<strong>Operation</strong> Examples<br />
Using the Memory Registers<br />
6. Save the settings in register 00.<br />
Press ft to check the new sequence.<br />
MODULATION AMPLJTU~E_cIIIIIIIIII""l-1Ill<br />
8.00000 MHz<br />
rrnFREQUENCY<br />
I<br />
I<br />
,_----=.=S=E=Q==O=R=E=G=O=O==============~~<br />
insseq6.drw<br />
1a-15
-- ----<br />
<strong>Operation</strong> Examples .<br />
Offsetting the RF Output from a Reference<br />
Offsetting the RF Output from a Reference<br />
In this example, you will enter an RF output frequency, set it as the reference value, <strong>and</strong><br />
then offset the RF output frequency 10 MHz below the reference value.<br />
Setting the Reference Value<br />
1. Set the frequency to 500 MHz.<br />
MODULATION<br />
---- --<br />
ref1.drw<br />
2. Set 500 MHz as the reference frequency.<br />
The Asymbol appears in the display to indicate that the reference mode is selected. The<br />
output frequency is still 500 MHz.<br />
ref2.drw<br />
1a-16
<strong>Operation</strong> Examples<br />
Offsetting the RF Output from a Reference<br />
Offsetting the RF Output<br />
3. Offset the output frequency 10 MHz below the reference frequency.<br />
You can enter in the offset value directly, or use the knob or ~ <strong>and</strong> ~ keys.<br />
MODULATION<br />
ref3,drw<br />
Amentian! In the reference mode, the output frequency equals the reference frequency ±<br />
the displayed offset frequency.<br />
Turning the Reference Mode Off or On<br />
4. Turn off the reference mode to display the actual output frequency.<br />
( I . , .22=-~ I ,<br />
. ,<br />
---_......_--<br />
FREOUENCY<br />
( _ . "10 DIDD=:JD=:JDra~~;'l<br />
= 0 D=:JD=:JD 0 (/ 'I<br />
490.00000 MHz<br />
~<br />
/ 0 = 0 o =:JD =:JD 0, /<br />
-'- 0 DO D=:JDDD 0 '-~<br />
'~~ .<br />
11-' 0 0 0 0 =:J 0 0<br />
u ll~~ D~D c ][u 0 ]<br />
~<br />
ret4.drw<br />
[ ~lo~1<br />
5. Turn on the reference mode without changing the reference frequency.<br />
(<br />
ref5.drw<br />
1a·17
<strong>Operation</strong> Examples<br />
Offsetting the RF Output from a Reference<br />
6. Change the displayed units to kHz.<br />
Note that for amplitude, reference settings are displayed in dB units only.<br />
rel6.drw<br />
Setting a New Reference Value<br />
7. Set the current output frequency as the new reference frequency at any time.<br />
I .• ~-? ---<br />
---- ----...........---<br />
MODULATION<br />
Iu c~ [§ ~ ~ ~ ~ ~ ~II§ () 11'1_----=1===F~=E~=OU=;=:=~=z===========A=M=PU=T=UD=E==-="-I_?_1<br />
0<br />
r;~18s8][8§8 () ][B oJ -, /<br />
[ ~~ ] ref7.drw<br />
1a-18
<strong>Operation</strong> Examples<br />
Holding the Output AUenuator Range<br />
Holding the Output Attenuator Range<br />
In this example, you will hold the output attenuator so it does not change ranges when you<br />
change the amplitude setting. This will prevent attenuator range changes from affecting<br />
the output signaL<br />
Set the Amplitude Level<br />
1. Set the amplitude level to -82 dEm.<br />
1i.~(.)iL'~~]~I~ ~~\§]I ~II-()JIJ,,~[ -~~~~~IIIII!!!!!I1111!!!!!~~~~1IIII!!!!!11111!!!!!_811112~.~~M~~:; j I<br />
~_ :/e nn~ ooo~~ n 0 ~<br />
FREQUENCY<br />
MODULATION<br />
[ AMPLITUDE [~ ~ [~1 rd':~)J attn1.drw<br />
Holding the Attenuator<br />
2. Hold the attenuator at this setting.<br />
FREQUENCY<br />
- -:::O~-?as<br />
MODULATION<br />
-82.0 dRm l lJ<br />
HOLQ!<br />
attn2.drw<br />
1a-19
<strong>Operation</strong> Examples .<br />
Holding the Output AUenuator Range<br />
Adjusting the Amplitude<br />
3. Adjust the amplitude setting.<br />
Now amplitude changes do not cause the attenuator to change its range setting.<br />
Consequently, amplitude changes are limited to the range provided by the instrument's<br />
vernier. For information about the instrument's vernier ranges, refer to Chapter lb,<br />
"<strong>Operation</strong> Reference."<br />
FREQUENCY MODULATION AMPLITUDE:il<br />
- ---<br />
-82,.0 dBm HOLD<br />
II<br />
-- - ---- -- .'<br />
attna.drw<br />
1a-20
<strong>Operation</strong> Examples<br />
Setting a User Selectable Modulated Frequency <strong>and</strong> Waveform (Option 1E2 or 1EP Only)<br />
Setting a User Selectable Modulated Frequency <strong>and</strong><br />
Waveform (Option lE2 or lEP Only)<br />
NOTE<br />
This modulation example can only be performed if Option lE2 or lEP is<br />
present.<br />
In this example, you will select the modulation level <strong>and</strong> the modulated frequency <strong>and</strong><br />
waveform of the RF signal output.<br />
Setting the Modulation Level<br />
1. Select FM modulation with a deviation of 25 kHz.<br />
Either AM or M modulation may be used instead of FM. The modulation type (FM, AM,<br />
or M) <strong>and</strong> the modulation level (deviation or depth) is displayed on the top line of the<br />
front panel display as shown.<br />
FM<br />
I 2 J I~] [ >::J)<br />
oneaed<br />
Setting the Modulated Waveform<br />
2. Press the INT 1kHz (FREQUENCY/WAVEFORM) key until SQU is selected.<br />
Repetitively pressing the INT 1kHz (FREQUENCY/WAVEFORM) key selects one of five<br />
states:<br />
• a fixed 1 kHz sinewave internal source<br />
• a variable-frequency sinewave source (indicated by SIN preceded by the frequency<br />
value)<br />
• a variable-frequency triangle source (TRI)<br />
• a variable-frequency squarewave source (SQu)<br />
• a variable-frequency sawtooth (or ramp) source (SAW)<br />
1a-21
<strong>Operation</strong> Examples .<br />
Setting a User Selectable Modulated Frequency <strong>and</strong> Waveform (Option 1E2 or 1EP Only)<br />
onet ooct<br />
Setting the Modulated Frequency<br />
3. Set the modulated frequency to 1.5 kHz.<br />
The kHz key is the only accepted units key.<br />
on68bd<br />
1a-22
1<br />
<strong>Operation</strong> Examples<br />
Signaling a Numeric-Type FLEX Pager (Option 1EP Only)<br />
Signaling a Numeric-Type FLEX Pager (Option lEP Only)<br />
In this example you will set up the pager encoder to send a signal appropriate to test a<br />
numeric-type FLEX pager.<br />
NOTE<br />
This pager encoding example can only be performed if Option 1EP is present.<br />
The front panel of the Option 1EP instrument is different from the st<strong>and</strong>ard<br />
instrument's front panel. The green <strong>and</strong> blue labels are incorporated for the<br />
pager encoding mode only. Therefore, these keys have multiple functions on<br />
instruments with Option 1EP.<br />
Figure 1a-1. The <strong>8648A</strong> Option lEP Signal Generator<br />
1 /I :0. AgH,,'<br />
<strong>8648A</strong> ICOkH~-1000MHz<br />
SIGNAL GENERATOR<br />
r FORM;~Q0EN~LEX<br />
MODULATION<br />
AMPLITUDE<br />
POLARITY NORMAL FILTER ON<br />
FREQUENCY_1IIII!II1IIll<br />
@J (FREQUENCY] SIiJP LiJ 11] ctJ ~ [EJ<br />
FUNCTIO~~<br />
,.--- DATA1IIIIIII!,.-1IIIIIll<br />
;/ ~) Q PREV D E F [<br />
r;;;vl<br />
II. (0 I (> I [AMPLITUDEI [Q] OJ I=:IJ [I] IJ:'I]<br />
~<br />
SPACE<br />
~<br />
\~ rrnusE~ [IEN::DERJ1 I~ dJ ctJ c!J 1=1J ~<br />
,'""' I ~ ~ SHIFT<br />
3~ l~ [:J 8 \I~ LJ L:':!:J l~ ~<br />
~ ~/ (P E)<br />
8~ rR [~M::ORYI]8l.1 ~~ l:o~r[~"t':"20"' ;<br />
IRFl<br />
POWER ~<br />
&r-I.<br />
O~D<br />
~<br />
B ~ a @]i ~ ~ ~ ~&f (ATINl<br />
& ~<br />
RF OUTPUT<br />
~_" RECALL ~, l (FREOUENCY) tv K
I'L-l_-,=Li<br />
<strong>Operation</strong> Examples .<br />
Signaling a Numeric-Type FLEX Pager (Option 1EP Only)<br />
Use the ~ (NEXT) <strong>and</strong> ~ (PREV) keys to scroll through the encoder parameters. The<br />
cursor will blink around the first letter of the active parameter. The ~ (NEXT) key<br />
moves forward sequentially through each pager encoder parameter <strong>and</strong> the ~ (PREY)<br />
key moves backward sequentially.<br />
To move between setting for each parameter, rotate the AMPLITUDE/ENCODER knob<br />
until the desired setting is displayed. When characters are entered by way of the<br />
keypad (such as the capcode), terminate the entry with the MHz dB{m) (ENTER) key.<br />
5. Start signaling the pager after all of the encoder parameters are set by pressing the<br />
!NCR SET (START/STOP) key.<br />
Entering Pager Encoding Settings<br />
1. Display the first pager encoder menu.<br />
After setting your pager's carrier frequency <strong>and</strong> an FM deviation of 4.8 kHz (for a FLEX<br />
pager) on the signal generator, press the FM (ENCODER) key once again to display the<br />
first pager encoder menu (FORMAT). The FM (ENCODER) key toggles between the<br />
frequency modulation menu <strong>and</strong> the pager encoder menu.<br />
MODULA1'ION<br />
I?i ~~18 §§8§§D-[-ri;, "~~F:~O:~;~A'~C>~~~~~~~IIIIIIIIIIIIII~AM:""P~LI~=~~<br />
FLEX<br />
NONMAL<br />
~~, I~ ~ ~ 0 D[~ '~~i ==P=-O-=L=AR=IT=Y==========Fl=L1='E=N=I).\I=~="-I~<br />
Iv<br />
c C! DD:::J D D D (] D<br />
---_._-_. ----<br />
Encodel.drw<br />
Selecting the Format Settings<br />
2. Set FORMAT to FLEX, POLARITY to NORMAL, <strong>and</strong> FILTER to ON.<br />
a. With the blinking cursor on the "F" of FORMAT, set the FLEX format by rotating the<br />
AMPLITUDE/ENCODER knob until FLEX is displayed.<br />
b. Press the ~ (NEXT) key to move the blinking cursor to POLARITY, then use the<br />
AMPLITUDE/ENCODER knob to set the polarity to NORMAL.<br />
c. Using the ~ (NEXT) key <strong>and</strong> the AMPLITUDE/ENCODER knob, set FILTER to ON.<br />
1a-24
<strong>Operation</strong> Examples<br />
Signaling a Numeric-Type FLEX Pager (Option 1EP Only)<br />
I<br />
~~r------ ____<br />
"<br />
(~) ~"I:""~UUI u ~<br />
~ UL 100000 0<br />
c::J::::J::::JO::::J::::JO 0 ( \)<br />
L:=J::::JCJU::::Juo U \ .:»<br />
~rocol~D~ 18<br />
0 UiDCODO::::J 0 o--c;<br />
'[ [.=~<br />
POLARITY<br />
MODULATION<br />
FLEX<br />
NORMAL<br />
============---_1<br />
Encode1.drw<br />
Selecting the Data Rate <strong>and</strong> Pager Type Settings<br />
3. Set DATA RATE to 3200/2 <strong>and</strong> PAGER TYPE to NUMERIC, using the<br />
AMPLITUDE/ENCODER knob <strong>and</strong> the ~ (NEXT) key.<br />
You may choose to set the data rate to one of the other settings; you FLEX pager should<br />
automatically adjust.<br />
~~~~-~~==r-r--~~.<br />
=(=~=')=89, §1 RFR§~ Rr§i (): ··r-r:D.::Q:~: 3200/2<br />
~ MODUIATION<br />
,_/ CJ DO _ COO 0 0 O'-~~ 1_----=~==P=A=G=ER=T\=P=E="=U=ME=R=I=IJ==============__~<br />
D<br />
rarooollooo<br />
BE9000 0 I~ ~<br />
Press the ~ (NEXT) key to move to the next page.<br />
4. Set VECTOR TYPE to STANDARD using the AMPLITUDE/ENCODER knob.<br />
Ecccdez.drs<br />
o ~<br />
I I --------r- r:::=::=<br />
ra rooo Icc 0 0<br />
Irc:==l<br />
D uE9ccoo 0 ~<br />
~. ~=~=;=~=:=E===============-~<br />
Press the ~ (NEXT) key to move to the next page.<br />
Encode3.drw<br />
1a-25
<strong>Operation</strong> Examples .<br />
Signaling a Numeric-Type FLEX Pager (Option 1EP Only)<br />
Selecting the Message Settings<br />
5. You may choose one of the five fixed messages (only numbers one <strong>and</strong> five are useful for<br />
numeric pagers) or you may define your own message. For this example, use your own<br />
phone number as the user-defined message:<br />
a. Set MESSAGE NO. to 6 <strong>and</strong> MESSAGE LENGTH to 40 using the<br />
AMPLITUDE/ENCODER knob <strong>and</strong> the key.<br />
b. Press the ~ (NEXT) key again to select the FREE MESSAGE parameter.<br />
c. Enter your phone number with the numeric keys <strong>and</strong> terminate your entry with the<br />
MHz dB(m) (ENTER) key.<br />
!=<br />
I<br />
I<br />
--~---<br />
FREQUENCY MODCLATJON AMPLITUDE -2<br />
~=========-_1<br />
MESSAGE NO.6 MESSAGELENGTH 40<br />
FREE IVIESSAGE<br />
Cl'l61 Dabc<br />
Press the ~ (NEXT) key to move to the next page.<br />
Selecting the Transmission Repetitions <strong>and</strong> Amplitude<br />
6. Set MODE to SINGLE <strong>and</strong> AMPLITUDE to 0.0 dBm using the AMPLITUDE/ENCODER<br />
knob <strong>and</strong> the ~ (NEXT) key. Enter the numeric values using the numeric keys <strong>and</strong> the<br />
MHz dB(m) (ENTER) key.<br />
I I<br />
l [ =<br />
~..<br />
FREQUENCY MODULATION AMPIJTUD~<br />
I MODE SINGLE AMPLTTIJIJE o.j<br />
I<br />
Press the ~ (NEXT) key to move to the next page.<br />
encode5.drw<br />
1a-26
<strong>Operation</strong> Examples<br />
Signaling a Numeric-Type FLEX Pager (Option 1EP Only)<br />
7. Set IMMEDIATE STOP to OFF, HEADER to ON, <strong>and</strong> TERMINATOR to ON using<br />
AMPLITUDE/ENCODER knob <strong>and</strong> the key. These are default settings that normally<br />
would not be adjusted.<br />
(<br />
II<br />
I<br />
FREQUEi'CY MODULATION AMPLITUDE<br />
IMMEDIATE STOP OFF<br />
HEADER ON<br />
TERMINATOR ON<br />
Press the ~ (NEXT) key to move to the next page.<br />
Selecting the Pager Capcode (Address)<br />
8. Enter your pager's capcode (address) in the pager code menu. The rad dB!!V (SHIFT) key<br />
is required to enter alphabetical characters. For example, to enter the following<br />
capcode: A00124 77, press, 7 (A), 00124n, MHz dB{m) (ENTER). Then, using the ~<br />
(NEXT) key <strong>and</strong> the AMPLITUDE/ENCODER knob, set DUMMY CALL to OFF.<br />
NOTE<br />
The pager's capcode contains information that automatically sets the<br />
parameters of the last two menus.<br />
FREQUENCY<br />
PAGER CODE<br />
DUMMY CALL<br />
A0012477<br />
OFF<br />
MODUlAl1ON<br />
encode40.cdr<br />
Press the ~ (NEXT) key to move to the next page.<br />
1a-27
<strong>Operation</strong> Examples<br />
Signaling a Numeric-Type FLEX Pager (Option 1EP Only)<br />
9. ADDRESS - TYPE <strong>and</strong> ADDRESS 1 are set automatically when the capcode is entered in the<br />
previous menu. IfA00124 77 was entered, SHORT <strong>and</strong> 0045245 would be displayed<br />
respectively. Generally, you would not change these settings.<br />
F- ~ 1[;~·~~-8~~~~-(-.. ~ ~... "'~""~F~REQ~U~EN'lC:Cf"--IIII11111111I11111111~ .....1IIIIIIIII11III<br />
MODULAnON<br />
~PUruDE<br />
--1- 1<br />
'\ ./ = 0 000 r.. n L:J" ,,' [' ADDRESS TYPE SHORT-- -<br />
[--/ 0 DO 0 DOC::: 0 0 '--- _ADDRESS! 0045245 I<br />
o ro=oa 10 0 0 110 I L-...'::::===========----<br />
C DE9o:::::JD ('--:) 0 ()<br />
encode4l.cdr<br />
Press the ~ (NEXT) key to move to the next page.<br />
Selecting the Protocol Settings<br />
10.FRAME, PHASE, <strong>and</strong> COLLAPSE CYCLE are also set automatically when you enter the<br />
pager's capcode. Ifyou entered A0012477 previously, 011, D, <strong>and</strong> 4 would be displayed.<br />
NOTE<br />
IfMODE is set to BURST or CONT instead of SINGLE, you may choose to change<br />
the collapse cycle to 1 to 7. With a collapse cycle of 4, the pager will receive<br />
the message once every 16 frames (2 4 ). Ifthe collapse is 0 or 1, the pager will<br />
receive the message either every frame (2°), or every other frame (2 1 ) .<br />
Press the ~ (NEXT) key to move to the next page.<br />
1a-28
<strong>Operation</strong> Examples<br />
Slgnaling a Numeric-Type FLEX Pager (Option 1EP Only)<br />
Selecting the Roaming Mode Settings<br />
l1.Set ROAMING MODE to NONE using the AMPLITUDE/ENCODER knob.<br />
~.. ··11~ ~§ 88 B~ (~+.~r-~11!11111111 FREQUENCY<br />
,. IIIIIIIIII!IIIIIIII!III~ MODULAnON -.lllll1IIIIIIIII~---------JIIIII~-'"<br />
AMPUWOE<br />
PHASE D<br />
I<br />
_/~. I~ ~ ~ Si.I~ ~ \. Jjl ,_---==~=~=~=~AP=E=~=~=C=Y=C=LE=__=4=FRAME===0=1=1 =-========,--_ l<br />
n 8 :::JDD DOD (: IIC:::::: (>]<br />
II ,<br />
---- ------- ----. ---_.._- --- -- - encode42.cdr<br />
Press the ~ (NEXT) key to move to the next page.<br />
Encoding<br />
12.To start encoding after selecting all pager encoder parameters, press the INCR SET<br />
(START/STOP) key.<br />
FREQUENCY<br />
MESSAGE NO.6<br />
CYCLE 00<br />
MODULAnON<br />
AMPUlUDE<br />
AMPLITIJDE 0.0 dBm<br />
FRAME 011 PHASE D<br />
encode43.cdr<br />
1a-29
1b <strong>Operation</strong> Reference<br />
This chapter describes each of the instrument's functions including all of the front panel<br />
keys, the rear panel connectors, <strong>and</strong> the optional remote interface <strong>and</strong> memory interface.<br />
This information is presented in the same functional groups as the front panel key<br />
functional groupings.<br />
NOTE<br />
Option lEP adds a pager encoder capability to the st<strong>and</strong>ard functions.<br />
Consequently the front panel of the Option lEP instrument is different from<br />
the st<strong>and</strong>ard instrument's front panel. The green <strong>and</strong> blue labels are<br />
incorporated for the pager encoding settings only. Therefore these keys have<br />
multiple functions on instruments with Option lEP.<br />
1b-1
<strong>Operation</strong> Reference .<br />
Frequency <strong>and</strong> Amplitude<br />
Frequency <strong>and</strong> Amplitude<br />
,.__ AMPLITUDE<br />
_<br />
1 2 3 4 freqkeys.drw<br />
The knob <strong>and</strong> reference set keys work similarly for both frequency <strong>and</strong> amplitude settings.<br />
1. Knob<br />
Turn the knobs to increment or decrement the frequency <strong>and</strong> amplitude settings. The<br />
knobs are always active when the instrument is in local operation.<br />
IfOption lEP is present <strong>and</strong> the signal generator is in the ENCODER mode, the knob in<br />
the AMPLITUDE/ENCODER block is used to select the desired setting for each pager<br />
encoder parameter.<br />
2. Digit-Select Arrow Keys<br />
Press these digit-select arrow keys ()to select the digit to be changed with the knob.<br />
NOTE<br />
The knobs increment the selected digit only. For information about<br />
incrementing by an arbitrary value using the increment set keys, see<br />
"Increment Set" in this chapter.<br />
3. REF SET<br />
Press REF SET to turn on the reference mode <strong>and</strong> to set the current RF output setting as<br />
the reference value. The reference value is stored in non-volatile memory until you replace<br />
it by pressing REF SET again.<br />
When you press REF SET, the Ii symbol is displayed between the value <strong>and</strong> the units. When<br />
Ii appears, the displayed value indicates the offset between the reference value <strong>and</strong> the RF<br />
output signal.<br />
1b-2
<strong>Operation</strong> Reference<br />
Frequency <strong>and</strong> Amplitude<br />
The RF output signal is not changed when you press this key.<br />
Units<br />
When you press REF SET for frequency, values can be entered in MHz or kHz. For<br />
amplitude, values can be entered in any of the amplitude units provided, but they are<br />
displayed in dB only.<br />
4. REF ON/OFF<br />
Press REF ON/OFF to turn off the reference mode if it is on, or to turn on the reference mode<br />
without changing the reference value.<br />
When you turn on the reference mode, the displayed value indicates the offset between the<br />
reference value <strong>and</strong> the current RF output setting.<br />
The RF output signal is not changed when you press this key.<br />
Output Power Trouble?<br />
Ifthe RF output power seems too low, look for Ii in the display<br />
between the power level value <strong>and</strong> the dB indicator. The Ii tells<br />
you that reference mode is turned on. The displayed value is not<br />
the output power level; it is the offset between the reference value<br />
<strong>and</strong> the output power. To exit the reference mode, press<br />
REF ON/OFF. You can then reset the output power to the desired<br />
level.<br />
1b-3
<strong>Operation</strong> Reference<br />
Function<br />
Function<br />
,-----------------<br />
I I I ]<br />
2<br />
3<br />
1. FREQUENCY<br />
The RF output frequency range for each model is shown in the following table. When<br />
making frequency changes, the instrument does not turn off the RF output. However, the<br />
power does blank for a few milliseconds when crossing the frequencies at 249,501, 1001,<br />
1260, 1600, 2001, 2520, <strong>and</strong> 3200 MHz.<br />
Model<br />
<strong>8648A</strong><br />
8648B<br />
8648C<br />
8648D<br />
Frequency Range<br />
100 kHz to 1000 MHz<br />
9 kHz to 2000 MHz<br />
9 kHz to 3200 MHz<br />
9 kHz to 4000 MHz<br />
Frequency switching typically takes less than 75 ms at frequencies lower then 1001 MHz,<br />
<strong>and</strong> less than 100 ms at higher frequencies.<br />
1b-4
<strong>Operation</strong> Reference<br />
Function<br />
2. AMPLITUDE<br />
The RF output amplitude range is shown in the following table. When making amplitude<br />
changes, the instrument does not turn off the RF output. The period of any over- or<br />
under-ranging that may occur during level transitions is typically less than 30 ms.<br />
Output Amplitude Ranges<br />
Model Frequency Range Amplitude<br />
<strong>8648A</strong> 100 kHz to 1000 MHz +10 to -136 dBm<br />
8648B/C/D<br />
8648B/C/D<br />
with Option lEA<br />
~2500MHz<br />
> 2500 MHz<br />
< 100 kHz<br />
:s 1000 MHz<br />
s 1500 MHz<br />
s 2100 MHz<br />
:s 2500 MHz<br />
> 2500 MHz<br />
+13 to -136 dBm<br />
+10 to -136 dBm<br />
+17 to -136 dBm<br />
+20 to -136 dBm<br />
+19 to -136 dBm<br />
+17 to -136 dBm<br />
+15 to -136 dBm<br />
+13 to -136 dBm<br />
3. FM, AM,
<strong>Operation</strong> Reference<br />
Function<br />
Setting Up the Pager Encoder<br />
NOTE<br />
The pager encoder mode is available only on instruments with Option lEP.<br />
Option lEP adds pager encoding/signaling capabilities to the st<strong>and</strong>ard<br />
functions. Consequently the front panel of the Option lEP instrument is<br />
different from the st<strong>and</strong>ard instrument's front panel. The green <strong>and</strong> blue<br />
labels are incorporated for the pager encoding settings only. Therefore, these<br />
keys have multiple functions on instruments with Option lEP.<br />
Figure Ib-L <strong>8648A</strong> Option lEP Signal Generator<br />
Agiletrt<br />
<strong>8648A</strong> iOOkHz-1000MHz<br />
SIGNIIl GENERATOR<br />
FORMAT FLEX<br />
POLARITY NORMAL FILTER ON<br />
~HP-IB MEMORY~ U V W<br />
POWER IR 8888 ~ ~ ~<br />
DATA<br />
tNItH<br />
A 8 C<br />
dB(m)<br />
CD IT] 0 ~ ~<br />
0 E F I<br />
CD IT] [}] ~<br />
mv Ie;] !, l1J<br />
emr<br />
G H I I I SPACE ?<br />
IT] II] Q] [;J u v iI,m' [;] ~I SET<br />
J SHIFT I<br />
IT] 0 I~<br />
,<br />
~!~<br />
dB,:,:V ! em' NfOF<br />
'-..=> ~<br />
<strong>Operation</strong> Reference<br />
Function<br />
[ I<br />
IAMPLITUDE I<br />
I FM I<br />
~(~R)<br />
1~ BEl<br />
funckeys. drw<br />
1. ENCODER<br />
NOTE<br />
Before selecting the pager encoder mode, check that the correct pager carrier<br />
frequency <strong>and</strong> FM deviation have been set.<br />
To select the pager encoder mode, press FM (ENCODER) twice: once to set FM deviation,<br />
then again to toggle between the st<strong>and</strong>ard functions <strong>and</strong> the pager encoder mode. The<br />
display will look like the following:<br />
---------------<br />
,<br />
FREQUENCY MODULATION AMPLI~UDE<br />
DDD:::JD 0<br />
I~ III t=I . ID I I ()<br />
FORMAT FLEX<br />
I[]]~C ': )~§-j DDD:::JD 0<br />
\.,-_ .•./ POLARITY NORMAL FILTER ON<br />
I ',_/ Lon LJUD--JLJ U<br />
I [~]~IDDD~E<br />
D C OOCD:::JD 0 D<br />
I<br />
Encode1.drw<br />
This format menu is always displayed first when the pager encoder mode is selected.<br />
The ft (PREV) <strong>and</strong> ~ (NEXT) keys are used to move the blinking cursor between each<br />
parameter.<br />
The knob in the AMPLITUDEIENCODER block is used to select the desired setting for<br />
each pager encoder parameter.<br />
To start or stop encoding, press INCR SET (START/STOP).<br />
1b-7
<strong>Operation</strong> Reference<br />
Function<br />
Setting the Format<br />
The format menu, shown in the previous figure, has the following settings:<br />
• FORMAT selects the pager protocol being tested.<br />
FLEX: FLEX format<br />
FLEX-TD: FLEX-TD format<br />
POCSAG: POCSAG format<br />
PN15: Pseudor<strong>and</strong>om Sequence (PN15)<br />
RESYNC: Re-synchronization function (for FLEX/FLEX-TD pagers only)<br />
SERVICE: Servicing the <strong>8648A</strong> Option 1EP<br />
• POLARITY selects the data polarity.<br />
Normal: Normal polarity<br />
POCSAG<br />
FLEX/FLEX·TD<br />
(2·LevelFSK),<br />
RESYNC, PN15<br />
FLEX/FLEX-TD<br />
(4-LevelFSK)<br />
"I": Carrier Deviation "I": Carrier + Deviation "10": Carrier + Deviation<br />
"11": Carrier + (Deviation/3)<br />
"01": Carrier (Deviation/3)<br />
"0": Carrier + Deviation "0": Carrier Deviation "00": Carrier Deviation<br />
INVERSE:<br />
Inverse polarity<br />
POCSAG<br />
FLEX/FLEX-TD<br />
(2-Level FSK),<br />
RESYNC, PN15<br />
FLEX/FLEX-TD<br />
(4-Level FSK)<br />
<br />
<br />
"I": Carrier + Deviation "I": Carrier Deviation "10": Carrier Deviation<br />
"11": Carrier (Deviation/3)<br />
"01": Carrier + (Deviation/S)<br />
"0": Carrier Deviation "0": Carrier + Deviation "00": Carrier + Deviation<br />
• FILTER selects whether or not the baseb<strong>and</strong> modulation filter (10th-order Bessel<br />
low-pass filter, -3 dB at 3.9 kHz) is used. Normally the filter is on.<br />
ON:<br />
OFF:<br />
Uses the low-Pass filter<br />
Does not use the low-pass filter<br />
1b-8
<strong>Operation</strong> Reference<br />
Function<br />
FLEX/FLEX-TD<br />
Setting the data Rate <strong>and</strong> Pager Type<br />
The parameter menu for the data rate <strong>and</strong> the pager type looks like the following:<br />
~=~~~~=__ -LI<br />
I<br />
-s;=--~<br />
I I \0 COCOOOOO C( )<br />
II )Oc:-:lCOOOOOC ,<br />
I<br />
<strong>Operation</strong> Reference<br />
Function<br />
IfNUMBERED is selected, the next parameter to be selected is NUMBER as follows.<br />
encode21.drw<br />
NUMBER is for setting the initial number of the numbered numeric message that will be transmitted.<br />
The allowable range is 0 to 63.<br />
I Lc= II e---<br />
IfHEX/BIN is selected, the next setting to be selected is BLOCKING LENGTH:<br />
clio<br />
~~<br />
~~<br />
MODULATION AMPLlTIJDE -----<br />
, r>. 000091.1 0 (~I
<strong>Operation</strong> Reference<br />
Function<br />
• MESSAGE NO. is defined as the following where ''X'' represents the phase setting:<br />
0: Arbitrary message set from the external controller using the GPIB capability.<br />
The data must be entered in units of works. Refer to<br />
'[SOURce]:PAGing[:FORMat]:{POCSag IFLEX IFTD}:ARBitrary:<br />
DEFine , ,..., " <strong>and</strong> ''Using the Buffer Memory for the<br />
Arbitrary Messages" in Chapter 2.<br />
START FRAME <strong>and</strong> STOP FRAME are defined in the following menu:<br />
!§<br />
00000<br />
c:::::JD 00000<br />
DD 00000 0<br />
I I<br />
::<br />
§o<br />
~<br />
00000<br />
]DDDIIDDD 011 DDD DOD 801<br />
I<br />
FREQUENCY MODULATION AMPLITUDE<br />
START FRAME 000 STOP FRAlvlE 127<br />
--------<br />
I<br />
encode22.drw<br />
The frames between the START FRAME <strong>and</strong> STOP FRAME will be transmitted. The allowable<br />
ranges for both are 000 to 127.<br />
1: Displays: 01223456[X}<br />
where ''X'' = "0" for phase A, "1" for phase B, "2" for phase C, "3" for phase D.<br />
2: Displays: ABCDEFG[X}<br />
where ''X'' = phase ''1>:.', ''B'', "C", "D".<br />
3: Displays: TEST PAGING:XXXXXXX<br />
where ''XXXXXXX'' = "PHASE s: "PHASE B", "PHASE C", or "PHASE D".<br />
4: Displays: ALPHANUMERIC 40CHARS TEST PAGING:XXXXXXX<br />
where ''XXXXXXX'' = "PHASE );', "PHASE B", "PHASE C", or "PHASE D".<br />
5: Displays: 8888888888888888888888888888888888888888<br />
for LCD test with 50 characters of "8"<br />
6: User-definable message, up to 40 characters long, set from the front panel.<br />
Enter numeric messages with the keypad. Alphanumeric messages require the<br />
rad dBIlV (SHIFT) key to access the alphabetical characters (blue letters) above<br />
the keypad. Ifrequired alphabetical characters are not available on the front<br />
panel, send a message from an external controller over GPIB. Refer to<br />
"[SOURce]:Paging[:FORMat]<br />
:{pOCSag\FLEX IFTD}:MESS:DEFin~ 'string''' in Chapter 2.<br />
• MESSAGE LENGTH specifies the maximum number of characters that will be sent out <strong>and</strong><br />
displayed in the message field. The allowable range is 1 to 40. After specifying the number of<br />
characters, press MHz dB(m} (ENTER) to save the new value.<br />
When the value of this parameter is equal to or greater than the length of the message, the<br />
whole message will be sent out.<br />
When the value of this parameter is less than the length of the message, only the characters<br />
specified by this parameter are output. (For example, if the MESSAGE NO. is 1 (0123456[X]) <strong>and</strong><br />
the MESSAGE LENGTH is 5, the message which is displayed <strong>and</strong> will be sent out is actually 01234.)<br />
1b-11
<strong>Operation</strong> Reference<br />
Function<br />
Setting the Encoding Mode The number of times a message is transmitted <strong>and</strong> the level of that<br />
transmission are determined by the following menu:<br />
L---_~__~__<br />
----------------<br />
FREQUE~CY MODULATION A... "\1PLITUDE ~<br />
MODE BURST A.\fPLITUDE O.OdBm I I<br />
BURSTS 003<br />
an616abc<br />
o<br />
o<br />
o<br />
o<br />
o<br />
MODE determines whether the message will be output once or multiple times when INCR SET<br />
(START/STOP) is pressed.<br />
SINGLE:<br />
Outputs the message once.<br />
BURST: Outputs the message the number of times specified in the BURSTS field (3<br />
times in this example).<br />
CONT:<br />
Outputs the message continuously until the INCR SET (START/STOP) key is<br />
pressed a second time. (Note: The collapse cycle described later on in this<br />
section will determine how often the message will be transmitted per cycle.)<br />
AMPLITUDE sets the output signal level of the carrier.<br />
BURSTS sets the number of times the message will be transmitted. This parameter is displayed<br />
only when the MODE parameter is set to BURST. The allowable range is 1 to 256.<br />
RF OFF is displayed below the amplitude setting when the RF output is turned off. To toggle the<br />
RF signal output on <strong>and</strong> off, press RF ON/OFF.<br />
HOLD is displayed when the step attenuator is held at its current range setting. To toggle the<br />
attenuator hold function on <strong>and</strong> off, press ATTN HOLD.<br />
Another menu is displayed as follows for completing the Encoding Mode:<br />
17~<br />
i ~/<br />
" 0<br />
I<br />
I<br />
--<br />
DaD CDCDD 0 ~~<br />
.<br />
I<br />
rr:'~'=<br />
o C::J'O COCDD 0;' \<br />
l:J gj 0<br />
C:::D[~OO -, \ ' IMMEDIATE STOP OFF<br />
r:::: :J:J COCOO =J'J<br />
HEADER ON<br />
0 :J:J 0 DOC 0 '-------<br />
~1.~:J~1o D C<br />
MODUL ATION<br />
~--<br />
~---------------~-<br />
AMPLITUDE<br />
TERMINATOR ON<br />
o<br />
IMMEDIATE STOP terminates pager signaling as follows when a stop event occurs.<br />
ON:<br />
OFF:<br />
Terminates pager signaling immediately.<br />
Default setting. Terminates pager signalingjust before the next instance the<br />
pager is on. (If TERMINATOR is set to ON, the pager encoder generates the<br />
re-synchronization pattern in the frame that was supposed to contain the<br />
message.)<br />
HEADER sets whether the idle frame signal is output in the frame before the first message.<br />
ON:<br />
OFF:<br />
Default setting. Outputs the idle frame signal.<br />
Does not output the idle frame signal.<br />
1b-12
<strong>Operation</strong> Reference<br />
Function<br />
• TERMINATOR sets whether the re-synchronization pattern is output after the last message. The<br />
collapse cycle will determine in which frame the re-synchronization pattern appears after the<br />
INCR SET (START/STOP) key is pressed to stop or at the end of a burst sequence (refer to<br />
"FLEX/FLEX-TD Signaling Examples").<br />
ON:<br />
OFF:<br />
Default setting. Outputs the re-synchronization pattern.<br />
Does not output the re-synchronization pattern.<br />
NOTE<br />
If TERMINATOR is set to OFF, the pager under test is not synchronized. Therefore, the<br />
pager can not be synchronized with the future page until the re-synchronization<br />
pattern is sent. To send the re-synchronization pattern, set TERMINATOR to ON in this<br />
menu or select RESYNC in the format menu.<br />
Entering the Pager Capcode (Address) The pager code menu looks like the following:<br />
'-', cl~:::::J :::::J.:::::J 0 0 I",·<br />
1'0<br />
( ) I L::::".-:1 0 :::::J-:J D eli n 1<br />
, /e:: C=:::::JO:::::J':::::JOO.IO '"<br />
FREQUENCY<br />
PAGER CODE A0012477<br />
"-' c co O:::::JDOD 0 , DUMMY CALL OFF<br />
,- --fLlrctal~-;;';--~"I'~O~- L-----'==========='____<br />
u<br />
E~ DOD C) :0 C~)<br />
encode40.cdr<br />
• PAGER CODE accepts alphanumeric characters up to 16 digits.<br />
Use the numeric keys to enter the capcode. To select an alphabetical character, press rad/dBIlV<br />
(SHIFT) before the numeric key associated with the desired alphabetic character. Terminate<br />
your entry with the MHZ/dB(m) (ENTER) key.<br />
A FLEX/FLEX-TD pager's capcode contains address <strong>and</strong> protocol information. Entering the capcode<br />
in the PAGER CODE data field automatically sets up the ADDRESS TYPE, ADDRESS1, <strong>and</strong><br />
ADDRESS2 in the address menu, <strong>and</strong> the FRAME, PHASE, <strong>and</strong> COLLAPSE CYCLE in the<br />
protocol menu as well.<br />
The following table shows an example of the conversion from capcodes to the parameters. Note that<br />
the values of COLLAPSE CYCLE <strong>and</strong> FRAME are changed.<br />
Capcode<br />
ADDRESS<br />
TYPE<br />
ADDRESS1 ADDRESS2 FRAME PHASE COLLAPSE<br />
CYCLE<br />
AOO12477 SHORT 0045245 None 011 D 4<br />
2AOO12477 SHORT 0045245 None 011 D 2<br />
1272AOO12477 SHORT 0045245 None 127 D 2<br />
1b·13
<strong>Operation</strong> Reference<br />
Function<br />
• DUMMY CALL inserts a message with all5s in all non-call phases. This is required by the<br />
FLEX-TD st<strong>and</strong>ard (RCR STD-34A) for sensitivity testing.<br />
ON:<br />
OFF:<br />
Default setting. Activates the dummy call function for equalizing the FSK<br />
deviation. An address for the non-call phases must be set.<br />
Does not activate the dummy call function. Idle frames are set in the non-call<br />
phases.<br />
The address menu will display the following information:<br />
~ []'.I--I 0 Il:] [] I=-- I=- ._1 I[] FREQUENCY MODUlAl1ON AMPUTUDE<br />
o=oooccoo<br />
1 OC:=OOOCCDO ADDRESS TYPE SHORT<br />
__-::::o=::. ] 0 0 0 C C D c=:0====, ADDRESSl 0045245<br />
I[J' I[j 0 01 0 0 c:=====I ~<br />
c l~ DOD ~D~EJ_ilJ,<br />
encode4l.cdr<br />
• ADDRESS TYPE selects the address length.<br />
SHORT:<br />
LONG:<br />
Short address<br />
Long address<br />
• ADDRESS 1 is the 7-digit short address or the primary address of the long address.<br />
• ADDRESS2 is the 7-digit secondary address of the long address. (This is displayed only when<br />
ADDRESS TYPE is set to LONG.)<br />
If DUMMY CALL is ON, the following address menu is displayed.<br />
FREQUENCY<br />
MODULATION<br />
I ADDRESS TYPE (DUMMY CALL) SHORT<br />
ADDRESSl 0032769<br />
encode23.drw<br />
ADDRESS TYPE (DUMMY CALL) displays the address type used in the non-call<br />
phases (automatically set).<br />
SHORT:<br />
LONG:<br />
Short address<br />
Long address<br />
• ADDRESSl is the 7-digit short address or the primary address of the long address.<br />
• ADDRESS2 is the 7-digit secondary address of the long address. (This is displayed only when<br />
ADDRESS TYPE (DUMMY CALL) is LONG.)<br />
NOTE<br />
To equalize the FSK deviation, the addresses for DUMMY CALL should contain an equal<br />
number of"l" <strong>and</strong> "0".<br />
1b-14
<strong>Operation</strong> Reference<br />
Function<br />
Setting the Protocol The protocol menu displays the following information when ''A0000001'' is<br />
the previously entered capcode.<br />
I II I I I ~_<br />
III..:B[§= ~ '~ 8:3 8EIF I. ~.\ I'r:~.. F.REQUENCY<br />
MODULATION<br />
AMPLITUDE<br />
.~/ [J 0 [J [J [J [J [J S c::: \ ~/ I CYCLE 00 FRAME 000 PHASE A<br />
I [J c: D [J 0 DOL c::: . . COlLAPSECYCLE 0 REPEAT 0<br />
=:J ~1§8BIIBBB :) II§ [I ==================--_-.J<br />
II<br />
an613abc<br />
These parameters, except for CYCLE, are all automatically set when the capcode is entered in the<br />
PAGER CODE data field.<br />
• CYCLE: Defines the start cycle. The allowable range is 0 to 14.<br />
• FRAME: Defines the start frame where the message is located. The allowable range is 0 to 127.<br />
• PHASE: Defines the phase for the pager. The allowable ranage is A, B, C, or D.<br />
• COLLAPSE CYCLE: Determines how many times a message repeats within a cycle when BURST<br />
or CONT is active in the encoding MODE setting. The default setting of 4 will repeat the message<br />
once every 16 frames (2 4 ). The allowable range is 0 through 7.<br />
• REPEAT: displayed only ifFLEX-TD is selected in the format menu. Defines the repetition<br />
transmission value. Determines how many cycles the message will be repeated. The allowable<br />
range is 0 to 3.<br />
Setting the Roaming Mode<br />
FREQUENCY MODULATION AMPLITUDE<br />
ROAMING MODE NONE<br />
encode24.drw<br />
l<br />
• ROAMING MODE determines the mode in which a pager is used.<br />
NONE:<br />
SSID:<br />
Tests a pager without the roaming mode.<br />
Tests a pager in the SSID mode which responds to a simulcast transmission<br />
system. SSID consists of three words as follows:<br />
- SSlD1 (BIWOOO):<br />
Local Channel ID<br />
Coverage Zone<br />
- SSlD2 (BIW111):<br />
Country Code<br />
Traffic Management Flag<br />
- Frame Offset (BIW101)<br />
1b-15
<strong>Operation</strong> Reference<br />
Function<br />
SSID, NID:<br />
Tests a pager in the SSID <strong>and</strong> NID modes. The NID mode, in addition to the<br />
SSID mode, is a roaming network for covering wider multiple areas. NID<br />
consists of a network address <strong>and</strong> a short message vector as follows:<br />
- SSIDI (BIWOOO):<br />
Local (Channel) ID<br />
Coverage Zone<br />
- SSID2 (BIWll1):<br />
Country Code<br />
SSID Traffic Management Flag (TMF)<br />
- Frame Offset (BIWI0l)<br />
- NID<br />
Network Address: 21 bits<br />
Short Message Vector:<br />
RF Channel (M)<br />
Multiplier<br />
(<strong>Service</strong>) Area<br />
NID Traffic Management Flat (TMF)<br />
NOTE<br />
When ALPHANUMERIC is selected in the PAGER TYPE field <strong>and</strong> SSID, NID is selected in<br />
the ROAMING MODE field, the maximum allowable range ofthe MESSAGE LENGTH field is<br />
limited to 35.<br />
The following menu is displayed for setting the SSID mode for a pager to be tested:<br />
i I<br />
lQj[~r o DO<br />
, 0 L::::JD<br />
I 0 c:::::JD<br />
D<br />
00000<br />
00000<br />
00000<br />
00000<br />
~[[~]IDDD<br />
§o------<br />
0<br />
o DOD DOD 0118 0 1<br />
I<br />
FREQUENCY<br />
LOCAL ID 000<br />
COUNTRY CODE 0000<br />
~<br />
MODULATION<br />
AMPLITUDE<br />
ssro TMF 02<br />
COVERAGE ZONE 00<br />
encode25.drw<br />
I<br />
o LOCAL ID: Defines the local channel ID of a pager under test. The allowable range is 0 to 51l.<br />
o COVERAGE ZONE: Defines the coverage zone of a pager under test. The allowable range is 0 to 3l.<br />
• COUNTRY CODE: Defines the country code. The allowable range is 0 to 1023.<br />
• SSID TMF: Defines the SSID traffic management flag. This value is automatically set when the<br />
capcode 9address) is entered in the PAGER CODE data field. The allowable range is 0 to 15.<br />
1b·16
<strong>Operation</strong> Reference<br />
Function<br />
After completing the previous menu, set FRAME OFFSET in the following menu:<br />
I I<br />
L D CDDDDDDD D( '11<br />
1~~DI~t "onno 0<br />
I<br />
~ ~<br />
FREQUENCY MODULATION AMPLITUDE<br />
~, II<br />
FRAME OFFSET 00<br />
,D CDDDDDDD D /'<br />
n DC nnnnn n " 'I<br />
I<br />
I<br />
DODD D :<br />
D ~~IDDD 0 IG encode26.drw<br />
• FRAME OFFSET: Defines the number of frames to be offset by BIWI0l from the signaling frame<br />
at the home area. The allowable range is 0 to 63.<br />
The next menu is displayed for setting the NID mode after completing the SSID mode settings only<br />
if the SSID <strong>and</strong> NID modes are selected.<br />
I I<br />
DDDDD<br />
DDDDD<br />
[Qj[iJ§ DDDDD BO<br />
D DO DDDDD D<br />
D<br />
~~IDDD<br />
DODD<br />
~<br />
0 IG<br />
D 0<br />
I<br />
FREQUENCY MODULATION AMPLITUDE<br />
ADDRESS 2058240<br />
MULTll'LIER 0<br />
RFCH 0<br />
NID Tl'v1F 02<br />
AREA 00<br />
~<br />
I<br />
encode27.drw<br />
• ADDRESS: Defines the network address which appears on the RF channel within the address<br />
field in predicted frames. The allowable range is 2058240 to 2062335.<br />
• RF CH: Represents each RF channel obtained by the formula as follows:<br />
RF CH = Modulo 8 of Integer [(RF Freq. kHz)/(channel space kHz)]<br />
The allowable range is 0 to 7.<br />
• AREA: Defines the service area identification. The allowable range is 0 to 31.<br />
• MULTIPLIER: Defines how much the network address is extended. The allowable range is 0 to 7.<br />
• NID TMF: Defines NID traffic management flag. This value is automatically set when the<br />
capcode (address) is entered in the PAGER CODE data field. The allowable range is 0 to 15.<br />
Message During Encoding To start <strong>and</strong> stop encoding after selecting all pager encoder<br />
parameters, press the INCR SET (START/STOP) key. The following display is shown during encoding<br />
a pager under test:<br />
I I<br />
~<br />
~~§<br />
DDDDD<br />
DDDDD 6(~'<br />
DDDDD 6 .~<br />
~ D DO DDDDD<br />
D<br />
~~IDDD<br />
DODD<br />
0 IG<br />
D 0<br />
FREQUENCY MODULATION AMPLITUDE<br />
'---------"<br />
I MESSAGE NO. 6 AMPLITUDE O.OdBm I<br />
CYCLE 00 FRAME 000 PHASE A REPEAT 0<br />
encode28.drw<br />
1b-17
<strong>Operation</strong> Reference<br />
Function<br />
NOTE<br />
REPEAT is displayed additionally only if FLEX-TD is selected in the format menu.<br />
IfMESSAGE NO. is set to 0, the display is changed as follows:<br />
encode29.drw<br />
NOTE<br />
Ifthe RF output is turned off, AMPLITUDE x.xdBm will be substituted for RF OFF.<br />
While encoding, the blinking cursor is on the first character A of AMPLITUDE or R of RF<br />
OFF.<br />
Signaling Examples The following examples illustrate the frame structure for the three<br />
transmission repetition settings. The HEADER <strong>and</strong> TERMINATOR parameters are set to ON (default),<br />
<strong>and</strong> the COLLAPSE CYCLE (CC) is set to 1 <strong>and</strong> 2 (messages will be repeated every 2 frames (2 1 ) <strong>and</strong> 4<br />
frames (2 2 ) respectively).<br />
• SINGLE Mode Example<br />
Start Cycle: 10<br />
Start Frame: 127<br />
Collapse Cycle: Has no effect<br />
- Since HEADER is set to ON, the idle signal is output at Frame 126.<br />
- With TERMINATOR set to ON, the asynchronous state signal is output after the message.<br />
• BURST Mode Example<br />
Start Cycle: 10<br />
Start Frame: 127<br />
Collapse Cycle: 1 (2 1 ) <strong>and</strong> 2 (2 2 )<br />
Burst: 3<br />
Cycle 10 10 11<br />
Frame 126 127 0<br />
CC = 1 idle message asynchronous<br />
CC =2 idle message asynchronous<br />
- Since HEADER is set to ON, the idle signal is output at Frame 126.<br />
1b-18
<strong>Operation</strong> Reference<br />
Function<br />
- With TERMINATOR set to ON, the asynchronous state signal is output in the frame where the<br />
next message was supposed to occur (as determined by the collapse cycle).<br />
Cycle 10 10 11 11 11 11 11 11 11 11 ... 11<br />
Frame 126 127 0 1 2 3 4 5 6 7 ... 11<br />
CC=1 idle message idle message idle message idle asynchronous<br />
CC= 2 idle message idle idle idle message idle idle idle message ... asynchronous<br />
CONT Mode Example<br />
Start Cycle: 10<br />
Start Frame: 127<br />
Collapse Cycle: 1 (2 1 ) <strong>and</strong> 2 (2 2 )<br />
Stop: Selected in frame f+ 1<br />
- Since HEADER is set to ON, the idle signal is output at Frame 126.<br />
- With TERMINATOR set to ON, <strong>and</strong> IMMEDIATE STOP set to OFF, selecting stop will replace<br />
the next message with the asynchronous signal.<br />
Cycle 10 10 11 11 11 ... c c c c c<br />
Frame 126 127 0 1 2 .... f f + 1 f+ 2 f+ 3 f + 4<br />
CC = 1 idle message idle message idle ... message idle asynchronous<br />
CC =2 idle message idle idle idle .., message idle idle idle asynchronous<br />
SSID/NID Roaming Example When the roaming function with SSID <strong>and</strong> NID is set to on with<br />
the following conditions, the contents in each phase are shown in the following table:<br />
• 6400 bps, 4-level FSK<br />
• Call in Phase: A<br />
• Address Type: Long Address<br />
1b-19
<strong>Operation</strong> Reference<br />
Function<br />
• Roaming Mode: SSID, NID<br />
Field Phase A Phase B, C PhaseD<br />
Word 0 of<br />
block 0<br />
Word 1 of<br />
block 0<br />
Word 2 of<br />
block 0<br />
Word 3 of<br />
block 0<br />
Word 4 of<br />
block 0<br />
Word 5 of<br />
block 0<br />
Word 6 of<br />
block 0<br />
Word 7 of<br />
block 0<br />
Word 0 of<br />
block 1<br />
Word 1 of<br />
block 1<br />
Word 2 of<br />
block 2<br />
BI Block Info Dummy Block Info Dummy Block Info<br />
BI BIWOOO BIW101 a BIW101 a<br />
BI BIW111 BIW101 a BIW101 a<br />
BI BIW101 a BIW101 a BIW101<br />
AF Network Address Idle Idle<br />
AF Address 1 Dummy Address l' Dummy Address 1<br />
AF Address 2 Dummy Address 2 Dummy Address 2<br />
VF<br />
Short Message Vector<br />
(for Network Address)<br />
VF b VF 2<br />
VF Vector (for Address 1,2) Numeric Vector (for<br />
Dummy Address 1,2)<br />
Numeric Vector (for<br />
Dummy Address 1,2)<br />
VF Message Dummy Message Dummy Message<br />
MF Message Dummy Message Dummy Message<br />
: :<br />
: IB Idle Idle Idle<br />
where,<br />
a. BIW101 System Message: Time Instruction,<br />
Seconds Adjust: 0,<br />
Daylight Savings: No (St<strong>and</strong>ard Time),<br />
Local Time zone: Greenwich Meridian<br />
b. Vector Type: Short Message/Tone Only,<br />
Message Type: 3 Numeric Characters (000) with Short Address<br />
BI: Block Information<br />
AF: Address Field<br />
VF: Vector Field<br />
MF: Message Field<br />
IB: Idle Block<br />
1b·20
<strong>Operation</strong> Reference<br />
Function<br />
NOTE<br />
Ifthe firmware revision of the <strong>8648A</strong> option 1EP is B.04.08 or below, the contents in<br />
each phase are shown in the following table:<br />
• 6400 bps, 4-level FSK<br />
• Call in Phase: A<br />
• Address Type: Long Address<br />
• Roaming Mode: SSID, NID<br />
Field Phase A Phase B, C Phase D<br />
Word 0 of<br />
block 0<br />
Word 1 of<br />
block 0<br />
Word 2 of<br />
block 0<br />
Word 3 of<br />
block 0<br />
Word 4 of<br />
block 0<br />
Word 5 of<br />
block 0<br />
Word 6 of<br />
block 0<br />
Word 7 of<br />
block 0<br />
Word 0 of<br />
block 1<br />
Word 1 of<br />
block 1<br />
Word 2 of<br />
block 2<br />
HI Block Info Dummy Block Info Dummy Block Info<br />
HI BIWOOO Idle Idle<br />
HI BIWll1 Idle Idle<br />
HI Idle Idle BIW101<br />
AF Network Address Idle Idle<br />
AF Address 1 Dummy Address l' Dummy Address 1<br />
AF Address 2 Dummy Address 2 Dummy Address 2<br />
VF<br />
Short Message Vector<br />
(for Network Address)<br />
Idle<br />
VF Vector (for Address 1,2) Numeric Vector (for<br />
Dummy Address 1,2)<br />
Idle<br />
Numeric Vector (for<br />
Dummy Address 1,2)<br />
VF Message Dummy Message Dummy Message<br />
MF Message Dummy Message Dummy Message<br />
IB Idle Idle Idle<br />
: : : :<br />
1b·21
<strong>Operation</strong> Reference<br />
Function<br />
where,<br />
BI: Block Information<br />
AF: Address Field<br />
VF: Vector Field<br />
MF: Message Field<br />
IB: Idle Block<br />
poeSAG<br />
Setting the Data Rate <strong>and</strong> Pager Type The parameter menu for the data rate <strong>and</strong> the pager<br />
type looks like the following:<br />
FREQUENCY<br />
MODULATION<br />
~<br />
AMPLITUDE l<br />
FUNCTION 00<br />
1<br />
I<br />
encode321if<br />
• DATA RATE<br />
512 512 bps<br />
1200 1200 bps<br />
2400 240012 bps<br />
• PAGER TYPE<br />
NUMERIC: Numeric type<br />
TONE ONLY: Tone only type<br />
ALPHANUM 7BIT: 7-bit coded alphanumeric type entered by hex-binary code<br />
ALPHANUM BBIT: 8-bit coded alphanumeric type entered by hex-binary code<br />
ALPHANUMERIC: 7-bit coded alphanumeric type<br />
NOTE<br />
The ALPHANUM 7BIT <strong>and</strong> ALPHANUM 8BIT types can be used for displaying<br />
two-byte special characters, for example, Chinese characters, through a conversion<br />
table.<br />
The following examples show how the actual bit streams are transmitted if ''BOA1''is<br />
set to the message (MESSAGE NO.6):<br />
1b·22
<strong>Operation</strong> Reference<br />
Function<br />
For ALPHANUM 8BIT<br />
First Byte<br />
Second Byte<br />
MSB LSB MSB LSB<br />
Bit number b8 b7 b6 b5 b4 b3 b2 bl b8 b7 b6 b5 b4 b3 b2 bl<br />
Bit streams I 0 I I 0 0 0 0 I 0 I 0 0 0 0 I<br />
1 1 1<br />
Characters B 0 A I<br />
For ALPHANUM 7BIT<br />
The eighth bit (b8) is ignored as follows:<br />
First Byte<br />
Second Byte<br />
MSB LSB MSB LSB<br />
Bit number b7 b6 b5 b4 b3 b2 bl b7 b6 b5 b4 b3 b2 bl<br />
Bit streams 0 1 I I 0 0 o 10 I 0 I 0 0 0 I<br />
Characters B (3) 0<br />
A (2) I<br />
When converting the binary data stream to 2-level FSK, the first bit out becomes the least<br />
significant bit (LSB) of the 2-level symbol with the following bit the most significant bit (MSB) of<br />
the symbol.<br />
Setting the Message The message menu looks like the following:<br />
I<br />
I<br />
-----<br />
"-- D ~D :::JDL::m L ~_<br />
/ \OLDOOOCDOC/ \<br />
\ ;'OLDDDOCDOC'\J<br />
'--/ODD DOCDOC'<br />
D<br />
~.DDDIFDC<br />
ODDDODC () CQ0<br />
1',<br />
i<br />
FREQUENCY MODULATION A..'tPLITUDE<br />
MESSAGE NO.1 MESSAGE LENGTH 40<br />
0123456[0]<br />
I<br />
encode4<br />
• MESSAGE NO. is defined as the following where ''X'' represents the phase setting:<br />
0: Arbitrary message set from the external controller using the GPIB capability.<br />
The data must be entered in units of works. Refer to "[SOURce]:PAGing<br />
[:FORMat]:[POCSag IFLEX IFTS}:ARBitrary:DEFine , ,...,<br />
" <strong>and</strong> ''Using the Buffer Memory for the Arbitrary Messages" in Chapter<br />
2.<br />
This arbitrary message buffer is divided into multiple segments by assigning<br />
1b-23
<strong>Operation</strong> Reference<br />
Function<br />
START BATCH <strong>and</strong> STOP BATCH in the following menu:<br />
,---------- ----<br />
FREQUENCY WODUlAJ10N AMPUlU~<br />
START BATCH 000 STOP BATCH 12~<br />
encode44.cdr<br />
The allowable ranges for both are 000 to127.<br />
1: Displays: 0123456 [-]<br />
2: Displays: ABCDEFG [ P ]<br />
3: Displays: TEST PAGING: POCSSAG<br />
4: Displays: ALPHANUMERIC 40CHARS TEST PAGING: POCSAG<br />
5: Displays: 8888888888888888888888888888888888888888<br />
for LCD test with 40 characters of "B".<br />
6: User-definable message, up to 40 characters long, set from the front panel. Enter<br />
numeric messages with the keypad. Alphanumeric messages require the rad dBrN<br />
(SHIFT) key to access the alphabetical characters (blue letters) above the keypad.<br />
Ifrequired alphabetical characters are not available on the front panel, send a<br />
message from an external controller over GPIB. Refer to U[SOURce]:PAGing<br />
[:FORMat]:{POCSag IFLEX IFTD}:MESS:DEFine 'string''' in Chapter 2.<br />
• MESSAGE LENGTH specifies the maximum number of characters that will be sent out <strong>and</strong><br />
displayed in the message field. The allowable range is 1 to 40. After specifying the number of<br />
characters, press MHz dB(m) (ENTER) to save the new value.<br />
When the value of this parameter is equal to or greater than the length of the message, the<br />
whole message will be sent out.<br />
When the value of this parameter is less than the length of the message, only the characters<br />
specified by this parameter are output. (For example, if the MESSAGE NO. is 1 (0123456[-]) <strong>and</strong><br />
the MESSAGE LENGTH is 5, the message which is displayed <strong>and</strong> will be sent out is actually 01234.)<br />
Setting the Encoding Mode The number of times a message is transmitted <strong>and</strong> the level of that<br />
transmission are determined by the following menu:<br />
:\10D11LAT10N<br />
Tl---<br />
A}.iPLITUDE<br />
_ AMPLITUDEOOdBm~_ _ _<br />
eneveetc<br />
1b·24
<strong>Operation</strong> Reference<br />
Function<br />
• MODE determines whether the message will be output once or multiple times when INCR SET<br />
(START/STOP) is pressed.<br />
SINGLE:<br />
Outputs the message once.<br />
BURST: Outputs the message the number of times specified in the BURSTS field (3<br />
times in this example).<br />
CONT:<br />
Outputs the message continuously until the INCR SET (START/STOP) key is<br />
pressed a second time.<br />
• AMPLITUDE sets the signal output level of the carrier.<br />
• BURSTS sets the number of times the message will be transmitted. This parameter is displayed<br />
only when the MODE parameter is set to BURST. The allowable range is 1 to 255.<br />
• RF OFF is displayed below the amplitude setting when the RF output is turned off.To toggle the<br />
RF signal output on <strong>and</strong> off, press RF ON/OFF.<br />
• HOLD is displayed when the step attenuator is held at its current range setting. To toggle the<br />
attenuator hold function on <strong>and</strong> off, press ATTN HOLD.<br />
Entering the Pager Capcode (Address) The pager code menu looks like the following:<br />
t I ]<br />
'-\ ° ~c<br />
( i 0 0<br />
'J<br />
DCJD<br />
<strong>Operation</strong> Reference<br />
Function<br />
RESYNC<br />
Setting the Encoding Mode The following parameters must be set to activate the<br />
resynchronization function for a FLEX/FLEX-TD pager under test:<br />
I I<br />
[Qj]i]B 00000<br />
00000<br />
00000<br />
~<br />
§o<br />
o DO 00000 0<br />
~IDD[JII[JOO<br />
D .0 DDO 000 0<br />
118<br />
0<br />
1<br />
I<br />
BURSTS<br />
FREQUENCY<br />
DOl<br />
MODULATION<br />
~<br />
AMPLITUDE<br />
AMPLITIJDE O.OdBm<br />
I<br />
encode38.drw<br />
BURSTS defines the number of data to make a pager resynchronized with this pager encoding<br />
signal. One burst is 1.92s. The allowable range is 000 to 256. 0 represents the continuous mode.<br />
NOTE<br />
This setting is required only when RESYNC is selected in the format menu. The ft<br />
(PREY) <strong>and</strong> ~ (NEXT) keys toggle the format menu <strong>and</strong> this BURSTS menu. No other<br />
menus are displayed.<br />
Message During Resynchronizing To start <strong>and</strong> stop encoding after selecting all pager encoder<br />
parameters, press the INCR SET (START/STOP) key.<br />
!<br />
I I<br />
~<br />
~<br />
FREQUENCY MODULATION AMPLITUDE<br />
(J~~8 00000 00000 1<br />
0<br />
[Qi~c 00000 18 RESYNC SENDING AMPLITUDE O.OdBm<br />
oeooo 0 0<br />
D<br />
~I[]DOII[JOO<br />
o 000'000<br />
0118 0 1<br />
I<br />
encode37.drw<br />
I<br />
l<br />
I<br />
NOTE<br />
Ifthe RF output is turned off, AMPLITUDE x.xdsm will be substituted for RF OFF.<br />
While encoding, the blinking cursor is on the first character A of AMPLITUDE or R of<br />
RF OFF.<br />
PN15<br />
Setting the Data Rage IfPN15 modulation is selected in the format menu, the following<br />
parameters must be set to complete the pager encoder setup process.<br />
I I<br />
§o<br />
-------.<br />
[Qi~DDDnDc (~O c:::o 000000<br />
00 CJoooooo<br />
o DO 00000 0<br />
D iO ~IDDOllooo DOD DOD 0118 0 1<br />
I<br />
FREQUENCY MODULATION AMPLITUDE<br />
~<br />
PNI5 FSK 512/2 AMPLITUDE O.OdEm I<br />
encode30.drw<br />
1b-26
I<br />
<strong>Operation</strong> Reference<br />
Function<br />
• DATA RATE<br />
512/2: 512 bps, 2-level FSK<br />
1200/2: 1200 bps, 2-level FSK<br />
1600/2: 1600 bps, 2-level FSK<br />
2400/2: 2400 bps, 2-level FSK<br />
3200/2: 3200 bps, 2-level FSK<br />
3200/4: 3200 bps, 4-level FSK<br />
6400/4: 6400 bps, 4-level FSK<br />
NOTE<br />
This setting is required only when PN15 is selected in the format menu. The ft (PREV)<br />
<strong>and</strong> ~ (NEXT) keys toggle the format menu <strong>and</strong> this PN15 FSK data rate menu. No<br />
other menus are displayed.<br />
Message During Encoding To start <strong>and</strong> stop encoding, press the INCR SET (START/STOP) key.<br />
... ~~ .'2<br />
FREQUENCY<br />
r::=~ DISD DDDDD DB 0<br />
~ I~ D BBBBB D<br />
I<br />
ra!ooDlbDD 'ID l<br />
bII ( ') RI.SiI D DDD DD IPN15 SENDING<br />
MODULATION<br />
~ 19DDD~D OILD 0 II encode31.tif<br />
NOTE<br />
Ifthe RF output is turned off, AMPLITUDE x , xdBm will be substituted for RF OFF.<br />
While encoding, the blinking cursor is on the first character A of AMPLITUDE or R of<br />
RF OFF.<br />
SERVICE This function is used for servicing the 8648a Option lEP, <strong>and</strong> provides a<br />
continuous FSK signal.<br />
Setting the Data Rate The following parameter must be set to activate the service function:<br />
]----<br />
......111111111~ FIlEQUEOCY MODUlAIlON<br />
I FORMAT SERVICE<br />
CALIBRATION FSK 512/2<br />
. _.__._.._--,----_.<br />
encode4S.cdr<br />
1b-27
<strong>Operation</strong> Reference<br />
Function<br />
• CALIBRATION FSK is one of the data rates as follows:<br />
512/2: 512 bps, 2-level FSK<br />
1200/2: 1200 bps, 2-level FSK<br />
1600/2: 1600 bps, 2-level FSK<br />
2400/2: 2400 bps, 2-level FSK<br />
3200/2: 3200 bps, 2-level FSK<br />
3200/4: 3200 bps, 4-level FSK<br />
6400/4: 6400 bps, 4-level FSK<br />
NOTE This setting is required only when SERVICE is selected in the format menu. The ~<br />
(PREV) <strong>and</strong> ~ (NEXT) keys toggle the blinking cursor between the format parameter<br />
<strong>and</strong> this CALIBRATION FSK parameter. No other menus are displayed.<br />
Message During Servicing To start <strong>and</strong> stop encoding, press the INCR SET (START/STOP) key.<br />
I I<br />
~ ~<br />
FREQUENCY MODULATION AMPLITUDE<br />
DDDDD D<br />
DDDDD D<br />
DDDDD D<br />
FSK SENDING<br />
AMPUTUDE O.OdBm<br />
P1~c nBBB<br />
DOD DDDDD D<br />
0<br />
liB ()<br />
~IDDDIIDDD<br />
D D ILJDD DDD 0 I<br />
I<br />
encode39.drw<br />
I<br />
NOTE<br />
Ifthe RF output is turned off, AMPLITUDE x.xdBm will be substituted for RF OFF.<br />
While encoding, the blinking cursor is on the first character A of AMPLITUDE or R of<br />
RF OFF.<br />
1b-28
<strong>Operation</strong> Reference<br />
Function<br />
Pulse Modulation<br />
NOTE<br />
Pulse modulation is valid only for instruments with Option lE6.<br />
[ I I<br />
I<br />
000000[[Q<br />
000000'00<br />
000000 0<br />
00000 0<br />
o<br />
orooo 0 ~<br />
[000 ]ro====I<br />
funckeys.drw<br />
1. PULSE<br />
To select pulse modulation, press AM (PULSE) twice. IfRF is on, the display will look like<br />
the following representation. The MOD ON/OFF key enables or disables the pulse<br />
modulator.<br />
When the instrument is in the pulse modulation mode, pulse modulation should be turned<br />
off using MOD ON/OFF before switching off the instrument. Ifthe instrument is switched off<br />
while the pulse modulation mode is turned on, the instrument will power up with no RF<br />
output.<br />
I<br />
I<br />
(-'\1 6<br />
~" oO:::Joo o~<br />
DO OO:::JOO<br />
:::J,<br />
O(<br />
,<br />
)<br />
~!O DO OO:::JOO<br />
0 DO OO=:JOO o <br />
D o DOC I~ 0 O:::J =:J<br />
011601<br />
~~<br />
MODULATION<br />
AMPLITUDE<br />
~[:r::~==~ PULSE MOD -loo.0dBm<br />
I<br />
REAR!:',<br />
PULSE<br />
PULSE MOD<br />
-100.0 dBm<br />
REAR IN OFF<br />
ON/OFF<br />
~ on68a2d<br />
NOTE<br />
The word PULSE is shown in the AMPLITUDE portion of the display when<br />
pulse modulation is enabled (MOD ON/OFF) <strong>and</strong> the RF is turned on<br />
(RF ON/OFF). In this case, no RF will be present at the RF output unless a<br />
TTL-high signal is applied to the rear-panel PULSE IN connector.<br />
1b·29
<strong>Operation</strong> Reference<br />
Function<br />
The following keys are invalid when the pulse modulation screen is visible:<br />
• INT400 Hz<br />
• INT 1kHz<br />
• EXT AC<br />
• EXT DC<br />
• 1kHz+EXT DC<br />
1b-30
<strong>Operation</strong> Reference<br />
Function<br />
Increment Set<br />
1. INCR SET<br />
Press INCR SET to view or change the increment set value for the currently active function<br />
(the active function is the last function key you press; FREQUENCY, AMPLITUDE, FM, AM, or<br />
M). When you press INCR SET, ~ is displayed between the value <strong>and</strong> the units. The ~<br />
indicates that the displayed value is the increment set value.<br />
NOTE<br />
An increment value cannot be set for the knobs or the memory recall arrow<br />
keys.<br />
Increment Set Ranges<br />
Function<br />
Range<br />
Frequency<br />
Amplitude<br />
Amplitude<br />
FM Deviation<br />
1 Hz to 999.75 MHz<br />
> 0.0 to 149.0 dB (<strong>8648A</strong>)<br />
> 0.0 to 150.5 dB (8648B/C/D)<br />
> 0.0 to 100 kHz<br />
AMDepth > 0.0 to 100%<br />
M Deviation<br />
Internal Audio Generator<br />
(Options 1EP <strong>and</strong> 1E2 only)<br />
> 0.0 to 10.0 Radians<br />
0.01 to 1.0 kHz<br />
NOTE<br />
It is possible to set an increment value of greater resolution than can be<br />
displayed or than the hardware can respond to. However, the instrument<br />
records each arrow key press <strong>and</strong> will respond after the appropriate number<br />
of presses.<br />
START/STOP Encoding IfOption lEP is present <strong>and</strong> the signal generator is in the<br />
ENCODER mode, the INCR SET key functions as a START/STOP key to start or stop the<br />
pager encoding when in the pager encoder mode.<br />
PREY <strong>and</strong> NEXT IfOption lEP is present <strong>and</strong> the signal generator is in the ENCODER<br />
mode, the ~ <strong>and</strong> ~ keys function as the PREY <strong>and</strong> NEXT keys to change the blinking first<br />
character between each parameter when in the pager encoder mode.<br />
1b-31
<strong>Operation</strong> Reference<br />
Function<br />
Data<br />
,. DATA<br />
000<br />
('kH;'l r;;;v'1<br />
000 ~<br />
~---- 3<br />
Q[D[D<br />
~<br />
L.=!.J<br />
BuV<br />
\0Q~ I~ EMF<br />
~<br />
----~----<br />
4<br />
1. MHz/dBm, kHz/mV, %/!!V, radldB~.lV<br />
Press a units key after you enter a value. This terminates the entry.<br />
Note that the units keys in the left column are each labeled with an amplitude unit on the<br />
bottom <strong>and</strong> a frequency or modulation unit on the top. The instrument applies the<br />
appropriate unit for the function value you are entering. The bottom key in the row for<br />
instance, terminates a
<strong>Operation</strong> Reference<br />
Function<br />
3. emf<br />
Press these keys to display the amplitude value indicated on the key label in electromotive<br />
force units. Emfis the RF output voltage with no load. It is twice the output voltage with a<br />
50 ohm load.<br />
4.±<br />
Press this key at any time while you are entering an amplitude or reference offset value to<br />
change the sign of the value.<br />
1b·33
<strong>Operation</strong> Reference<br />
Function<br />
. Instrument Preset<br />
POWER ¢::::<br />
Turn the instrument on while pressing the backspace key (¢::::)to perform an instrument<br />
preset. The instrument will power up to factory-defined settings shown in the following<br />
table. Save <strong>and</strong> recall registers are not affected by this operation.<br />
POWER DEL<br />
Turn the instrument on while pressing the memory DEL key to perform a clear memory.<br />
This function erases all save/recall registers, sets the GPIB address to 19, <strong>and</strong> performs an<br />
instrument preset where the instrument powers up to factory-defined settings shown in<br />
the following table.<br />
NOTE<br />
This will cause an error message to appear on the display: 627 Battery RAM<br />
failure: memory lost. This is normaL<br />
1b·34
<strong>Operation</strong> Reference<br />
Function<br />
Instrument Preset Settings<br />
Function Parameter Setting<br />
RF Frequency Frequency 100 MHz<br />
Increment<br />
Reference<br />
10 MHz<br />
0.0 MHz<br />
RF Amplitude Power Level -136 dBm<br />
Increment<br />
Reference<br />
1.0 dBm<br />
O.OdBm<br />
FM Input Internal<br />
Frequency<br />
Coupling<br />
State<br />
1 kHz<br />
AC<br />
OfT<br />
Deviation 30%<br />
Increment<br />
0.1 kHz<br />
AM Input Internal<br />
Frequency<br />
State<br />
1 kHz<br />
OfT<br />
Depth 30%<br />
Increment 0.1%<br />
M Input Internal<br />
Frequency<br />
Coupling<br />
State<br />
Deviation<br />
Increment<br />
1 kHz<br />
AC<br />
OfT<br />
1.0 radians<br />
0.1 radians<br />
RF State OfT<br />
Attenuator Coupling OfT<br />
Pulse (Option 1E6) State OfT<br />
1b-35
<strong>Operation</strong> Reference<br />
Function<br />
Instrument Preset Settings<br />
Function Parameter Setting<br />
Pager Encoding (Option 1EP) FORMAT FLEX<br />
POLARITY<br />
FILTER<br />
DATA RATE<br />
PAGER TYPE<br />
VECTOR TYPE<br />
BLOCKING LENGTH<br />
NORMAL<br />
ON<br />
1600/2 (for FLEXIFLEX-TD)<br />
512 (for POCSAG)<br />
NUMERIC<br />
STANDARD<br />
lBIT<br />
FUNCTION 00<br />
MESSAGE NO. 1<br />
MESSAGE LENGTH 40<br />
MODE<br />
SINGLE<br />
BURSTS 1<br />
IMMEDIATE STOP<br />
HEADER<br />
TERMINATOR<br />
PAGER CODE<br />
ADDRESS TYPE<br />
OFF<br />
ON<br />
ON<br />
AOOOOOOI (for FLEXIFLEX-TD)<br />
0000000 (for POCSAG)<br />
SHORT<br />
ADDRESS1 0032769<br />
ADDRESS2 0000000<br />
CYCLE 0<br />
FRAME 0<br />
PHASE<br />
A<br />
COLLAPSE CYCLE 4<br />
REPEAT 0<br />
INTERNAL AUDIO<br />
GENERATOR<br />
1<br />
START FRAME/BATCH 0<br />
STOP FRAME/BATCH 127<br />
DUMMY CALL<br />
OFF<br />
ADDRESS1 (DUMMY CALL) 0032769<br />
ADDRESS2 (DUMMY CALL) 0000000<br />
1b·36
<strong>Operation</strong> Reference<br />
Function<br />
Instrument Preset Settings<br />
Function Parameter Setting<br />
Modulation<br />
Generator<br />
(Option lE2)<br />
FREQUENCY<br />
SHAPE<br />
1.00 kHz<br />
SINE<br />
1b-37
<strong>Operation</strong> Reference<br />
Function<br />
. GPIB<br />
r<br />
HP-IB<br />
1--8<br />
2Ja<br />
.---, DI~DDDDDD~~<br />
( '\D c=JDDDDDD Dl' '.')'<br />
I JD c=JDDDDDD D .<br />
~ DO ,DDDDD D'_<br />
~IBBB .~ I[[Q]<br />
hpibkeys.drw<br />
l.ADRS<br />
Press ADRS to view the instrument's GPIB address setting in the second line of the<br />
FREQUENCY display.<br />
To change the address, press ADRS <strong>and</strong> a two-digit number. For example, enter 01 to set<br />
the address to 1.<br />
Acceptable HP-IB addresses are 00 through 30.<br />
2. LOCAL<br />
Press LOCAL to return to front-panel operation when the instrument has been set for<br />
remote operation. The SEQ <strong>and</strong> REG fields will replace the HP-IB status indications in the<br />
second line of the FREQUENCY display when the instrument is returned to local<br />
operation.<br />
1b-38
<strong>Operation</strong> Reference<br />
Function<br />
Memory<br />
The memory keys allow you to save instrument settings into memory registers <strong>and</strong> recall<br />
the registers in a numeric sequence.<br />
Up to 10 register sequences can be defined (0 through 9). A sequence can contain up to 100<br />
registers (00 through 99). There are a total of 300 registers available in the instrument.<br />
The registers can be used in the sequences in any combination (such as 10 sequences of 30<br />
registers each, or 3 sequences of 100 registers each) as long as the total does not exceed<br />
300 registers. It is not possible to have all 10 sequences each contain 100 registers as that<br />
would be 1000 registers. (If Option 1EP is present, there are a total of 70 registers<br />
available.)<br />
/, ============================:::::,<br />
FREQUENCY<br />
MODULATION __ AMPLITUDE II<br />
FM 300kKz<br />
1kHz OFF<br />
-136.0dBm<br />
RF OFF<br />
I<br />
,.......FREQUENCY<br />
1(\<br />
11<br />
SEQ 0 REG 00<br />
300 REG<br />
SEQ 9 REG 99<br />
Memory key entries are automatically terminated after you enter the last digit. Register<br />
key entries (SAV, DEL, <strong>and</strong> REG), require two digits. Sequence key entries (SEQ) require<br />
one digit.<br />
1b-39
<strong>Operation</strong> Reference<br />
Function<br />
mernksys.drw<br />
1. SAY<br />
Press SAV <strong>and</strong> a register number (00 through 99) to save the current operating settings in<br />
a memory register. All front-panel settings except the knob digit positions <strong>and</strong> the GPIB<br />
address will be saved in the register.<br />
When you press the SAY key, a message is displayed to tell you the total number of<br />
registers still available.<br />
When you save a register, it is assigned to the currently selected sequence. (The number of<br />
the selected sequence appears in the second line of the FREQUENCY display.) You can<br />
only recall a register when the sequence it is assigned to is selected.<br />
(Refer to "4. SEQ" for further information about register sequences.)<br />
NOTE<br />
The instrument does not have a copy function for saving registers from one<br />
sequence to another.<br />
2. REG<br />
Press REG <strong>and</strong> a register number (00 through 99) to recall the operating settings saved in<br />
that register.<br />
The number of the last register recalled appears in the display along with the number of<br />
the currently selected sequence.<br />
You can only recall registers from the currently selected sequence.<br />
To recall a register from another sequence, you must first select the sequence using the<br />
SEQ key.<br />
Ifyou recall a register remotely in 8656/57-compatible language <strong>and</strong> nothing has been<br />
saved in that register, the instrument preset settings will be restored.<br />
1b·40
<strong>Operation</strong> Reference<br />
Function<br />
3. Register Recall Arrows<br />
The recall ~ <strong>and</strong> ~ keys can be used to select sequences or recall registers. The last key<br />
pressed (SEQ or REG) determines which field is affected by the arrow keys.<br />
(Refer to "4. SEQ" for further information about register sequences.)<br />
[ I I I<br />
[QE; O O O O O O ~O<br />
0 CJoooooo o(~<br />
0 CJoooooo 0'0<br />
o DO 00000 ~_,<br />
[BBB O][D]<br />
rnemkeyl.drw<br />
4. SEQ<br />
Press SEQ <strong>and</strong> a sequence number (0 through 9) to select a register sequence. When you<br />
select a sequence, the number of the sequence appears in the display along with the<br />
number of the first register saved in the sequence. The instrument is set to the operating<br />
settings saved in the first register. If no registers have been saved in the sequence, a<br />
message is displayed to let you know.<br />
NOTE<br />
Selecting the sequence you are currently in is a quick way to return to the<br />
beginning of the sequence<br />
A sequence can include up to 100 registers (00 through 99). There are a total of 300<br />
registers available in the st<strong>and</strong>ard instrument <strong>and</strong> 70 registers in <strong>and</strong> instrument with<br />
Option 1EP (pager encoder) installed. Registers are automatically assigned to the<br />
currently selected sequence when they are saved. The registers saved in any given<br />
sequence are independent from the registers in any other sequence. This allows you to<br />
create up to ten different register sequences. Consequently, it is possible to have up to ten<br />
registers with the same number (for example, REG 01) each assigned to a different<br />
sequence <strong>and</strong> each with different operating settings saved in it.<br />
1b·41
<strong>Operation</strong> Reference<br />
Function<br />
5. DEL<br />
Press DEL <strong>and</strong> a register number (00 through 99) to delete that register. The specified<br />
register is deleted from the currently selected sequence only, but registers in other<br />
sequences you have set up are not affected. After you have deleted a register, you will not<br />
be able to recall that register number until you have saved operating settings in it again.<br />
NOTE<br />
The register number is immediately deleted from the sequence when the<br />
delete entry is completed. However, the settings contained in the register are<br />
recalled when you delete the register so you can re-save the settings ifyou<br />
need to.<br />
Renumbering the Registers If you use the arrow keys to recall the registers in<br />
sequence, the deleted register number will be skipped. If you wish to eliminate the skip,<br />
you can do so by moving each register following the deleted register back one register<br />
number. To delete an entire sequence, delete each register in the sequence.<br />
1b-42
<strong>Operation</strong> Reference<br />
Function<br />
Modulation Source<br />
Figure 1-2. Modulation Source Paths (the 1 kHz path is highlighted)<br />
MOD INPUT/OUTPUT<br />
cnetaoo<br />
J<br />
1b-43
<strong>Operation</strong> Reference<br />
Function<br />
Ca: 1]<br />
'I<br />
110 8jl§lIR §§8§~ I~():<br />
it 0 ~ 00000 0 ..<br />
I D ~IBBBI<br />
"- ' .~<br />
MODULATION SOURCE<br />
rr;:1ODl riNTl m MOD<br />
1~--~ I~ I~ INP~IOUTPUT<br />
\1 ~~~~)/;c;) !;(J[) (~Q<br />
27 \~<br />
4 3<br />
(Opt 1E2 only) (Opt 1EP only)<br />
/'--'!.EQ~CYl<br />
600Sl -F-- lVPK<br />
6 7<br />
on612bd<br />
1. MOD ON/OFF<br />
Press MODON/OFF to turn on or off the currently-selected modulation mode (AM, FM, M,<br />
or pulse). OFF appears in the second line of the MODULATION display when modulation is<br />
turned off.<br />
This key also turns on or off the audio output at the MOD INPUT/OUTPUT connector<br />
when an internal source (400 Hz or 1 kHz) is selected.<br />
The operation of this key is the same as the MOD ON/OFF key on the 83300A Remote<br />
Interface.<br />
2. INT 400 Hz, INT 1 kHz<br />
Press one of these keys to select an internal source for modulating the carrier. The selected<br />
source is also output at the MOD INPUT/OUTPUT port as a 1 Vpk signal into 600 ohms.<br />
3. (FREQUENCY), 4. (FREQUENCY/WAVEFORM)<br />
IfOption lEP is present, the INT 1kHz (FREQUENCY) key, or if Option lE2 is present, the<br />
INT 1kHz (FREQUENCY/WAVEFORM) key will toggle between the 1 kHz internal source<br />
<strong>and</strong> the internal variable-frequency generator with its four waveforms. Repetitively<br />
pressing the INT 1kHz key toggles between 1kHz (the 1 kHz internal source), SIN (the sine<br />
waveform), TRI (the triangle waveform), SQU (the square waveform), <strong>and</strong> SAW (the saw or<br />
ramp waveform).<br />
The frequency of the modulated frequency may be changed by entering the frequency on<br />
the keypad <strong>and</strong> terminating the value with the kHz key. kHz is the only valid units key that<br />
is accepted. Therefore, to set a frequency of 10 Hz, you must press .01 kHz. The frequency<br />
knob will not change this frequency. After the frequency is set, toggling the INT 1kHz key<br />
only changes the waveform. The frequency remains unchanged.<br />
1b-44
<strong>Operation</strong> Reference<br />
Function<br />
The acceptable frequency range for the internal variable-frequency generator is 10 Hz to<br />
20 kHz.<br />
Pressing AM, FM, or M allows you to store a variable frequency <strong>and</strong> waveform for each of<br />
these types of modulation. After setting up one of these types of modulation with a<br />
frequency/waveform combination, simply pressing that modulation key (AM, FM, or M)<br />
recalls the frequency/waveform combination that was set up earlier. For example, an<br />
instrument is configured so the AM state is set up with a 2 kHz sine waveform, the FM<br />
state is set up with a 500 Hz square waveform, <strong>and</strong> the M state is set up with a 5 kHz<br />
triangle waveform. Then pressing either AM, FM, or M will set the instrument to that<br />
modulation type with the frequency/waveform combination to which it was previously set.<br />
NOTE<br />
Ifanother key (for example, FREQUENCY, AMPLITUDE, <strong>and</strong> so forth) is pressed<br />
after a frequency <strong>and</strong> waveform combination is set, pressing the INT 1kHz key<br />
once makes the INT 1kHz active. Subsequent key presses toggles the<br />
instrument through its waveform choices.<br />
5. EXT AC, EXT DC<br />
Press one of these keys to configure the MOD INPUT/OUTPUT port as an ac- or<br />
de-coupled input for modulating the carrier.<br />
Calibrated modulation requires an audio source of 1 Vpk into 600 ohms. For audio source<br />
frequencies of less than 10 kHz, a HI or LO indicator will appear in the second line of the<br />
MODULATION display when the level of the source is not within approximately ±5% of<br />
.,----, 1 Vpk.<br />
Acceptable Frequency Ranges for an<br />
External Audio Source<br />
Modulation Coupling Range<br />
FM EXTAC 1 Hz to 150 kHz<br />
EXTCC<br />
DC to 150 kHz<br />
M EXTAC 20 Hz to 10 kHz<br />
AM a EXTAC 1 Hz to 25 kHz<br />
AM a EXTAC DC to 25 kHz<br />
a. AM b<strong>and</strong>width degrades at carrier<br />
frequencies below 1.5 MHz <strong>and</strong> is not<br />
specified.<br />
Ifyou press EXT DC while the instrument is already in external de mode <strong>and</strong> the FM is on,<br />
then the instrument will perform a de FM calibration. The calibration takes approximately<br />
one second. During the calibration the following message appears on the display: DCFM<br />
calibration in progress.<br />
1b-45
<strong>Operation</strong> Reference<br />
Function<br />
·6.1 kHz + ~XTDC<br />
Press 1 kHz + EXT DC to configure the MOD INPUT/OUTPUT port as a de-coupled input for<br />
modulating the carrier along with the internal 1 kHz source.<br />
(Refer also to "3. EXT AC EXT DC" for further information about operation <strong>and</strong> acceptable<br />
ranges.)<br />
NOTE<br />
1 kHz + EXT AC, 400 Hz + EXT DC, <strong>and</strong> 400 Hz + EXT AC are available only<br />
via GPIB.<br />
Setting the Modulation Level When modulating with both an internal <strong>and</strong> external<br />
source, the level of the external source should not exceed 0.5 V peak or 0.5 Vdc. This level<br />
will provide one half of the displayed modulation. To set modulation to the level you desire,<br />
set the displayed modulation to two-thirds of the desired setting. The external source, set<br />
to 0.5 V peak or 0.5 Vdc, will provide the additional one-third of the desired setting<br />
(one-half of the instrument's setting).<br />
For example, to set up the modulation for 3 kHz of FM deviation, set the instrument for 2<br />
kHz of FM. The external source, set to 0.5 V peak, will provide another 1 kHz of deviation.<br />
Ifthe external source is set to less than 0.5 V peak, the modulation level provided by the<br />
external source will be less than one-half of the displayed modulation. The following<br />
equation may be helpful for determining the appropriate modulation level setting for the<br />
instrument when the level of the external source is less than 0.5 V.<br />
A<br />
-- =D<br />
1+£<br />
Where:<br />
• A = Actual modulation level<br />
• E = External source level<br />
• D = Displayed modulation level<br />
For example, to set up for 3 kHz of FM deviation with an external source set<br />
to 0.3 V peak, the instrument's displayed modulation level would be:<br />
3kHz<br />
1 + 0.3 V = 2.3 kHz<br />
7. MOD INPUT/OUTPUT<br />
This port outputs a 1 Vpk (into 600 ohms) audio tone when an internal modulation source<br />
is selected. When an external modulation input is selected (EXT AC, EXT DC or 1 kHz + EXT<br />
DC), it provides the input for a 1 Vpk (into 600 ohms) audio source. (Refer to the preceding<br />
table for acceptable frequency ranges.)<br />
1b-46
<strong>Operation</strong> Reference<br />
Function<br />
RF Output<br />
I I<br />
Pl<br />
I<br />
I<br />
B O·<br />
B ~CJ BBBBBBlN6l<br />
CJDDDDDD 0<br />
o 00 00000 0<br />
D ~[BBB]IBBB 0 Ir===-~<br />
rtkeys.drw<br />
,. RFOUTPUT _<br />
Max. RevPwr<br />
D 50W50V<br />
50J1.<br />
1. RF ON/OFF<br />
Press RF ON/OFF to turn the RF output signal on or off. RF OFF appears in the second line<br />
of the AMPLITUDE display when the output signal is off.<br />
The instrument turns off the output signal by switching in the maximum output<br />
attenuation (130 dB) <strong>and</strong> setting the vernier to its lowest setting. This results in<br />
approximately 170 dB of carrier isolation.<br />
2. ATTN HOLD<br />
Press AnN HOLD to hold the step attenuator at its current setting. HOLD appears in the<br />
second line of the AMPLITUDE display when the attenuator hold function is on.<br />
When the attenuator hold function is on, amplitude adjustments are limited to the range<br />
of the instrument's vernier. The vernier provides 0.1 dB per step adjustment resolution<br />
across its specified 10 dB range.<br />
1b·47
<strong>Operation</strong> Reference<br />
Function<br />
. Vernier Ranges The following table, "10 dB Specified Vernier Ranges", provides the<br />
upper <strong>and</strong> lower limits of each vernier range. The instrument's amplitude setting when<br />
you press the ATTN HOLD key determines which vernier range is used.<br />
The vernier is allowed to over-range <strong>and</strong> under-range beyond the limits shown in the table<br />
when ATTN HOLD is selected. However, amplitude settings that exceed the limits may not<br />
provide output levels that are within the accuracy specifications of the instrument.<br />
10 dB SpecifiedVernier Ranges<br />
Range<br />
Upper <strong>and</strong> Lower Limits<br />
3.RFOUTPUT<br />
1 +10.0 dfsm" to -5.9 dBm<br />
2 -6.0 dBm to -15.9 dBm<br />
3 -16.0 dBm to -25.9 dBm<br />
4 -26.0 dBm to -35.9 dBm<br />
5 -36.0 dBm to -45.9 dBm<br />
6 -46.0 dBm to -55.9 dBm<br />
7 -56.0 dBm to -65.9 dBm<br />
8 -66.0 dBm to -75.9 dBm<br />
9 -76.0 dBm to -85.9 dBm<br />
10 -86.0 dBm to -95.9 dBm<br />
11 -96.0 dBm to -105.9 dBm<br />
12 -106.0 dBm to -115.9 dBm<br />
13 -116.0 dBm to -127.0 dBm<br />
14 -127.1 dBm to -136.0 dBm<br />
a. +13 dBm for 8648B/C/D<br />
The following table shows the reverse power protection for the RF output port of each<br />
instrument model. When the instrument senses a reverse-power signal, it turns the RF<br />
output off, the step attenuator to maximum attenuation, <strong>and</strong> the vernier to its lowest<br />
setting. A message appears in the second line of the display when the reverse power<br />
protection has been activated.<br />
After you have removed the reverse-power signal from the RF output, press the RF ON/OFF<br />
key to turn the output signal on again.<br />
1b-48
<strong>Operation</strong> Reference<br />
Function<br />
CAUTION<br />
Applying a signal source to the RF output port that exceeds the power level<br />
listed or maintaining a signal source at the RF output for an extended period<br />
of time may damage the instrument.<br />
Reverse Power Protection<br />
:s 2000 MHz 50 watts into 50Q<br />
> 2000 MHz 25 watts into 50Q<br />
Rear Panel<br />
2 4 3 5<br />
ot71 a<br />
1. 10 MHz REF INPUT <strong>and</strong> OUTPUT<br />
These connectors provide the input <strong>and</strong> output ports for the instrument's timebase<br />
reference. The instrument will lock to a 2 MHz, 5 MHz, or 10 MHz external reference<br />
source connected to the input that is within ±5 ppm. When the internal timebase is being<br />
used, the output connector provides a 10 MHz, 1 Vrms level signal.<br />
2. DISPLAY CONTRAST<br />
This knob controls the front panel display contrast. Display contrast can be optimized for<br />
viewing the display from above, below, or directly in front of it.<br />
3. AUXILIARY INTERFACE<br />
Connect the 83300A Remote Interface or the 83301A Memory Interface to this connector<br />
for operation with the instrument. Refer to "Remote Interface" <strong>and</strong> "Memory Interface" in<br />
1b-49
<strong>Operation</strong> Reference<br />
Function<br />
this section for information about operating<br />
j<br />
these devices.<br />
TX Data (output)<br />
+5 Volts RX Data (input)<br />
Ground \ / NC<br />
5~~-c6-~1 ~<br />
~~\~cy, 0<br />
NC / \ NC<br />
CTS (input)<br />
RTS (output)<br />
i<br />
4. Line Voltage Connector<br />
For information about the line voltage connector or fuse replacement, refer to Chapter 3,<br />
"Installation."<br />
5. HP-IB Connector<br />
This is an IEEE 488.1-1987 connector for controlling the instrument via an external<br />
controller. For information about GPIB operation of the instrument, refer to Chapter 2,<br />
"GPIB Programming."<br />
6. TIMEBASE ADJ <strong>and</strong> Language Switches<br />
Position one of this switch places the instrument in the timebase adjustment mode. For the<br />
timebase adjustment procedure, refer to Chapter 7, "Adjustments."<br />
Position two of this switch allows you to set the language for remote programming to<br />
either 8656/57-compatible language (1) or to SCPI (0). The language switch is read once at<br />
power-up.<br />
7. External Pulse Input<br />
This connector provides the input for an external TTL signal which is used by the pulse<br />
modulator to modulate the RF signal off <strong>and</strong> on. This connector is on Option 1E6 only.<br />
1b-50
<strong>Operation</strong> Reference<br />
Function<br />
Remote Interface (Accessory)<br />
'/<br />
~jJOCl"l<br />
D"IOF INTRfAC<br />
,..SEQ.....REG~<br />
------O~~FI<br />
o<br />
I<br />
III<br />
, ·~ __~/I<br />
I<br />
[1 II<br />
2 ~'--ON/OFF i RF I [~I I". . /l_ --- 4<br />
-~ -~-~~-- -- - ---~~j III<br />
3<br />
ot72a<br />
1. MOD ON/OFF<br />
Press MOD ON/OFF to turn on or off all modulation (internal <strong>and</strong> external) to the RF<br />
carrier. When modulation is turned ofT, the LED above the key is off <strong>and</strong> OFF appears in<br />
the second line of the instrument's MODULATION display.<br />
This key also turns on or off the audio output at the MOD INPUT/OUTPUT port when an<br />
internal source (400 Hz or INT 1 kHz) is selected.<br />
2.RF ON/OFF<br />
Press RFON/OFF to turn the RF output signal on or off. When the RF output signal is<br />
turned off the LED above the key is off <strong>and</strong> RF OFF appears in the second line of the<br />
instrument's AMPLITUDE display. There is approximately 170 dB of carrier isolation<br />
when the output is off.<br />
3. Sequence Selection Arrows<br />
Press ~ or ~ to select the next or previous sequence of registers. The sequences are selected<br />
in numeric order. The number of the selected sequence appears in the second line of the<br />
FREQUENCY display. When a sequence is selected, the first register in the sequence is<br />
recalled. When a sequence is selected that has no registers saved in it, two dashes (- -) will<br />
appear in the REG field.<br />
1b-51
<strong>Operation</strong> Reference<br />
Function<br />
4. Register Recall Arrows<br />
Press ~ or ~ to recall the operating settings saved in the registers in the currently selected<br />
sequence. The number of the last register accessed appears in the REG field.<br />
Iftwo dashes (- -) appear in the REG field, a sequence that has no registers saved in it has<br />
been selected.<br />
After the last register in the sequence has been recalled, the register count will begin<br />
again at the first register saved in the sequence.<br />
(Refer to "MEMORY" in this section for further information about register sequences.)<br />
1b·52
<strong>Operation</strong> Reference<br />
Function<br />
Memory Interface (Accessory)<br />
83301 A<br />
MEMORY INTERFACE<br />
l '"~C_<br />
~COf'Y<br />
3<br />
BUSY<br />
2<br />
1<br />
ot730<br />
I. POWER<br />
This light indicates that power is being supplied to the 83301A. It should light when the<br />
cable is connected to the AUXILIARY INTERFACE connector on the rear panel of the<br />
instrument. Ifit does not light, refer to Chapter 5, "<strong>Service</strong>."<br />
2. Copy Arrow Keys<br />
Making a Copy When the 83301A is connected to the instrument, press the ~ to copy all<br />
of the memory registers saved in the instrument into the 83301A's memory. After you have<br />
pressed an arrow key, you must also press the SAY key on the instrument's front panel to<br />
begin the copy process. Press the ~ <strong>and</strong> SAY keys to copy the memory registers stored in<br />
the 83301A into the instrument's memory.<br />
NOTE<br />
Copying memory into the instrument or the 83301A causes any existing<br />
memory registers in the receiving device to be erased. It does not effect the<br />
memory in the sending device, however.<br />
3. BUSY<br />
This light is turned on while memory registers are being copied from one device to another.<br />
Attempting to operate the instrument or memory interface while this light is on may cause<br />
the memory data to be corrupted. The light will turn off when the copy is complete.<br />
1b-53
Ie <strong>Operation</strong> messages<br />
This chapter provides descriptions for both front panel <strong>and</strong> GPIB operation messages. For<br />
information about service messages, numbered 500 <strong>and</strong> above, refer to Chapter 5c, '<strong>Service</strong><br />
Error Messages".<br />
1c-1
<strong>Operation</strong> messages .<br />
Front Panel <strong>Operation</strong> Messages<br />
Front Panel <strong>Operation</strong> Messages<br />
SEQ X SAVE __ xxx registers available<br />
This message is displayed when the SAY key is pressed to inform you of how many<br />
registers are still available. Ifa register is available, enter the two-digit number of the<br />
register you wish to save.<br />
SEQ X REG<br />
XXX has not been saved<br />
This message is displayed when an attempt is made to recall a register that has not been<br />
saved in the sequence. Check to be sure that the appropriate sequence is selected <strong>and</strong><br />
that you have entered the correct register number.<br />
SEQ X DEL<br />
Enter number to delete<br />
This message is displayed when the DEL key is pressed. Enter the number of the<br />
memory register you wish to delete. When a register is deleted, the settings saved in it<br />
are erased <strong>and</strong> the register number is removed from the sequence.<br />
SEQ X has no registers saved in it<br />
This message is displayed when a sequence is selected that has no registers saved in it.<br />
Ifyou wish to save registers in the sequence, set up the instrument, press the SAY key,<br />
<strong>and</strong> enter a two-digit register number.<br />
o No external dc coupling for PM<br />
~ This message is displayed when PM is selected <strong>and</strong> EXT DC or 1 kHz + EXT DC is also<br />
selected. DC coupling of an external source is not possible for PM. Ifyou press<br />
1 kHz + EXT DC you will actually get 1 kHz <strong>and</strong> external ac. Or, select EXT AC coupling for<br />
PM. Additional internal plus external modulation capabilities (such as 1 kHz + EXT DC<br />
are available through GPIB control of the instrument; refer to Chapter 2, "GPIB<br />
Programming".<br />
o Modulation exceeds deviation range<br />
~ This message is displayed when modulation is set to a level that exceeds the operating<br />
range of the instrument. This condition occurs when a modulation level is entered that is<br />
out-of-range for the current RF frequency setting, or when the RF frequency setting is<br />
changed <strong>and</strong> the modulation setting is out-of-range for the new setting.<br />
o There are no registers available<br />
~ This message is displayed when an attempt is made to save a memory register <strong>and</strong> all of<br />
the instrument's memory registers have already been used. Delete any unneeded<br />
registers in order to save new ones. Deleting registers from any sequence will make<br />
them unavailable for saving new settings in the sequence you are using.<br />
1c-2
<strong>Operation</strong> messages<br />
Front Panel <strong>Operation</strong> Messages<br />
o Invalid units selection<br />
~ This message is displayed when a units key is pressed that is not valid for the active<br />
function. Check that the units key you select is labeled with the appropriate units for the<br />
value you are entering.<br />
o Increment value entry out of range<br />
~ This message is displayed when the INCR SET key is pressed <strong>and</strong> a value is entered that<br />
is not within the increment value range for the active function. Refer to "Increment Set"<br />
in Chapter lb, "<strong>Operation</strong> Reference", for a listing of the increment value ranges.<br />
o End of increment range<br />
~ This message is displayed when the ~ or ~ increment arrow key is pressed <strong>and</strong> the<br />
increment value does not set the instrument to a setting that is within the instrument's<br />
allowable range. To view or change the increment value, press the INCR SET key. Refer to<br />
"Increment Set" in Chapter lb, "<strong>Operation</strong> Reference", for a listing of the increment<br />
value ranges.<br />
o Entered value out of range<br />
~ This message is displayed when a value is entered that does not set the RF output signal<br />
within the instrument's allowable range. Refer to "Function" in Chapter lb, "<strong>Operation</strong><br />
Reference", for information on the instrument's allowable ranges.<br />
o End of knob range<br />
~ This message is displayed when the knob is turned but changing the selected digit would<br />
set the instrument to a value that is not within its allowable range.<br />
o Amplitude exceeds ATTN HOLD limits<br />
1 This message is displayed then ATTN HOLD is on <strong>and</strong> the amplitude is set to a level that<br />
1 exceeds the vernier range limits by greater than 5 dBm. Exceeding the 10 dB vernier<br />
range of an attenuator hold setting causes the output level accuracy to degrade. For<br />
information about the vernier ranges <strong>and</strong> limits, refer to ''RF Output" in Chapter lb,<br />
"<strong>Operation</strong> Reference".<br />
o DCFM calibration in progress<br />
~ This message is displayed when FM is selected <strong>and</strong> EXT DC is also selected. The<br />
instrument will perform a de FM calibration <strong>and</strong> this message is displayed during the<br />
calibration.<br />
o Press SAV to copy memory FROM 8647/8<br />
~ This message is displayed when the ~ key is pressed on an 8330lA memory Interface<br />
connected to the instrument. Press the SAV key to copy the memory registers saved in<br />
the instrument into the memory interface.<br />
1c-3
<strong>Operation</strong> messages<br />
Front Panel <strong>Operation</strong> Messages<br />
o Copying registers from 8647/8<br />
~ This message is displayed while the memory registers are being copied from the<br />
instrument to the 83301A Memory Interface.<br />
o Press SAY to copy memory TO 8647/8<br />
~ This message is displayed when the'[ key is pressed on an 83301A Memory Interface<br />
connected to the instrument. Press the SAY key to copy memory registers that had been<br />
saved in the memory interface into the instrument.<br />
o Copying registers to 8647/8<br />
~ This message is displayed while the memory registers are being copied from the 83301A<br />
memory Interface to the instrument.<br />
o Invalid data in Memory Interface<br />
: This message is displayed when the instrument detects that the 83301A Memory<br />
Interface does not contain valid memory register data. Try copying a memory register<br />
into the memory interface first, then initiate a copy from the memory interface to the<br />
instrument again.<br />
o Communication failure: copy aborted<br />
~ This message is displayed when the instrument is not able to successfully copy memory<br />
registers between the instrument <strong>and</strong> the 83301A Memory Interface. This message will<br />
be displayed if the cable connecting the instrument to the primary interface is<br />
disconnected during the copy process.<br />
o Memory copy was successful<br />
: This message is displayed when the instrument has successfully copied the memory<br />
registers between the instrument <strong>and</strong> the 83301A Memory Interface. When this<br />
message is displayed, the copy process is complete <strong>and</strong> you can disconnect the memory<br />
interface from the instrument.<br />
1c-4
4<br />
Specifications<br />
This chapter contains specifications <strong>and</strong> supplemental characteristics<br />
for the <strong>8648A</strong>/B/CID synthesized signal generators.<br />
• Specifications describe the instrument's warranted performance<br />
over the 0 to 50 0 C temperature range <strong>and</strong> apply after a 30 minute<br />
warm-up unless otherwise noted. All performance below a carrier<br />
frequency of 250 kHz is typical.<br />
• Supplemental characteristics (shown in italics) are intended to<br />
provide information useful in estimating instrument capability<br />
in your application by describing typical, but non-warranted<br />
performance.<br />
The regulatory information is located in the last section of this<br />
chapter.<br />
Options<br />
Option Specifications<br />
The <strong>8648A</strong>/B/C/D synthesized signal generator specifications refer to<br />
several options. Those options are described below.<br />
• Option lEA - High power (8648B/C/D only)<br />
• Option IEP - Pager encoder/signaling (includes modulation<br />
generator functionality of Option IE2) (<strong>8648A</strong> only)<br />
(Not available with Option IE2)<br />
• Option IE2 - Modulation generator (Not available with Option IEP)<br />
• Option IE5 - High stability timebase<br />
• Option IE6 - Pulse modulation (8648B/CID only)<br />
Specifications unique to instruments with Options IE2, IE6, or IEP<br />
are listed after the general specifications.<br />
Specifications 4·1
Frequency<br />
Specifications<br />
Range<br />
<strong>8648A</strong><br />
8648B<br />
8648C<br />
8648D<br />
100 kHz to 1000 MHz<br />
9 kHz to 2000 MHz<br />
9 kHz to 3200 MHz<br />
9 kHz to 4000 MHz<br />
1··~IUt10n<br />
Display<br />
--------------------<br />
1<br />
0.001 Hz<br />
10 Hz<br />
Accuracy"<br />
Typically ±3xlO- 6 x carrier frequency in Hz.<br />
Typically ±O.15xlO- 6 x carrier frequency in Hz<br />
for Option lE5.<br />
" After one hour warm-up <strong>and</strong> within one year of calibration.<br />
Switching Speed (typical)<br />
< 1001 MHz < 75ms<br />
> 1001 MHz < 100 ms<br />
Internal Reference<br />
Oscillator<br />
Accuracy <strong>and</strong> stability" (typical, calibration <strong>and</strong><br />
adjustment dependent)<br />
± Aging rate ± temperature effects ± line voltage effects<br />
" After one hour warm-up <strong>and</strong> within one year of calibration.<br />
Aging<br />
Temperature<br />
Line Voltaget<br />
St<strong>and</strong>ard<br />
Timebase (typical)<br />
High Stability Timebase<br />
Option lE5<br />
< ±2 ppm/year < ±0.1 ppm/year" or<br />
< ±0.0005 ppm/day"<br />
< ±l ppm < ±O.Ol ppmt (typical)<br />
< ±O.5ppm N/A<br />
" After four days warm-up <strong>and</strong> within one year of calibration.<br />
t Specification applies at 25 0 ±5 °C.<br />
t Specification applies for a line voltage change of ±596.<br />
4·2 Specifications
Output<br />
10 MHz, typically> 0.5 Vrms level into 50ohm,s<br />
External reference oscillator input<br />
Accepts 2, 5, 10 MHz ±5 ppm <strong>and</strong> a level range of 0.5 V to<br />
2 V r m • into 50 ohms<br />
Output<br />
Range<br />
<strong>8648A</strong><br />
8648B/C/O<br />
< 2500 MHz<br />
< 4000 MHz<br />
Maximum Leveled"<br />
< 100 kHz<br />
< 100 MHz<br />
< 1000 MHz<br />
< 1500 MHz<br />
~ 2100 MHz<br />
~ 2500 MHz<br />
~ 4000 MHz<br />
+ 10 to -136 dBm<br />
+ 13 to -136 dBm<br />
+ 10 to -136 dBm<br />
Option lEA<br />
Option lEA <strong>and</strong> IE6<br />
+17dBm<br />
+13 dBm<br />
+20 dBm + 13 dBm (typically + 16 dBm)*'<br />
+20 dBm + 18 dBm<br />
+ 19 dBm + 17 dBm<br />
+ 17 dBm + 15 dBm<br />
+ 15 dBm + 13 dBm<br />
+ 13 dBm + 11 dBm<br />
• Typical for f c < 250 kHz .<br />
•• Combining Option 1E6 with lEA reduces output levels by 2 dB, below 100 MHz only + 13 dBm (typically + 16 dBm)<br />
is specified.<br />
23<br />
21<br />
A ~ ro.~<br />
"\<br />
~<br />
--,~<br />
~<br />
19<br />
17<br />
15<br />
13<br />
21 8021 162121 24021 aaee 4212121<br />
FREOUENCYCMHz)<br />
Figure 4-1. Typical Output Power with Option lEA<br />
Specifications 4·3
.1 Display Resolution<br />
____________________I_O_.I_d_B<br />
_<br />
Accuracy' t t<br />
r, < 100 kHz<br />
r, ~ 2500 MHz<br />
r, ~ 3200 MHz<br />
fc ~ 4000 MHz<br />
> -100 dBm < -100 dBm<br />
±1.0 dB ±3.0 dB<br />
±1.0 dB ±1.0 dB<br />
±1.5 dB ±3.0 dB<br />
±2.0 dB ±3.0 dB<br />
• Accuracy is valid from maximum specified output power to -127 dBm. Below -127 dBm, accuracy is typically<br />
±3.0 dB for frequencies between 100 kHz <strong>and</strong> 2500 MHz <strong>and</strong> is not specified for frequencies outside<br />
of this range.<br />
t Accuracy applies at 25 ±5 °C, <strong>and</strong> typically degrades up to ±0.5 dB over 0 to 50°C or at output<br />
power levels> 13 dBm.<br />
t Accuracy is typical for f c < 250 kHz.<br />
Reverse power protection<br />
< 2000 MHz 50 watts into 50 ohms<br />
< 4000 MHz 25 watts into 50 ohms<br />
SWR (output < -6 dBm, typical)<br />
< 249 kHz < 2.5:1<br />
< 2500 MHz < 1.5:1<br />
< 4000 MHz < 2.0:1<br />
IOutput Impedance<br />
INominally 50 ohms<br />
Spectral Purity<br />
1 Harmonics<br />
L-- I< -30 dBc (output ~ + 4 dBm)<br />
Subharmonics (output ~<br />
+ 4 dBm)<br />
< 1001 MHz -60 dBc<br />
< 3200 MHz -50 dBc<br />
~ 4000 MHz -40 dBc<br />
4-4 Specifications
Nonharrnonics (2': 5 kHz offset, :OS + 4 dBm output level)<br />
< 249 MHz < -55 d&<br />
< 1001 MHz < -60d&<br />
< 2001 MHz < -54d&<br />
< 4000 MHz < -48 dBc<br />
Residual FM (CCITT, rrns)<br />
< 249 MHz < 7 Hz, typically < 4 Hz<br />
< 501 MHz < 4 Hz, typically < 2 Hz<br />
< 1001 MHz < 7 Hz, typically < 4 Hz<br />
< 2001 MHz < 14 Hz, typically < 8 Hz<br />
< 4000 MHz < 28 Hz, typically < 12 Hz<br />
SSB Phase Noise (at 20 kHz offset, typical)<br />
at r, 500 MHz<br />
at r, 1000 MHz<br />
at r, 2000 MHz<br />
at C c 3000 MHz<br />
at r, 4000 MHz<br />
< -120 dBclHz<br />
< -116 dBclHz<br />
< -11 0 dBclHz<br />
< -106 dBclHz<br />
< -104 dBcIHZ<br />
Frequency<br />
Modulation<br />
Peak Deviation (rates> 25 Hz ac FM)<br />
< 249 MHz<br />
< 501 MHz<br />
< 1001 MHz<br />
< 2001 MHz<br />
< 4000 MHz<br />
o to 200 kHz<br />
o to 100 kHz<br />
o to 200 kHz<br />
o to 400 kHz<br />
o to 800 kHz<br />
Resolution<br />
:OS<br />
10% peak deviation<br />
< 2001 MHz 10 Hz<br />
> 2001 MHz 20 Hz<br />
> 10% to maximum peak deviation<br />
< 2001 MHz 100 Hz<br />
2': 2001 MHz<br />
200 Hz<br />
Specifications 4·5
Deviation Accuracy (internal 1 kHz rate)<br />
< 1001 MHz ±3% of FM deviation ±30 Hz<br />
< 2001 MHz ±3% of FM deviation ±60 Hz<br />
< 4000 MHz ±3% of FM deviation ±120 Hz<br />
Rates<br />
Internal<br />
Option lE2<br />
External DC<br />
External AC<br />
400 Hz or 1 kHz<br />
10 Hz to 20 kHz<br />
de to 150 kHz (typical, 3 dB BW)<br />
1 Hz to 150 kHz (typical, 3 dB BW)<br />
Distortion (1 kHz rate, THD + N, 0.3 to 3 kHz BW)<br />
< 1001 MHz < 1% at deviations> 4 kHz<br />
< 2001 MHz < 1% at deviations> 8 kHz<br />
< 4000 MHz < 1% at deviations> 16 kHz<br />
(88 to 108 MHz) « 0.5% at deviations :-:; 75 kHz)<br />
Carrier frequency accuracy relative to CW in dc FM·<br />
< 1001 MHz<br />
< 2001 MHz<br />
< 4000 MHz<br />
± 100 Hz (typically 40 Hz) at deviations < 10 kHz<br />
±200 Hz (typically 80 Hz) at deviations < 20 kHz<br />
±400 Hz (typically 160 Hz) at deviations < 40 kHz<br />
• Specifications apply over the 25 ±5 °C range within 1 hour of DC FM calibration.<br />
FM + FM<br />
Internal 1 kHz or 400 Hz source plus external. In internal<br />
plus external FM mode, the internal source produces the set<br />
level of deviation. The external input should be set to<br />
:-:; ±0.5 Vpk or 0.5 Vdc (one-half of the set deviation).<br />
Phase Modulation<br />
Peak Deviation Range<br />
< 249 MHz o to 10 radians<br />
< 501 MHz o to 5 radians<br />
< 1001 MHz o to 10 radians<br />
< 2001 MHz oto 20 radians<br />
:-:; 4000 MHz oto 40 radians<br />
4·6 Specifications
Resolution<br />
< 2001 MHz 0.01 radian<br />
> 2001 MHz 0.02 radian<br />
Deviation Accuracy (internal 1 kHz rate, typical)<br />
< 1001 MHz ±3% ofdeviation setting ±0.05 radians<br />
< 2001 MHz ±3% ofdeviation setting ±0.1 radians<br />
< 4000 MHz ±3% ofdeviation setting ±0.2 radians<br />
Rates<br />
Internal<br />
Option IE2<br />
External<br />
400 Hz or 1 kHz<br />
20 Hz to 10 kHz<br />
20 Hz to 10kHz (typical, 3 dB BW)<br />
Distortion (1 kHz rate)<br />
< 1001 MHz < 1% at deviations ~ 3 radians<br />
< 2001 MHz < 1% at deviations ~ 6 radians<br />
< 4000 MHz < 1% at deviations ~ 12 radians<br />
Amplitude<br />
Modulation<br />
AM performance is not specified below 1.5 MHz <strong>and</strong> is typical above<br />
1001 MHz.<br />
[Range<br />
--------------------<br />
10 to 100%; output ~ 4 dBrn<br />
IResolution<br />
'-- [_0_.1_% _<br />
Accuracy" (1 kHz rate) I±5% of setting ± 1.5%<br />
• Applies at 25 ±5 °C <strong>and</strong> at < 70% depth; AM accuracy is typically '±7% of setting ± 1.5% over 0 to 50°C.<br />
Rates<br />
Internal<br />
400 Hz or 1 kHz<br />
Option 1E2<br />
10 Hz to 20 kHz<br />
External:<br />
DC<br />
de to 25 kHz (typical, 3 dB BW)<br />
AC<br />
1 Hz to 25 kHz (typical, 3 dB BW)<br />
]<br />
Specifications 4·7
Distortion (1 kHz rate, THD + Noise, 0.3 to 3 kHz BW)<br />
<strong>8648A</strong><br />
at 30% AM<br />
at 90% AM<br />
8648B/C/D<br />
at 30% AM<br />
at 70% AM<br />
< 2%<br />
< 3%<br />
< 2%<br />
< 3%<br />
Modulation Source<br />
Internal<br />
External<br />
400 Hz or 1 kHz, front panel BNC connector provided at<br />
nominally 1 Vp into 600 ohms.<br />
(See also "Modulation Generator Option lE2".)<br />
1 Vp into 600 ohms (nominal) required for full scale<br />
modulation. (High/Low indicator provided for external<br />
signals j; 10 kHz.)<br />
Remote<br />
Programming<br />
Interface<br />
Control Languages<br />
Functions Controlled<br />
IEEE-488 Functions<br />
GPIB (IEEE-488.2-1987) with Listen <strong>and</strong> Talk<br />
SCPI version 1992.0<br />
8656B <strong>and</strong> 8657 code compatibility<br />
All functions are programmable except the front-panel<br />
power key, the knobs, the increment set key, the arrow<br />
keys, the reference keys, <strong>and</strong> the rear-panel display<br />
contrast control.<br />
SHl, AHl, T6, TEO, L4, LEO, SRI, RLl, PPO, DCl,<br />
DTO, CO, E2<br />
4·8 Specifications
Environmental<br />
Operating temperature range oto 50"C<br />
Shock <strong>and</strong> vibration Meets MIL STD 28800E Type III, Class 5<br />
Leakage<br />
Conducted <strong>and</strong> radiated interference meets MIL STD 461B<br />
RE02 Part 2 <strong>and</strong> CISPR I I. Leakage is typically < 1 /l V<br />
(nominally 0.1 /lV with a 2 turn loop) at ~ 1001 MHz, when<br />
measured with a resonant dipole antenna one inch from<br />
any surface (except the rear panel) with output level<br />
< 0 dBm (all inputs/outputs properly terminated).<br />
General<br />
Power Requirements<br />
Internal Diagnostics<br />
Storage Registers<br />
Weight<br />
<strong>8648A</strong><br />
8648B/C/D<br />
Dimensions<br />
90 to 264 V; 48 to 440 Hz; 170 VA maximum<br />
Automatically executes on instrument power-up. Assists<br />
user in locating instrument errors <strong>and</strong> locating faulty<br />
module.<br />
300 storage registers with sequence <strong>and</strong> register number<br />
displayed. Up to 10 sequences are available with 30<br />
registers each.<br />
7 kg (15 lbs) net; 9 kg (20 lbs) shipping<br />
8.5 kg (19 lbs) net; 11 kg (24 lbs) shipping<br />
165H x 330W x 368D mm (6.5H x 13W x 14.6D in.)<br />
Options<br />
lEA<br />
High power (8648B/C/D only)<br />
1E2<br />
Modulation generator (Not available with Option 1EP)<br />
1E5<br />
High stability timebase<br />
1E6<br />
Pulse modulation (8648B/C/D only)<br />
1EP<br />
Pager encoder/signaling (includes modulation generator<br />
functionality of Option 1E2) (<strong>8648A</strong> only) (Not available<br />
with Option 1E2)<br />
1CM Rack kit, part number 08648-60001<br />
OBO<br />
Delete manual<br />
OBI<br />
Extra manual (includes service information)<br />
W30<br />
Three year warranty<br />
Specifications 4-9
Translated Operating Manuals<br />
Option ABO Chinese for Taiwan, part number 08648-90002<br />
Option ABI Korean, part number 08648-90006<br />
Option AB2 Chinese for PRC, part number 08648-90004<br />
Option ABE Spanish, part number 08648-90003<br />
Option ABD German, part number 08648-90019<br />
Option ABF French, part number 08648-90020<br />
Option ABJ Japanese, part number 08648-90005<br />
Accessories<br />
Transit Case<br />
Remote Interface<br />
Memory Interface<br />
Part number 5961-4720<br />
83300A<br />
83301A<br />
Modulation<br />
Generator<br />
Option lE2<br />
Adds variable frequency modulation source. (This functionality is also<br />
included with the pager encoder/signaling Option lEP.)<br />
Waveforms<br />
sine, triangle, square, <strong>and</strong> sawtooth (or ramp)<br />
Frequency Range<br />
Sine<br />
Square, Triangle, Sawtooth (or ramp)<br />
10 Hz to 20 kHz<br />
100 Hz to 2 kHz'<br />
• Useable from 10 Hz to 20 kHz. However, b<strong>and</strong>width limitations may result in waveform degradation. Refer to AM, FM,<br />
<strong>and</strong> Phase Modulation Rate specifications (External AC mode).<br />
IFrequency Accuracy ITypically ±O.Ol %<br />
Frequency Resolution<br />
1 Hz (3 digits or 10 Hz displayed)<br />
Depth <strong>and</strong> Deviation Accuracy (1 kHz sine)<br />
Refer to AM, FM, <strong>and</strong> Phase Modulation Accuracy<br />
specifications.<br />
4·10 Specifications
lou'pu,<br />
Front Panel BNe<br />
______________________I_N_O_m_in_al_ly_l_V_P -------<br />
Pulse Modulation<br />
Option IE6<br />
IRise/Fall Time<br />
_____________________I_ 80 dB<br />
< 4000 MHz > 70 dB<br />
IMaximum Pulse Repetition Rate<br />
_____________________I_l_O_M_H_Z<br />
_<br />
Supplemental Information<br />
Pulse Input<br />
Delay<br />
Video Feedthrough<br />
TTL level (± 15 V maximum)<br />
< 60 ns, typical<br />
< 30 m V, typical<br />
Pager<br />
Encoder/Signaling<br />
Option IEP<br />
Frequency<br />
Accuracy with Option IES·<br />
Typically ±0.15xlO- 6 x carrier frequency in Hz<br />
or OJJ92xlO- 6 x carrier frequency in Hz within 90 days<br />
ofcalibration.<br />
• After one hour warm-up <strong>and</strong> within one year of calibration.<br />
Specifications 4-11
Frequency Modulation<br />
FSK Deviation Accuracy with Option IEP<br />
I±60 Hz·<br />
• Specifications apply over the 25 ±5 ·C range, 4.8 kHz deviation. Meets FLEX requirements at 274 to 288, 322 to 329,<br />
929 to 932 MHz.<br />
Pager Signaling<br />
Supported Pager Protocols<br />
POCSAG<br />
Speed<br />
Message Format<br />
FLEX/FLEX-TD<br />
Speed<br />
2 Level FSK<br />
4 Level FSK<br />
Message Format<br />
Address Type<br />
Supported Roaming Method<br />
Messaging Accessible From Front Panel or GPIB<br />
Message Types<br />
Message Length<br />
Repetition Modes<br />
Messaging Accessible Only Over GPIB<br />
Message Type<br />
Batch Length<br />
FLEX/FLEX-TD<br />
POCSAG<br />
Repetition Mode<br />
Data Rate Accuracy<br />
POCSAG, FLEX., <strong>and</strong> FLEX-TD<br />
512, 1200, <strong>and</strong> 2400 bps<br />
Thne only, Numeric, Alphanumeric, Alphanumeric entered<br />
by hex-bin code, Pseudo-noise (l5-stage)<br />
1600 <strong>and</strong> 3200 bps<br />
3200 <strong>and</strong> 6400 bps<br />
Thne only, Numeric (st<strong>and</strong>ard, special, <strong>and</strong> numbered),<br />
Alphanumeric, HEX/Binary, Pseudo-noise (Ifi-stage),<br />
Re-synchronization<br />
Short, Long<br />
SSID, NID<br />
Five fixed (built-in), one user-defined<br />
40 characters maximum<br />
Single, Burst, Continuous<br />
arbitrary (user-defined)<br />
128 Frames<br />
128 Batches<br />
Single, Burst, <strong>and</strong> Continuous<br />
±5 ppmt<br />
• FLEX is a trademark of Motorola, Inc.<br />
t Specifications apply over the 25 ±5°C range.<br />
Modulation Source<br />
Internal<br />
400 Hz or 1 kHz, or audio generator (see Option lE2 for<br />
characteristics), front panel BNC connector provided at<br />
nominally 1 Vp into 600 ohms.<br />
General<br />
Storage Registers<br />
70 storage registers with sequence <strong>and</strong> register number<br />
displayed. Up to 10 sequences are available with 30<br />
registers each.<br />
4-12 Specifications