PowerGrip® GT® Belt Drives
PowerGrip® GT® Belt Drives
PowerGrip® GT® Belt Drives

Create successful ePaper yourself
Turn your PDF publications into a flip-book with our unique Google optimized e-Paper software.
PowerGrip ® GT ® <strong>Belt</strong> <strong>Drives</strong><br />
Bushing and Shaft Specification Tables<br />
– 5mm Pitch PowerGrip GT Sprockets<br />
L<br />
G<br />
F<br />
QD Type Bushings<br />
D<br />
B<br />
A<br />
E<br />
3/ 4 " Taper<br />
Per Foot<br />
(on diameter)<br />
Torque Dimensions (in) Cap Screws Approx. Weight<br />
Bushing Capacity Bolt Avg. Bore<br />
Style (lb-in) A B D E F G L Circle No. Size (lb)<br />
SH 3,500 7/16 1 7/8 2 5/8 7/8 3/4 1/8 1 5/16 2 1/4 3 1/4–20x1 3/8 .8<br />
SDS 5,000 7/16 2 3/16 3 3/16 7/8 3/4 1/8 1 5/16 2 11/16 3 1/4–20x1 7/8 1.2<br />
SK 7,000 9/16 2 13/16 3 7/8 1 15/32 1 1/4 7/32 1 15/16 3 5/16 3 5/16–18x2 2.8<br />
Stock Bore and Keyseat Information<br />
Bushings are available from stock for all popular<br />
bores within the bore range of each size bushing.<br />
Table 1 lists the bore range and keyseat dimensions<br />
for each QD bushing style.<br />
Table 1–Bushing Keyseat Dimensions<br />
Style Bores (in) Keyseat (in)<br />
SH 1/2 -1 3/8 Standard<br />
1 7/16-1 5/8 3/8 x 1/16<br />
SDS 1/2 -1 5/8 Standard<br />
1 11/16-1 3/4 3/8 x 1/8<br />
1 13/16-1 15/16 1/2 x 1/16<br />
SK 1/2 -2 1/8 Standard<br />
2 3/16-2 1/4 1/2 x 3/16<br />
2 1/4-2 1/2 5/8 x 1/16<br />
Where standard keyseats and keys are specified, see<br />
Table 2 for dimensions. Where bores do not permit<br />
standard depth keyseats, a flat key of the proper<br />
dimensions is furnished with the bushing.<br />
Table 2–Standard Keyseat & Key Dimensions<br />
Shaft<br />
Keyseat (in) Keyseat (in)<br />
Diameter (in) Width Depth Width Depth<br />
5/16 - 7/16 3/32 3/64 3/32 3/32<br />
1/2 - 9/16 1/8 1/16 1/8 1/8<br />
5/8 - 7/8 3/16 3/32 3/16 3/16<br />
15/16 - 1 1/4 1/4 1/8 1/4 1/4<br />
1 5/16 - 1 3/8 5/16 5/32 5/16 5/16<br />
1 7/16 - 1 3/4 3/8 3/16 3/8 3/8<br />
1 13/16 - 2 1/4 1/2 1/4 1/2 1/2<br />
2 5/16 - 2 3/4 5/8 5/16 5/8 5/8<br />
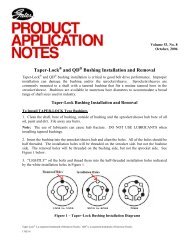
Sprocket Installation<br />
Prior to assembly, ensure that the tapered surface of<br />
the bushing and sprocket are clean. Any dirt,<br />
grease or oil must be removed. In no case is a<br />
lubricant to be used.<br />
Place the bushing into the sprocket hub and insert<br />
the bolts to make a loose fit of the bushing to the<br />
sprocket. Do not use lubricant on the bolts,<br />
bushing, sprocket or shaft.<br />
With the key in the shaft’s keyseat, slide the<br />
assembled bushing/sprocket to its proper position<br />
with the bolts to the outside. Smaller sprockets may<br />
have to be installed with bolts on the motor side. If<br />
difficulty is met in sliding the bushing onto the<br />
shaft, wedge a screwdriver blade into the bushing’s<br />
saw cut.<br />
When the bushing/sprocket assembly is properly<br />
lined up with its mating sprocket, remove the<br />
screwdriver, if used. Tighten the bolts evenly and<br />
progressively. Apply the recommended torque to<br />
the bolts as given in Table 3.<br />
Table 3 – Sprocket Installation<br />
Bolts (in)<br />
Torque Wrench<br />
Bushing Style Qty Size Force (lb-in)<br />
SH & SDS 3 1/4-20 x 1 3/8 108<br />
SK 3 5/16-18 x 2 180<br />
Sprocket Removal<br />
To remove sprockets, first remove the belt. Then<br />
loosen and remove bolts. Insert bolts into the<br />
tapped backoff holes.<br />
Progressively tighten the bolts until the sprocket is<br />
loose on the bushing. Remove sprocket and<br />
bushing, if necessary. If bolts cannot be inserted<br />
into the backoff holes from the motor side, then use<br />
a wedge to work the sprocket away from the bushing<br />
flange.<br />
If the bushing doesn’t slip easily off the shaft, wedge<br />
a screwdriver blade in the bushing’s saw cut.<br />
The World’s Most Trusted Name in <strong>Belt</strong>s, Hose & Hydraulics.<br />
25