TM-6710/6710CL High-Speed Progressive Scanning ... - JAI Pulnix
TM-6710/6710CL High-Speed Progressive Scanning ... - JAI Pulnix
TM-6710/6710CL High-Speed Progressive Scanning ... - JAI Pulnix

Create successful ePaper yourself
Turn your PDF publications into a flip-book with our unique Google optimized e-Paper software.
Page 8<br />
Installation<br />
If you are building your own power cables, consult the pin-out for the camera purchased. Connect the<br />
Ground and +12V power leads of the PC-12P power connector to Pin #1 and Pin #2, respectively.<br />
Remember that power must be DC regulated, and of sufficient current to properly power the camera.<br />
Attach the power cable to the connector. The 12-pin connector is keyed and will only fit in one<br />
orientation. Rotate the connector while applying slight pressure until the keyways line up. Press the<br />
connector into place until it is firmly seated.<br />
You may now plug the power cord into the 110V AC socket and power up the camera.<br />
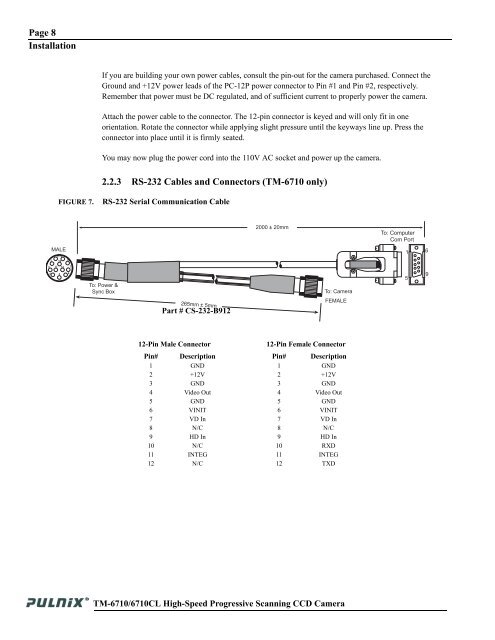
2.2.3 RS-232 Cables and Connectors (<strong>TM</strong>-<strong>6710</strong> only)<br />
FIGURE 7.<br />
RS-232 Serial Communication Cable<br />
2000 ± 20mm<br />
To: Computer<br />
Com Port<br />
MALE<br />
1 9<br />
2 10<br />
8<br />
1<br />
6<br />
3<br />
11 12<br />
7<br />
4<br />
5 6<br />
To: Power &<br />
Sync Box<br />
To: Camera<br />
5<br />
9<br />
265mm ± 5mm<br />
Part # CS-232-B912<br />
FEMALE<br />
12-Pin Male Connector<br />
12-Pin Female Connector<br />
Pin# Description Pin# Description<br />
1 GND 1 GND<br />
2 +12V 2 +12V<br />
3 GND 3 GND<br />
4 Video Out 4 Video Out<br />
5 GND 5 GND<br />
6 VINIT 6 VINIT<br />
7 VD In 7 VD In<br />
8 N/C 8 N/C<br />
9 HD In 9 HD In<br />
10 N/C 10 RXD<br />
11 INTEG 11 INTEG<br />
12 N/C 12 TXD<br />
<strong>TM</strong>-<strong>6710</strong>/<strong>6710</strong>CL <strong>High</strong>-<strong>Speed</strong> <strong>Progressive</strong> <strong>Scanning</strong> CCD Camera