Sensit 2 - AMS
Sensit 2 - AMS
Sensit 2 - AMS

Create successful ePaper yourself
Turn your PDF publications into a flip-book with our unique Google optimized e-Paper software.
L0071, Rev. M <strong>AMS</strong> SENSIT II GLASS FRONT VENDOR<br />
4.3.3 Leveling the Vendor<br />
For safe operation the vendor must be level.<br />
1. On the bottom of the vendor are four (4) threaded<br />
leveling legs located at the corners of the cabinet and<br />
a fifth support screw under the door. Before beginning,<br />
be sure that all five leveling legs are screwed in<br />
completely.<br />
2. With the door closed and locked, check the four main<br />
legs and adjust any leg that is not contacting the floor.<br />
Make sure the support screw under the door is all the<br />
way up and is not contacting the floor at this time.<br />
3. Place a level on top of the cabinet and check for<br />
horizontal from side-to-side.<br />
4. Adjust the leveling legs on the low side one turn at a<br />
time until the cabinet is level.<br />
5. Repeat the last two steps to level the vendor front-toback.<br />
6. After the vendor is level, adjust the support screw<br />
under the door until it contacts the floor.<br />
Figure 4.3). The closed end of the false leg should be<br />
facing forward.<br />
2. Install screws through the holes and tighten until snug.<br />
Do not over tighten.<br />
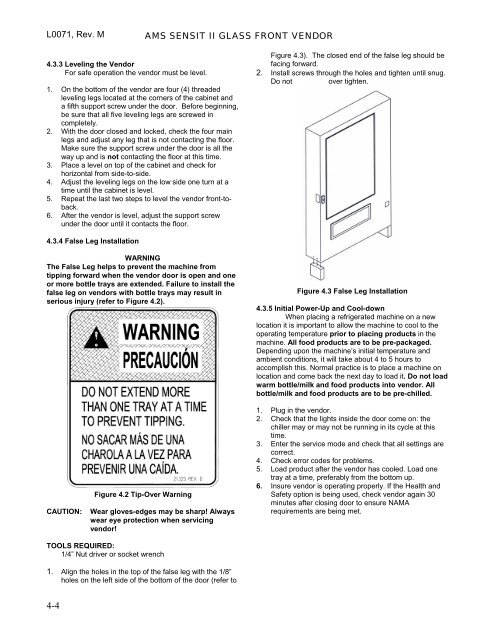
4.3.4 False Leg Installation<br />
WARNING<br />
The False Leg helps to prevent the machine from<br />
tipping forward when the vendor door is open and one<br />
or more bottle trays are extended. Failure to install the<br />
false leg on vendors with bottle trays may result in<br />
serious injury (refer to Figure 4.2).<br />
Figure 4.3 False Leg Installation<br />
4.3.5 Initial Power-Up and Cool-down<br />
When placing a refrigerated machine on a new<br />
location it is important to allow the machine to cool to the<br />
operating temperature prior to placing products in the<br />
machine. All food products are to be pre-packaged.<br />
Depending upon the machine’s initial temperature and<br />
ambient conditions, it will take about 4 to 5 hours to<br />
accomplish this. Normal practice is to place a machine on<br />
location and come back the next day to load it. Do not load<br />
warm bottle/milk and food products into vendor. All<br />
bottle/milk and food products are to be pre-chilled.<br />
CAUTION:<br />
Figure 4.2 Tip-Over Warning<br />
Wear gloves-edges may be sharp! Always<br />
wear eye protection when servicing<br />
vendor!<br />
1. Plug in the vendor.<br />
2. Check that the lights inside the door come on: the<br />
chiller may or may not be running in its cycle at this<br />
time.<br />
3. Enter the service mode and check that all settings are<br />
correct.<br />
4. Check error codes for problems.<br />
5. Load product after the vendor has cooled. Load one<br />
tray at a time, preferably from the bottom up.<br />
6. Insure vendor is operating properly. If the Health and<br />
Safety option is being used, check vendor again 30<br />
minutes after closing door to ensure NAMA<br />
requirements are being met.<br />
TOOLS REQUIRED:<br />
1/4” Nut driver or socket wrench<br />
1. Align the holes in the top of the false leg with the 1/8”<br />
holes on the left side of the bottom of the door (refer to<br />
4-4