Sensit 2 - AMS
Sensit 2 - AMS
Sensit 2 - AMS

You also want an ePaper? Increase the reach of your titles
YUMPU automatically turns print PDFs into web optimized ePapers that Google loves.
<strong>AMS</strong> SENSIT II GLASS FRONT VENDOR<br />
L0071, Rev. M<br />
8.0 MAINTENANCE<br />
8.1 REPLACING THE PROGRAM CHIP<br />
Occasionally it may be necessary to replace the program<br />
chip to take advantage of new software features. Please<br />
note that after replacing the chip it will be necessary to<br />
reprogram prices and any other variables such as option<br />
settings and blocking times that have been changed from<br />
the factory settings. The motors will need to be<br />
reconfigured. The Product Sensor option, if used, will need<br />
to be set to “Y”, and if the 1.5” Helix Tray is installed the<br />
home switch (in tray setup) will need to be set to “N”.<br />
1. Disconnect the power to the control board by using the<br />
power switch located on the right rail mount above the<br />
refrigeration unit power outlet. The fuse holder for older<br />
models can be located in the middle of the service door<br />
on the back of the main door.<br />
2. Locate the program chip (refer to Figure 8.1).<br />
3. Insert a chip removal tool in one of the slots located at<br />
the corners of the socket and pry the chip from the<br />
socket. Note that the chip has one chamfered corner<br />
which corresponds to a chamfer in the socket.<br />
4. Press the new chip in place, making sure the chamfer is<br />
correctly oriented and the wires on the chip line up with<br />
the connections in the socket.<br />
5. Reconnect the power to the board and check the<br />
software revision number. The revision number will be<br />
displayed for several seconds after connecting the<br />
power.<br />
6. Configure the motors, program the prices and re-enter<br />
any other desired settings. Refer to Section 6.0, Service<br />
Programming.<br />
Figure 8.1 Replacing Program Chip<br />
8.2 CLEANING THE REFRIGERATION UNIT<br />
<strong>AMS</strong> recommends cleaning the refrigeration unit at<br />
least twice a year under normal conditions, more often in<br />
dusty environments.<br />
CAUTION: Always wear eye protection and gloves<br />
when cleaning vendor! Condenser fins are sharp!<br />
1. Unplug the vendor.<br />
2. Remove the temperature sensor from refrigeration unit<br />
housing (refer to Section 7.3).<br />
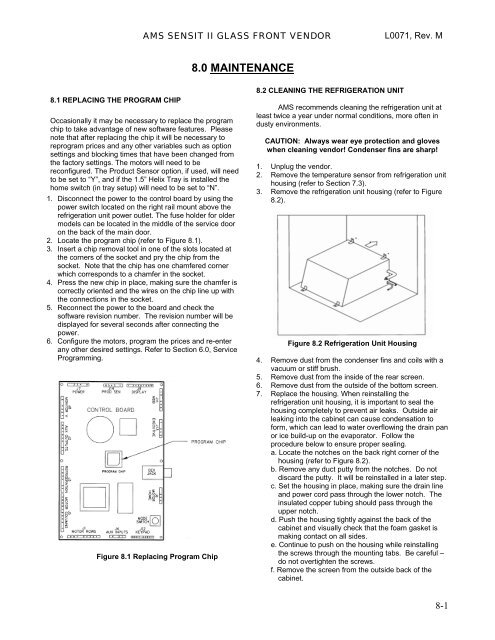
3. Remove the refrigeration unit housing (refer to Figure<br />
8.2).<br />
Figure 8.2 Refrigeration Unit Housing<br />
4. Remove dust from the condenser fins and coils with a<br />
vacuum or stiff brush.<br />
5. Remove dust from the inside of the rear screen.<br />
6. Remove dust from the outside of the bottom screen.<br />
7. Replace the housing. When reinstalling the<br />
refrigeration unit housing, it is important to seal the<br />
housing completely to prevent air leaks. Outside air<br />
leaking into the cabinet can cause condensation to<br />
form, which can lead to water overflowing the drain pan<br />
or ice build-up on the evaporator. Follow the<br />
procedure below to ensure proper sealing.<br />
a. Locate the notches on the back right corner of the<br />
housing (refer to Figure 8.2).<br />
b. Remove any duct putty from the notches. Do not<br />
discard the putty. It will be reinstalled in a later step.<br />
c. Set the housing in place, making sure the drain line<br />
and power cord pass through the lower notch. The<br />
insulated copper tubing should pass through the<br />
upper notch.<br />
d. Push the housing tightly against the back of the<br />
cabinet and visually check that the foam gasket is<br />
making contact on all sides.<br />
e. Continue to push on the housing while reinstalling<br />
the screws through the mounting tabs. Be careful –<br />
do not overtighten the screws.<br />
f. Remove the screen from the outside back of the<br />
cabinet.<br />
8-1