Sensit 2 - AMS
Sensit 2 - AMS
Sensit 2 - AMS

You also want an ePaper? Increase the reach of your titles
YUMPU automatically turns print PDFs into web optimized ePapers that Google loves.
<strong>AMS</strong> SENSIT II GLASS FRONT VENDOR<br />
L0071, Rev. M<br />
5.0 TRAY ADJUSTMENT AND CONFIGURATION<br />
The trays in <strong>AMS</strong> <strong>Sensit</strong> II vendors are highly<br />
configurable. Practically any combination of wide and<br />
narrow columns can be set up on a tray. Before changing<br />
the configuration of your trays, make sure to order the parts<br />
you will need, such as new helixes, dividers or additional<br />
motors.<br />
5.1 SNACK, CANDY, AND FOOD TRAY<br />
5.1.1 Removal<br />
1. To remove the tray, start with the tray pushed to its<br />
rearmost position. Lift the back of the tray up and<br />
pull the tray forward about ten inches. Reposition<br />
your hands to grasp the tray at its sides and slide the<br />
tray out. If the tray is spaced close to the tray<br />
above, it may be helpful to raise the front of the tray<br />
as you pull it free.<br />
3. When removing a tray, it is not necessary to<br />
disconnect the tray harness. The harness is long<br />
enough that it will allow a removed tray to be placed<br />
on the floor without having to be disconnected.<br />
5.1.2 Installation<br />
1. Before installing the tray, make sure the black plastic<br />
covers are on the tabs on each side at the back of<br />
the tray. To install the tray, slide the tray all the way<br />
to the rear. It will automatically drop into position.<br />
Make sure the harness slack is draped to the outside<br />
of the rail.<br />
5.2 BOTTLE TRAY<br />
5.2.2 Installation:<br />
CAUTION:<br />
An incorrectly installed tray can<br />
disengage from the rails and fall when<br />
extended! It is recommended that<br />
installation be performed by at least two<br />
people!<br />
1. Fully extend the slide rails in the cabinet and hold in<br />
position.<br />
2. Move the ball carriers out to the ends of the slide<br />
rails (refer to Figure 5.1) and hold in position.<br />
3. Route the tray harness over the rail in the cabinet<br />
and into the right column. Connect the tray harness<br />
to the appropriate receptacle.<br />
4. Align the rails on the sides of the tray with the<br />
extended slide rails and insert. Continue to hold the<br />
ball carriers and slide rails in place until the rails on<br />
the tray are firmly engaged in the ball carriers.<br />
5. Push the tray in completely to lock the rails together.<br />
6. Carefully extend the tray to check for proper<br />
installation. Support the tray to prevent falling if the<br />
rails are not properly engaged. Visually inspect the<br />
rails, and gently pull the front of the tray side to side<br />
to make sure the rails will not disengage.<br />
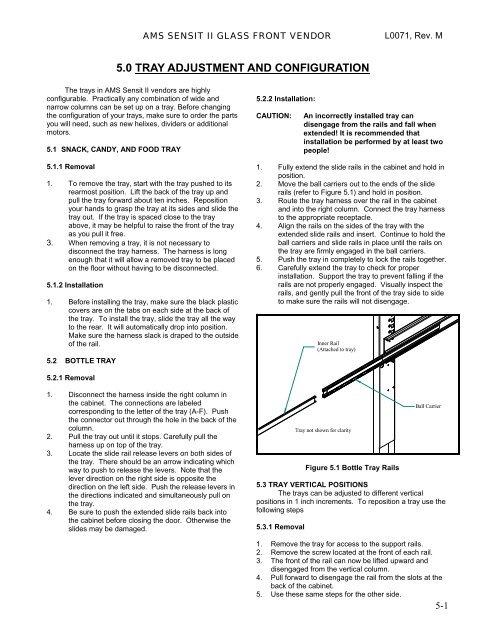
Inner Rail<br />
(Attached to tray)<br />
5.2.1 Removal<br />
1. Disconnect the harness inside the right column in<br />
the cabinet. The connections are labeled<br />
corresponding to the letter of the tray (A-F). Push<br />
the connector out through the hole in the back of the<br />
column.<br />
2. Pull the tray out until it stops. Carefully pull the<br />
harness up on top of the tray.<br />
3. Locate the slide rail release levers on both sides of<br />
the tray. There should be an arrow indicating which<br />
way to push to release the levers. Note that the<br />
lever direction on the right side is opposite the<br />
direction on the left side. Push the release levers in<br />
the directions indicated and simultaneously pull on<br />
the tray.<br />
4. Be sure to push the extended slide rails back into<br />
the cabinet before closing the door. Otherwise the<br />
slides may be damaged.<br />
Tray not shown for clarity<br />
Figure 5.1 Bottle Tray Rails<br />
Ball Carrier<br />
5.3 TRAY VERTICAL POSITIONS<br />
The trays can be adjusted to different vertical<br />
positions in 1 inch increments. To reposition a tray use the<br />
following steps<br />
5.3.1 Removal<br />
1. Remove the tray for access to the support rails.<br />
2. Remove the screw located at the front of each rail.<br />
3. The front of the rail can now be lifted upward and<br />
disengaged from the vertical column.<br />
4. Pull forward to disengage the rail from the slots at the<br />
back of the cabinet.<br />
5. Use these same steps for the other side.<br />
5-1