Sensit 2 - AMS
Sensit 2 - AMS
Sensit 2 - AMS
You also want an ePaper? Increase the reach of your titles
YUMPU automatically turns print PDFs into web optimized ePapers that Google loves.
<strong>AMS</strong> SENSIT II GLASS FRONT VENDOR<br />
L0071, Rev. M<br />
17. Plug in the vendor and allow to cool down before<br />
loading perishable products.<br />
8.9 TESTING THE TEMPERATURE SYSTEM<br />
(Health and Safety)<br />
1. Enter the service mode (refer to Section 6.0).<br />
2. Press # until the Temperature section appears, then<br />
press 2 to view the current set point. The temperature<br />
will be displayed in both Fahrenheit and Celsius.<br />
Setpoint of the vendor must be 41°F or lower for the H&S<br />
option to be enabled.<br />
3. At this point the sensor can either be temporarily<br />
disconnected, causing the controller to assume a<br />
temperature of 120°F/49C, or relocated outside the<br />
cabinet. Relocating the sensor outside will allow the<br />
sensor to be tested as well.<br />
software must be used. A vendor not designed for H&S<br />
may have H&S software installed but it will not meet H&S<br />
requirements.<br />
These instructions are for loading of <strong>Sensit</strong> II software<br />
into the vendor, configuring the vendor software as<br />
required, and/or downloading of selected history files.<br />
The configuration settings can be saved in a file for<br />
configuring the vendor again at a later time, or for uploading<br />
the same configurations to other vendors.<br />
8.10.1 Requirements<br />
The basic application requirements are:<br />
1. An IBM compatible PC (a lap-top or similar PC)<br />
operating on Windows 98 or higher.<br />
2. 32MB RAM (64 recommended).<br />
3. VGA monitor or better.<br />
4. CD-ROM drive.<br />
5. DB9 Serial port, or USB adapter.<br />
6. CD from <strong>AMS</strong> containing the most current version of<br />
P/N 3302, <strong>AMS</strong> <strong>Sensit</strong> II Utility and the most current<br />
vendor software for your application.<br />
7. P/N 20786, Harness, Chip Programming (See Figure<br />
6.1).<br />
8.10.2 Installation<br />
Install software onto the PC as follows:<br />
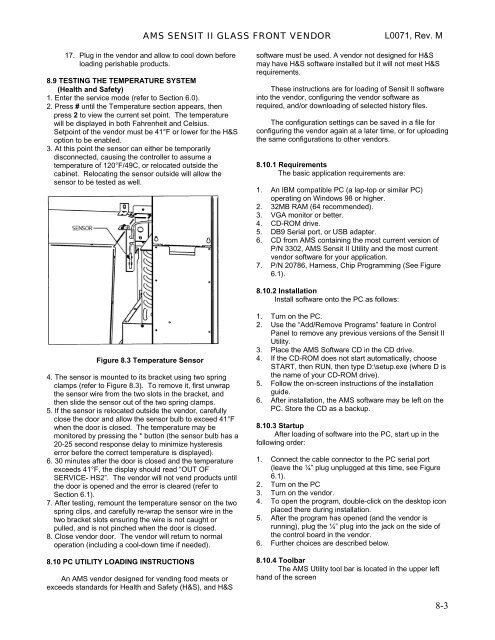
Figure 8.3 Temperature Sensor<br />
4. The sensor is mounted to its bracket using two spring<br />
clamps (refer to Figure 8.3). To remove it, first unwrap<br />
the sensor wire from the two slots in the bracket, and<br />
then slide the sensor out of the two spring clamps.<br />
5. If the sensor is relocated outside the vendor, carefully<br />
close the door and allow the sensor bulb to exceed 41°F<br />
when the door is closed. The temperature may be<br />
monitored by pressing the * button (the sensor bulb has a<br />
20-25 second response delay to minimize hysteresis<br />
error before the correct temperature is displayed).<br />
6. 30 minutes after the door is closed and the temperature<br />
exceeds 41°F, the display should read “OUT OF<br />
SERVICE- HS2”. The vendor will not vend products until<br />
the door is opened and the error is cleared (refer to<br />
Section 6.1).<br />
7. After testing, remount the temperature sensor on the two<br />
spring clips, and carefully re-wrap the sensor wire in the<br />
two bracket slots ensuring the wire is not caught or<br />
pulled, and is not pinched when the door is closed.<br />
8. Close vendor door. The vendor will return to normal<br />
operation (including a cool-down time if needed).<br />
8.10 PC UTILITY LOADING INSTRUCTIONS<br />
An <strong>AMS</strong> vendor designed for vending food meets or<br />
exceeds standards for Health and Safety (H&S), and H&S<br />
1. Turn on the PC.<br />
2. Use the “Add/Remove Programs” feature in Control<br />
Panel to remove any previous versions of the <strong>Sensit</strong> II<br />
Utility.<br />
3. Place the <strong>AMS</strong> Software CD in the CD drive.<br />
4. If the CD-ROM does not start automatically, choose<br />
START, then RUN, then type D:\setup.exe (where D is<br />
the name of your CD-ROM drive).<br />
5. Follow the on-screen instructions of the installation<br />
guide.<br />
6. After installation, the <strong>AMS</strong> software may be left on the<br />
PC. Store the CD as a backup.<br />
8.10.3 Startup<br />
After loading of software into the PC, start up in the<br />
following order:<br />
1. Connect the cable connector to the PC serial port<br />
(leave the ¼” plug unplugged at this time, see Figure<br />
6.1).<br />
2. Turn on the PC<br />
3. Turn on the vendor.<br />
4. To open the program, double-click on the desktop icon<br />
placed there during installation.<br />
5. After the program has opened (and the vendor is<br />
running), plug the ¼” plug into the jack on the side of<br />
the control board in the vendor.<br />
6. Further choices are described below.<br />
8.10.4 Toolbar<br />
The <strong>AMS</strong> Utility tool bar is located in the upper left<br />
hand of the screen<br />
8-3


