Sensit 2 - AMS
Sensit 2 - AMS
Sensit 2 - AMS

You also want an ePaper? Increase the reach of your titles
YUMPU automatically turns print PDFs into web optimized ePapers that Google loves.
<strong>AMS</strong> SENSIT II GLASS FRONT VENDOR<br />
L0071, Rev. M<br />
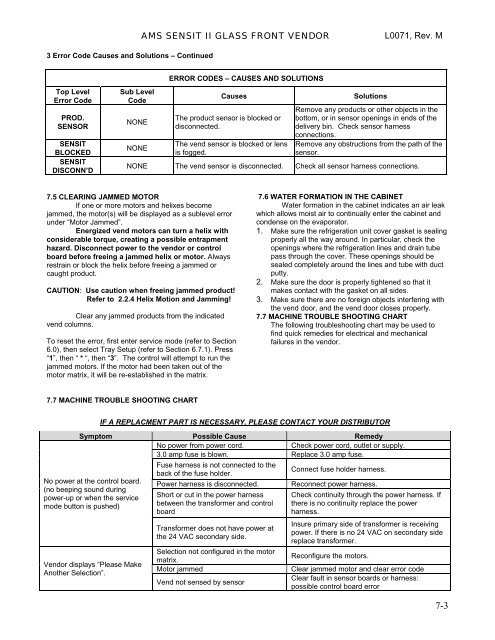
3 Error Code Causes and Solutions – Continued<br />
Top Level<br />
Error Code<br />
PROD.<br />
SENSOR<br />
SENSIT<br />
BLOCKED<br />
SENSIT<br />
DISCONN’D<br />
Sub Level<br />
Code<br />
NONE<br />
NONE<br />
ERROR CODES – CAUSES AND SOLUTIONS<br />
Causes<br />
The product sensor is blocked or<br />
disconnected.<br />
The vend sensor is blocked or lens<br />
is fogged.<br />
Solutions<br />
Remove any products or other objects in the<br />
bottom, or in sensor openings in ends of the<br />
delivery bin. Check sensor harness<br />
connections.<br />
Remove any obstructions from the path of the<br />
sensor.<br />
NONE The vend sensor is disconnected. Check all sensor harness connections.<br />
7.5 CLEARING JAMMED MOTOR<br />
If one or more motors and helixes become<br />
jammed, the motor(s) will be displayed as a sublevel error<br />
under “Motor Jammed”.<br />
Energized vend motors can turn a helix with<br />
considerable torque, creating a possible entrapment<br />
hazard. Disconnect power to the vendor or control<br />
board before freeing a jammed helix or motor. Always<br />
restrain or block the helix before freeing a jammed or<br />
caught product.<br />
CAUTION: Use caution when freeing jammed product!<br />
Refer to 2.2.4 Helix Motion and Jamming!<br />
Clear any jammed products from the indicated<br />
vend columns.<br />
To reset the error, first enter service mode (refer to Section<br />
6.0), then select Tray Setup (refer to Section 6.7.1). Press<br />
“1”, then “ * “, then “3”. The control will attempt to run the<br />
jammed motors. If the motor had been taken out of the<br />
motor matrix, it will be re-established in the matrix.<br />
7.6 WATER FORMATION IN THE CABINET<br />
Water formation in the cabinet indicates an air leak<br />
which allows moist air to continually enter the cabinet and<br />
condense on the evaporator.<br />
1. Make sure the refrigeration unit cover gasket is sealing<br />
properly all the way around. In particular, check the<br />
openings where the refrigeration lines and drain tube<br />
pass through the cover. These openings should be<br />
sealed completely around the lines and tube with duct<br />
putty.<br />
2. Make sure the door is properly tightened so that it<br />
makes contact with the gasket on all sides.<br />
3. Make sure there are no foreign objects interfering with<br />
the vend door, and the vend door closes properly.<br />
7.7 MACHINE TROUBLE SHOOTING CHART<br />
The following troubleshooting chart may be used to<br />
find quick remedies for electrical and mechanical<br />
failures in the vendor.<br />
7.7 MACHINE TROUBLE SHOOTING CHART<br />
IF A REPLACMENT PART IS NECESSARY, PLEASE CONTACT YOUR DISTRIBUTOR<br />
Symptom Possible Cause Remedy<br />
No power from power cord.<br />
Check power cord, outlet or supply.<br />
3.0 amp fuse is blown. Replace 3.0 amp fuse.<br />
No power at the control board.<br />
(no beeping sound during<br />
power-up or when the service<br />
mode button is pushed)<br />
Vendor displays “Please Make<br />
Another Selection”.<br />
Fuse harness is not connected to the<br />
back of the fuse holder.<br />
Power harness is disconnected.<br />
Short or cut in the power harness<br />
between the transformer and control<br />
board<br />
Transformer does not have power at<br />
the 24 VAC secondary side.<br />
Selection not configured in the motor<br />
matrix.<br />
Motor jammed<br />
Vend not sensed by sensor<br />
Connect fuse holder harness.<br />
Reconnect power harness.<br />
Check continuity through the power harness. If<br />
there is no continuity replace the power<br />
harness.<br />
Insure primary side of transformer is receiving<br />
power. If there is no 24 VAC on secondary side<br />
replace transformer.<br />
Reconfigure the motors.<br />
Clear jammed motor and clear error code<br />
Clear fault in sensor boards or harness:<br />
possible control board error<br />
7-3