Elektronika 2010-11.pdf - Instytut Systemów Elektronicznych ...
Elektronika 2010-11.pdf - Instytut Systemów Elektronicznych ...
Elektronika 2010-11.pdf - Instytut Systemów Elektronicznych ...

Create successful ePaper yourself
Turn your PDF publications into a flip-book with our unique Google optimized e-Paper software.
Fig. 2. Block scheme of the device for quality assessment<br />
of oocyte by spectrophotometric characterization<br />
Rys. 2. Schemat blokowy urządzenia do jakościowej oceny oocytów<br />
metodą spektrofotometryczną<br />
methodology will give an information about optical properties<br />
of the characterized material. Obtained data will be in form of<br />
numbers giving to an operator objective assessment of the<br />
development competence of the reproductive cell. On the stage<br />
of investigations, results of the analyze will be compared<br />
to a reference methodology of classification of the biological<br />
material based on the morphological criteria determined during<br />
observation under optical microscope.<br />
To realize presented above scenario a novel system utilizing<br />
spectrophotometric methodology and lab-on-a-chip must<br />
be built. Block scheme of the system is shown on Fig. 2.<br />
Heart of this system is the lab-on-a-chip enabling optical<br />
characterization of the single cell.<br />
Lab-on-a-chip<br />
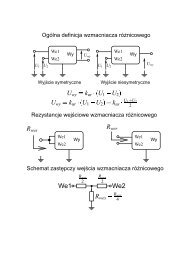
Lab-on-a-chip contains measurement cell, net of microchannels<br />
and passive valves for steering of fluid and oocyte/embryo<br />
flow, and inlet/outlet holes for biological material introduction/extraction<br />
and steering port (Fig. 3). The biological material is introduced<br />
into the measurement cell by inlet 1, than passes through<br />
set of passive Tesla valves (1 st check valves). Next, characterized<br />
oocyte flows into the measurement cell by sucking of the fluid<br />
by a pipette connected to the steering port of the chip. Topology<br />
of the measurement cell ensures mechanical immobilization<br />
of the cell between two optical fibers. After characterization the<br />
material is flashed back to the outlet 1 by passing through the<br />
second set of Tesla valves (2 nd check valve). Proposed configuration<br />
enables steering of the fluid flow and examined biological<br />
material transport with separation of the inlet and outlet.<br />
The microfluidic channels and channels for optical fibers (all<br />
140 mm depth) are etched simultaneously in DRIE (Deep Reaction<br />
Ion Etching) process in the 380 mm – thick monocrystalline<br />
silicon wafer (Fig. 4a). After etching, 0,3 mm – thick thermal<br />
silicon oxide is formed to passivate chemically surface of the<br />
chip. Next, the wafer is anodically bonded (450 0 C, 1,5 kV) to<br />
a borosilicate glass (Borofloat Schott, Germany) with previously<br />
mechanically drilled inlet and outlet via – holes. Following, optical<br />
fibers with outer diameter of 125 mm and 100 mm core<br />
(Ocean Optics, USA) are mounted. Fronts of the fibers are perfectly<br />
aligned each to other thanks to high precision of DRIE<br />
etching. Fibers are aligned to the edge of microfluidical channel,<br />
ensuring immobilization of the oocyte without its mechanical destruction<br />
(Fig. 4b). Fibers are fixed by use of UV epoxy hard glue<br />
(NOA 61, THORLABS, Sweden). Off-chip ends of both fibers<br />
are finished with standard SMA 905 connectors compatible with<br />
optical connections of the lamp and the spectrometer.<br />
The steering port inlet is finished with glued precise plastic<br />
connector (UpChurch, USA) enabling tight positioning of<br />
an end of the pipette. Assembled silicon-glass chip is placed<br />
on a PCB board and than in a metal package (Fig. 5). The<br />
metal package is small and shock resistant. It ensures stable<br />
positioning under microscope, safe transport and performing<br />
measurements outside laboratory, for example in a farm.<br />
Fig. 3. Layout of the lab-on-a-chip with integrated passive valves<br />
Rys. 3. Topologia lab-on-chipa ze zintegrowanymi zaworami pasywnymi<br />
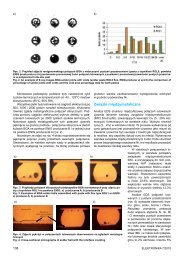
Fig. 5. Assembled in the metal package lab-on-a-chip for optical<br />
characterization of the oocyte<br />
Rys. 5. Lab-on-chip po montażu w metalowej obudowie<br />
a) b)<br />
Fig. 4. Lab-on-a-chip: a) view of the silicon chip after DRIE etching in comparison to a mosquito (left picture) and enlarged view of<br />
the central part of the chip with etched measurement cell and net of Tesla valves (right picture), b) view of the measurement cell with<br />
mounted optical fibers<br />
Rys. 4. Lab-on-chip: a) widok chipa krzemowego po trawieniu DRIE w porównaniu do komara (lewe zdjęcie) oraz powiększony obszar<br />
centralnej części chipa z wytrawioną komorą pomiarową oraz siecią zaworów typu Tesla (prawe zdjęcie), b) widok komory pomiarowej<br />
z zamontowanymi światłowodami<br />
<strong>Elektronika</strong> 11/<strong>2010</strong> 31