PDFlib 8 Windows COM/.NET Tutorial
PDFlib 8 Windows COM/.NET Tutorial
PDFlib 8 Windows COM/.NET Tutorial

You also want an ePaper? Increase the reach of your titles
YUMPU automatically turns print PDFs into web optimized ePapers that Google loves.
if (tbl == -1)<br />
throw new Exception("Error: " + p.get_errmsg());<br />
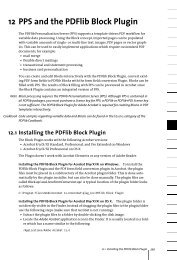
Fig. 8.36 Adding table cells with various contents step by step<br />
Generated table<br />
Our Paper Plane Models<br />
1 Giant Wing<br />
Material Offset print paper 220g/sqm<br />
Benefit It is amazingly robust and can<br />
even do aerobatics. But it is<br />
best suited to gliding.<br />
Amazingly robust!<br />
Generation steps<br />
Step 1: Add a cell spanning 3 columns<br />
Step 2: Add a cell spanning 2 columns<br />
Step 3: Add 3 more text line cells<br />
Step 4: Add the Textflow cell<br />
Step 5: Add the image cell with a text line<br />
Step 6: Fitting the table<br />
Step 3: Add three more Textline cells. The following code fragment adds the Material,<br />
Benefit and Offset print paper... cells. The Offset print paper... cell will start in the second<br />
column defining a column width of 120 points. The cell contents is positioned on the<br />
top left, with a margin of 4 points from all borders.<br />
optlist = "fittextline={position={left top} font=" + normalfont +<br />
" fontsize={capheight=6}} rowheight=14 colwidth=" + c1 + " margin=4";<br />
tbl = p.add_table_cell(tbl, 1, 3, "Material", optlist);<br />
if (tbl == -1)<br />
throw new Exception("Error: " + p.get_errmsg());<br />
tbl = p.add_table_cell(tbl, 1, 4, "Benefit", optlist);<br />
if (tbl == -1)<br />
throw new Exception("Error: " + p.get_errmsg());<br />
optlist = "fittextline={position={left top} font=" + normalfont +<br />
" fontsize={capheight=6}} rowheight=14 colwidth=" + c2 + " margin=4";<br />
tbl = p.add_table_cell(tbl, 2, 3, "Offset print paper 220g/sqm", optlist);<br />
if (tbl == -1)<br />
throw new Exception("Error: " + p.get_errmsg());<br />
Step 4: Add the Textflow cell. The following code fragment adds the It is amazingly...<br />
Textflow cell. To add a table cell containing a Textflow we first add the Textflow. We use<br />
fontsize={capheight=6} which will approximately result in a font size of 8 points and<br />
(along with margin=4), will sum up to an overall height of 14 points as for the text lines<br />
above.<br />
tftext = "It is amazingly robust and can even do aerobatics. " +<br />
"But it is best suited to gliding.";<br />
optlist = "font=" + normalfont + " fontsize={capheight=6} leading=110%";<br />
tf = p.add_textflow(-1, tftext, optlist);<br />
if (tf == -1)<br />
throw new Exception("Error: " + p.get_errmsg());<br />
The retrieved Textflow handle will be used when adding the table cell. The first line of<br />
the Textflow should be aligned with the baseline of the Benefit text line. At the same<br />
8.3 Table Formatting 235