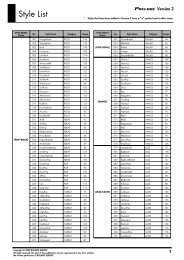

You also want an ePaper? Increase the reach of your titles
YUMPU automatically turns print PDFs into web optimized ePapers that Google loves.
Recorder functions<br />
SINGLE recording mode<br />
This mode is only available if the <strong>EM</strong>-<strong>55</strong> <strong>OR</strong>’s<br />
Song memory already contains data. When you<br />
press [● REC], the [REC<strong>OR</strong>D≈∏] icon and icon of<br />
the first empty track flash. This means you could<br />
record a new part straight away. (If all tracks<br />
already contain data, Track 1 will be selected.)<br />
You can, however, also substitute an already<br />
recorded part with a new version.<br />
(1) Press the [● REC] button.<br />
(2) Use the [T<strong>EM</strong>PO/DATA] dial to select<br />
“SINGLE”.<br />
(3) Use the SESSION PARTNER PADS/TRACKS<br />
buttons [1/9]~[8/16] to select the track<br />
you wish to record to:<br />
Punch I/O<br />
In this mode, you can re-record part of a track<br />
(the second chorus, for example). The important<br />
aspect of this mode is that newly recorded<br />
material does not erase the material before or<br />
after the passage you redo:<br />
Original track<br />
This passage is redone<br />
● REC<br />
● REC<br />
As you will notice, there are “only” 8 track<br />
buttons in the SESSION PARTNER section.<br />
Use the [TRACK] button to the right to<br />
select either track group 1~8 (upper row) or<br />
9~16 (lower row).<br />
You can only select one track (hence the<br />
name “SINGLE”) at a time. If you select a<br />
track that already contains data, your new<br />
version will overwrite the existing one.<br />
(4) If necessary, assign the desired Tone to<br />
the part you are about to record (see<br />
p. 15).<br />
If you select track [10], you can select Drum<br />
Sets rather than Tones. Track 10 is reserved<br />
for drum parts.<br />
(5) Press [START/STOP] to start recording.<br />
After a two-measure count-in (see p. 48),<br />
you will hear all parts that have already<br />
been recorded. Start playing (and recording)<br />
your new part.<br />
(6) Press [START/STOP] to stop recording.<br />
(7) Return to step (3) to record additional<br />
parts.<br />
(1) Press the [● REC] button.<br />
(2) Use the [T<strong>EM</strong>PO/DATA] dial to select<br />
“PUNCH I/O”.<br />
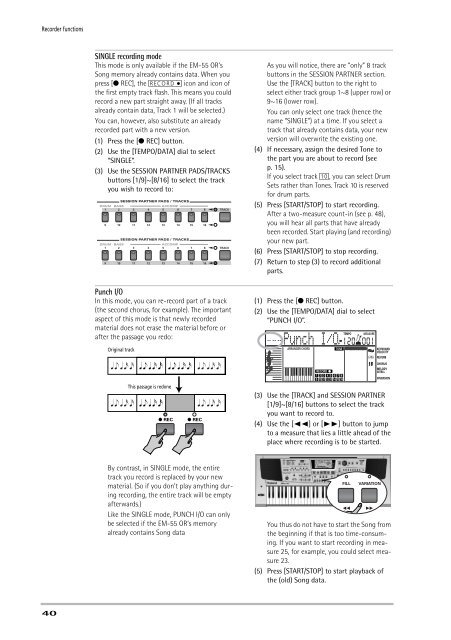
Punch I/O<br />
ARRANGER CH<strong>OR</strong>D<br />
T<strong>EM</strong>PO<br />
MEASURE<br />
120 001<br />
KEYBOARD<br />
VELOCITY<br />
REVERB<br />
CH<strong>OR</strong>US<br />
MELODY<br />
INTELL<br />
INVERSION<br />
(3) Use the [TRACK] and SESSION PARTNER<br />
[1/9]~[8/16] buttons to select the track<br />
you want to record to.<br />
(4) Use the [√√] or [®®] button to jump<br />
to a measure that lies a little ahead of the<br />
place where recording is to be started.<br />
TONE<br />
REC<strong>OR</strong>D<br />
1 2 3 4 5 6 7 8<br />
9 10 11 12 13 14 15 16<br />
By contrast, in SINGLE mode, the entire<br />
track you record is replaced by your new<br />
material. (So if you don’t play anything during<br />
recording, the entire track will be empty<br />
afterwards.)<br />
Like the SINGLE mode, PUNCH I/O can only<br />
be selected if the <strong>EM</strong>-<strong>55</strong> <strong>OR</strong>’s memory<br />
already contains Song data<br />
You thus do not have to start the Song from<br />
the beginning if that is too time-consuming.<br />
If you want to start recording in measure<br />
25, for example, you could select measure<br />
23.<br />
(5) Press [START/STOP] to start playback of<br />
the (old) Song data.<br />
40