Mercury Software User Manual - MicroDAQ.com
Mercury Software User Manual - MicroDAQ.com
Mercury Software User Manual - MicroDAQ.com

You also want an ePaper? Increase the reach of your titles
YUMPU automatically turns print PDFs into web optimized ePapers that Google loves.
<strong>User</strong> <strong>Manual</strong><br />
<strong>Mercury</strong> Graphic Supporting <strong>Software</strong><br />
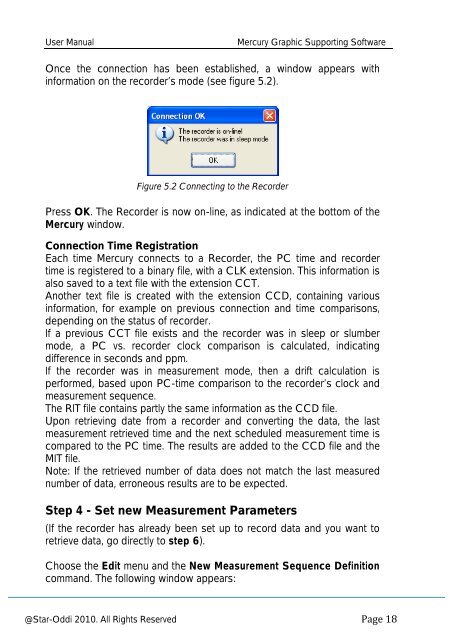
Once the connection has been established, a window appears with<br />
information on the recorder’s mode (see figure 5.2).<br />
Figure 5.2 Connecting to the Recorder<br />
Press OK. The Recorder is now on-line, as indicated at the bottom of the<br />
<strong>Mercury</strong> window.<br />
Connection Time Registration<br />
Each time <strong>Mercury</strong> connects to a Recorder, the PC time and recorder<br />
time is registered to a binary file, with a CLK extension. This information is<br />
also saved to a text file with the extension CCT.<br />
Another text file is created with the extension CCD, containing various<br />
information, for example on previous connection and time <strong>com</strong>parisons,<br />
depending on the status of recorder.<br />
If a previous CCT file exists and the recorder was in sleep or slumber<br />
mode, a PC vs. recorder clock <strong>com</strong>parison is calculated, indicating<br />
difference in seconds and ppm.<br />
If the recorder was in measurement mode, then a drift calculation is<br />
performed, based upon PC-time <strong>com</strong>parison to the recorder’s clock and<br />
measurement sequence.<br />
The RIT file contains partly the same information as the CCD file.<br />
Upon retrieving date from a recorder and converting the data, the last<br />
measurement retrieved time and the next scheduled measurement time is<br />
<strong>com</strong>pared to the PC time. The results are added to the CCD file and the<br />
MIT file.<br />
Note: If the retrieved number of data does not match the last measured<br />
number of data, erroneous results are to be expected.<br />
Step 4 - Set new Measurement Parameters<br />
(If the recorder has already been set up to record data and you want to<br />
retrieve data, go directly to step 6).<br />
Choose the Edit menu and the New Measurement Sequence Definition<br />
<strong>com</strong>mand. The following window appears:<br />
@Star-Oddi 2010. All Rights Reserved