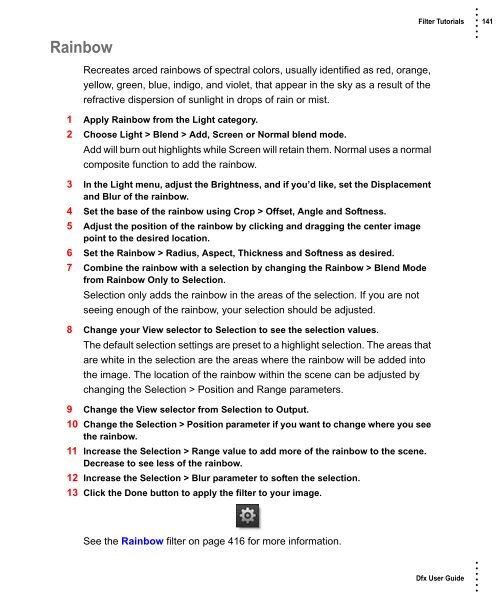
- Page 1 and 2:
Dfx User Guide
- Page 3 and 4:
ABOUT US About Us 3 • Tiffen has
- Page 5 and 6:
Books Click on a closed book to exp
- Page 7 and 8:
Apple Aperture 1 Install Dfx using
- Page 9 and 10:
To deactivate Dfx: 1 Select License
- Page 11 and 12:
Points, Pro-Mist®, Rack Focus, Rad
- Page 13 and 14:
HFX Diffusion 1 Black Diffusion/FX
- Page 15 and 16:
Lens 1 Blur 2 Chromatic Aberration
- Page 17 and 18:
GENERAL TUTORIALS General Tutorials
- Page 19 and 20:
3 Click on one of the categories in
- Page 21 and 22:
General Tutorials 21 • 5 Click on
- Page 23 and 24:
General Tutorials 23 • 6 Click th
- Page 25 and 26:
Viewing and Comparing Layers In add
- Page 27 and 28:
You can now compare the before and
- Page 29 and 30:
View One Layer while Editing Anothe
- Page 31 and 32:
3 Click on a parameter name in the
- Page 33 and 34:
Select a filter and preset that cha
- Page 35 and 36:
Applying a Selection Mask to a Laye
- Page 37 and 38:
Position 100, Range 25 Original Pos
- Page 39 and 40:
Applying a Path Mask to a Layer A P
- Page 41 and 42:
Applying a Snap Mask to a Layer The
- Page 43 and 44:
General Tutorials 43 • 6 Alternat
- Page 45 and 46:
General Tutorials 45 • 9 Click th
- Page 47 and 48:
Applying a EZ Mask to a Layer EZ Ma
- Page 49 and 50:
The strokes should be near the boun
- Page 51 and 52:
General Tutorials 51 • 9 If you s
- Page 53 and 54:
When drawing a filled trimap, the b
- Page 55 and 56:
The area inside of the blue, unknow
- Page 57 and 58:
General Tutorials 57 • 13 If ther
- Page 59 and 60:
General Tutorials 59 • 5 Resize t
- Page 61 and 62:
To change how the active mask is co
- Page 63 and 64:
General Tutorials 63 • 2 Click an
- Page 65 and 66:
FILTER TUTORIALS Filter Tutorials 6
- Page 67 and 68:
Black Diffusion/FX® / Gold Diffusi
- Page 69 and 70:
Bleach Bypass Bleach Bypass is a fi
- Page 71 and 72:
Center Spot Center Spot diffuses an
- Page 73 and 74:
Close-Up Lens Simulates close-up le
- Page 75 and 76:
Color-Grad® Color-Grad® can trans
- Page 77 and 78:
Color Spot Tints the image using pr
- Page 79 and 80:
Day for Night Day for Night simulat
- Page 81 and 82:
Defringe Purple or blue fringing ar
- Page 83 and 84:
Go to the Grad section of Common Fi
- Page 85 and 86:
11 You can also use the Texture > D
- Page 87 and 88:
In some of the filters, a selection
- Page 89 and 90: Edge Glow Edge Glow isolates lines
- Page 91 and 92: Eye Light Creates a targeted light
- Page 93 and 94: 11 Change your View to Output to se
- Page 95 and 96: 12 Change your View to Output to se
- Page 97 and 98: Flag / Dot Flags and Dots are recta
- Page 99 and 100: Gels Photographers, cinematographer
- Page 101 and 102: In the case of a person’s face, a
- Page 103 and 104: Gold / Silver Reflector Gold and Si
- Page 105 and 106: Filter Tutorials 105 • 8 Adjust t
- Page 107 and 108: Haze / Sky Haze Reduces excessive b
- Page 109 and 110: In the case of a person’s face, a
- Page 111 and 112: The Selection > Range parameter has
- Page 113 and 114: Ice Halos Ice halos are created whe
- Page 115 and 116: Infrared Infrared simulates infrare
- Page 117 and 118: Kelvin Degrees Kelvin is the standa
- Page 119 and 120: Lens Distortion Lens Distortion cor
- Page 121 and 122: The default selection settings are
- Page 123 and 124: 12 Click the Done button to apply t
- Page 125 and 126: ND-Grad The ND or Neutral Density G
- Page 127 and 128: 10 Increase the Selection > Range c
- Page 129 and 130: Old Photo Images are treated to loo
- Page 131 and 132: Ozone The Ozone filter allows you t
- Page 133 and 134: Pencil Pencil converts your image t
- Page 135 and 136: Polarizer The Polarizer creates a d
- Page 137 and 138: Pro-Mist® This popular motion pict
- Page 139: 12 Click the Done button to apply t
- Page 143 and 144: 10 Change the View selector from Se
- Page 145 and 146: Selective Saturation The saturation
- Page 147 and 148: Smoque® Mechanical smoke generator
- Page 149 and 150: Soft/FX® / Warm Soft/FX® Softens
- Page 151 and 152: Split Field Split Field splits the
- Page 153 and 154: Star Six point star patterns are ge
- Page 155 and 156: Strip Grad Strip Grad colors only a
- Page 157 and 158: Three Strip / Two Strip Three Strip
- Page 159 and 160: Tint Tints the entire image with a
- Page 161 and 162: Vari-Star Variable multi-point star
- Page 163 and 164: Vignette A vignette, or soft fade,
- Page 165 and 166: 14 Increase the Selection > Blur pa
- Page 167 and 168: X-Ray Simulates the look of X-Ray i
- Page 169 and 170: Viewer The Viewer is where images a
- Page 171 and 172: Parameters When the Parameters tab
- Page 173 and 174: Effect The Effect window shows all
- Page 175 and 176: Toolbar The Toolbar contains variou
- Page 177 and 178: Sashes By clicking and dragging the
- Page 179 and 180: Combo Box Adjustment Combo boxes al
- Page 181 and 182: Edit Preview Size Dfx works at a ma
- Page 183 and 184: Default Layout The interface is con
- Page 185 and 186: VIEWER Viewer 185 • The Viewer is
- Page 187 and 188: The View/Compare icon in the Effect
- Page 189 and 190: Horizontal Split Comparison Compare
- Page 191 and 192:
Magnifier When the Magnifier is sel
- Page 193 and 194:
Viewer Keyboard Shortcuts Viewer 19
- Page 195 and 196:
Wrap Filters Certain filter categor
- Page 197 and 198:
Presets for most filters have been
- Page 199 and 200:
Preset Pop-up Menu Right-click over
- Page 201 and 202:
Reset to Defaults Resets all of the
- Page 203 and 204:
Ranges, Toggles, and Color paramete
- Page 205 and 206:
EFFECT Effect 205 • The Effect wi
- Page 207 and 208:
Clicking on the image thumbnail in
- Page 209 and 210:
Drag and Drop Layers The ordering o
- Page 211 and 212:
Drag and Drop Masks Masks can be co
- Page 213 and 214:
Adjusting Toolbar Controls When cer
- Page 215 and 216:
Add Mask Using the Add Mask icon in
- Page 217 and 218:
Outer Blur The path is blurred outw
- Page 219 and 220:
On-Screen Controls Corner Points Th
- Page 221 and 222:
On-Screen Controls Radius The un-bl
- Page 223 and 224:
Create a Path Create a path by clic
- Page 225 and 226:
Point Editing Pop-up Menu Right-cli
- Page 227 and 228:
Workflow Using a coarse to fine edi
- Page 229 and 230:
Mark Foreground Click the Mark Fore
- Page 231 and 232:
Add additional FG and BG lines as n
- Page 233 and 234:
Once a stroke has been drawn, Snap
- Page 235 and 236:
EZ Mask EZ Mask is an easy to use i
- Page 237 and 238:
• The strokes should be near the
- Page 239 and 240:
Brushes Paint Foreground Click the
- Page 241 and 242:
To set the paint overlay opacity: 1
- Page 243 and 244:
Selection Mask Selection masks can
- Page 245 and 246:
Cyan A selection is created based o
- Page 247 and 248:
Black Clip Blacks in the selection
- Page 249 and 250:
To set the brush size: 1 Click on t
- Page 251 and 252:
COMMON FILTER CONTROLS Common Filte
- Page 253 and 254:
Scale Scale X The horizontal scale.
- Page 255 and 256:
Position Selects the values to be i
- Page 257 and 258:
Falloff Radius The blurred edge rad
- Page 259 and 260:
Color Sets the color of the light t
- Page 261 and 262:
Contrast Adjusts the contrast of th
- Page 263 and 264:
Controls Black Diffusion/FX®, Gold
- Page 265 and 266:
Contrast Adjusts the contrast of th
- Page 267 and 268:
Gaussian A slower, higher quality g
- Page 269 and 270:
Center Spot / Warm Center Spot 269
- Page 271 and 272:
CHROMATIC ABERRATION Chromatic Aber
- Page 273 and 274:
CLOSE-UP LENS Close-Up Lens 273 •
- Page 275 and 276:
COLOR CORRECTORS Color Correctors 2
- Page 277 and 278:
adjustments will affect only those
- Page 279 and 280:
Green Exposure Adds or subtracts gr
- Page 281 and 282:
Brightness Adjusts the brightness o
- Page 283 and 284:
Color The Color parameter sets the
- Page 285 and 286:
Hue Adjusts the hue in any non-blue
- Page 287 and 288:
Color The Color parameter sets the
- Page 289 and 290:
Mode Print to Slide Simulates the e
- Page 291 and 292:
Moonlight Color The Color parameter
- Page 293 and 294:
a greater amount of fog being remov
- Page 295 and 296:
Range Increases or decreases the ra
- Page 297 and 298:
Grad Use a gradient for the depth s
- Page 299 and 300:
Brightness Sets the intensity of th
- Page 301 and 302:
DOUBLE FOG Double Fog 301 • Descr
- Page 303 and 304:
Add The glow is added to your image
- Page 305 and 306:
Color The Color parameter sets the
- Page 307 and 308:
Screen The edge glow is combined wi
- Page 309 and 310:
Selection Presets A selection is cr
- Page 311 and 312:
Blur Sets the softness of the light
- Page 313 and 314:
Screen The mist is combined with th
- Page 315 and 316:
Color The Color parameter sets the
- Page 317 and 318:
FLAG / DOT Flag / Dot 317 • Descr
- Page 319 and 320:
FOG Fog 319 • Description The Fog
- Page 321 and 322:
GELS Gels 321 • Description Photo
- Page 323 and 324:
GamColor CineFilters CineFilters ch
- Page 325 and 326:
Grad Gels can optionally use a grad
- Page 327 and 328:
Glimmerglass®, Bronze Glimmerglass
- Page 329 and 330:
Screen The glow is combined with th
- Page 331 and 332:
Color The Color parameter sets the
- Page 333 and 334:
Size The Size parameters control th
- Page 335 and 336:
HALO Halo 335 • Description Halo
- Page 337 and 338:
Sky Reduces UV light, haze and is p
- Page 339 and 340:
HDTV/FX® HDTV/FX® 339 • Descrip
- Page 341 and 342:
HFX® STAR HFX® Star 341 • Descr
- Page 343 and 344:
North Star HFX® Star 343 • Vecto
- Page 345 and 346:
HIGH CONTRAST High Contrast 345 •
- Page 347 and 348:
Brightness Sets the intensity of th
- Page 349 and 350:
INFRARED Infrared 349 • Descripti
- Page 351 and 352:
KELVIN Kelvin 351 • Description D
- Page 353 and 354:
LENS DISTORTION Lens Distortion 353
- Page 355 and 356:
LIGHT / GOBO Light / Gobo 355 • D
- Page 357 and 358:
Rosco Gobos The Rosco range present
- Page 359 and 360:
Displacement Displaces the gobo by
- Page 361 and 362:
Gobos Category The gobos are organi
- Page 363 and 364:
Blur Sets the softness of the gobo.
- Page 365 and 366:
Category Special Effects. Looks: Bl
- Page 367 and 368:
Modules fields. Each of these field
- Page 369 and 370:
Post Color Correct Post Color Corre
- Page 371 and 372:
HiCon 1 A high contrast black and w
- Page 373 and 374:
Basic A simple film look that doesn
- Page 375 and 376:
Faux Film Faux Film attempts to giv
- Page 377 and 378:
LOW CONTRAST Low Contrast 377 • D
- Page 379 and 380:
MONO TINT Mono Tint 379 • Descrip
- Page 381 and 382:
ND-GRAD ND-Grad 381 • Description
- Page 383 and 384:
NIGHT VISION Night Vision 383 • D
- Page 385 and 386:
Additional Controls Grain Grain Siz
- Page 387 and 388:
Color The Color parameter sets the
- Page 389 and 390:
Kallitype A silver-iron method for
- Page 391 and 392:
HSV The HSV (Hue, Saturation, Value
- Page 393 and 394:
OZONE Ozone 393 • Description The
- Page 395 and 396:
Hue Zones are created using the ima
- Page 397 and 398:
Gamma Adjusts the gamma of the zone
- Page 399 and 400:
PENCIL Pencil 399 • Description P
- Page 401 and 402:
Light Balancing Light Balancing fil
- Page 403 and 404:
POLARIZER / WARM POLARIZER Polarize
- Page 405 and 406:
Contrast Adjusts the contrast of th
- Page 407 and 408:
PRO-MIST® Pro-Mist® 407 • Descr
- Page 409 and 410:
Warm Black Pro-Mist® Same as Black
- Page 411 and 412:
RACK FOCUS Rack Focus 411 • Descr
- Page 413 and 414:
Selection A selection is used to cr
- Page 415 and 416:
Spot A radial gradient is used to l
- Page 417 and 418:
Normal The rainbow is added to the
- Page 419 and 420:
RELIGHT ReLight 419 • Description
- Page 421 and 422:
Light Source Blend The light source
- Page 423 and 424:
Saturation Adjusts the saturation o
- Page 425 and 426:
Average A selection is created base
- Page 427 and 428:
Range Increases or decreases the ra
- Page 429 and 430:
Blur Blurs the selection. No Blur B
- Page 431 and 432:
Midtones Saturation Adjusts the sat
- Page 433 and 434:
Controls Color Amount Determines th
- Page 435 and 436:
Screen The smoke is combined with t
- Page 437 and 438:
Range Controls the range of values
- Page 439 and 440:
Category HFX Diffusion. Blur Sets t
- Page 441 and 442:
Brightness Sets the intensity of th
- Page 443 and 444:
Position There is an on-screen cont
- Page 445 and 446:
Range Controls the range of values
- Page 447 and 448:
STAR Star 447 • Description Six p
- Page 449 and 450:
STREAKS Streaks 449 • Description
- Page 451 and 452:
STRIP GRAD Strip Grad 451 • Descr
- Page 453 and 454:
SUNSET/TWILIGHT Sunset/Twilight 453
- Page 455 and 456:
THREE STRIP / TWO STRIP Three Strip
- Page 457 and 458:
Red Smooth Blurs the red selection
- Page 459 and 460:
Tint Mode Sets the color model that
- Page 461 and 462:
Position Selects the shadow values
- Page 463 and 464:
Blend Determines the blend mode to
- Page 465 and 466:
VIGNETTE Vignette 465 • Descripti
- Page 467 and 468:
WATER DROPLETS Water Droplets 467
- Page 469 and 470:
Type Corona A corona has a bright c
- Page 471 and 472:
Selection A selection can be used t
- Page 473 and 474:
X-RAY X-Ray 473 • Description Sim
- Page 475 and 476:
BLEND MODES Blend Modes 475 • Ble
- Page 477 and 478:
Lighten Compares two images and tak
- Page 479 and 480:
Path Mask Point Editing Shortcuts K


