

KRONOS/KRONOS X Operation Guide - Korg
KRONOS/KRONOS X Operation Guide - Korg
KRONOS/KRONOS X Operation Guide - Korg

Create successful ePaper yourself
Turn your PDF publications into a flip-book with our unique Google optimized e-Paper software.
Front and rear panels<br />
Front panel<br />
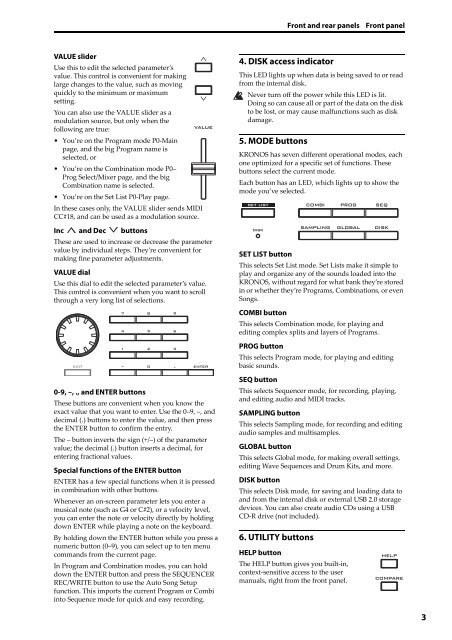
VALUE slider<br />
Use this to edit the selected parameter’s<br />
value. This control is convenient for making<br />
large changes to the value, such as moving<br />
quickly to the minimum or maximum<br />
setting.<br />
You can also use the VALUE slider as a<br />
modulation source, but only when the<br />
following are true:<br />
• You’re on the Program mode P0‐Main<br />
page, and the big Program name is<br />
selected, or<br />
• You’re on the Combination mode P0–<br />
Prog Select/Mixer page, and the big<br />
Combination name is selected.<br />
• You’re on the Set List P0‐Play page.<br />
In these cases only, the VALUE slider sends MIDI<br />
CC#18, and can be used as a modulation source.<br />
Inc and Dec buttons<br />
These are used to increase or decrease the parameter<br />
value by individual steps. They’re convenient for<br />
making fine parameter adjustments.<br />
VALUE dial<br />
Use this dial to edit the selected parameter’s value.<br />
This control is convenient when you want to scroll<br />
through a very long list of selections.<br />
0-9, –, ., and ENTER buttons<br />
These buttons are convenient when you know the<br />
exact value that you want to enter. Use the 0–9, –, and<br />
decimal (.) buttons to enter the value, and then press<br />
the ENTER button to confirm the entry.<br />
The – button inverts the sign (+/–) of the parameter<br />
value; the decimal (.) button inserts a decimal, for<br />
entering fractional values.<br />
Special functions of the ENTER button<br />
ENTER has a few special functions when it is pressed<br />
in combination with other buttons.<br />
Whenever an on‐screen parameter lets you enter a<br />
musical note (such as G4 or C#2), or a velocity level,<br />
you can enter the note or velocity directly by holding<br />
down ENTER while playing a note on the keyboard.<br />
By holding down the ENTER button while you press a<br />
numeric button (0–9), you can select up to ten menu<br />
commands from the current page.<br />
In Program and Combination modes, you can hold<br />
down the ENTER button and press the SEQUENCER<br />
REC/WRITE button to use the Auto Song Setup<br />
function. This imports the current Program or Combi<br />
into Sequence mode for quick and easy recording.<br />
4. DISK access indicator<br />
This LED lights up when data is being saved to or read<br />
from the internal disk.<br />
Never turn off the power while this LED is lit.<br />
Doing so can cause all or part of the data on the disk<br />
to be lost, or may cause malfunctions such as disk<br />
damage.<br />
5. MODE buttons<br />
<strong>KRONOS</strong> has seven different operational modes, each<br />
one optimized for a specific set of functions. These<br />
buttons select the current mode.<br />
Each button has an LED, which lights up to show the<br />
mode you’ve selected.<br />
SET LIST button<br />
This selects Set List mode. Set Lists make it simple to<br />
play and organize any of the sounds loaded into the<br />
<strong>KRONOS</strong>, without regard for what bank they’re stored<br />
in or whether they’re Programs, Combinations, or even<br />
Songs.<br />
COMBI button<br />
This selects Combination mode, for playing and<br />
editing complex splits and layers of Programs.<br />
PROG button<br />
This selects Program mode, for playing and editing<br />
basic sounds.<br />
SEQ button<br />
This selects Sequencer mode, for recording, playing,<br />
and editing audio and MIDI tracks.<br />
SAMPLING button<br />
This selects Sampling mode, for recording and editing<br />
audio samples and multisamples.<br />
GLOBAL button<br />
This selects Global mode, for making overall settings,<br />
editing Wave Sequences and Drum Kits, and more.<br />
DISK button<br />
This selects Disk mode, for saving and loading data to<br />
and from the internal disk or external USB 2.0 storage<br />
devices. You can also create audio CDs using a USB<br />
CD‐R drive (not included).<br />
6. UTILITY buttons<br />
HELP button<br />
The HELP button gives you built‐in,<br />
context‐sensitive access to the user<br />
manuals, right from the front panel.<br />
3


