XTreme EFIS - STRATOMASTER Instrumentation MGL Avionics
XTreme EFIS - STRATOMASTER Instrumentation MGL Avionics
XTreme EFIS - STRATOMASTER Instrumentation MGL Avionics
Create successful ePaper yourself
Turn your PDF publications into a flip-book with our unique Google optimized e-Paper software.
<strong>XTreme</strong>-<strong>EFIS</strong> Operating Manual Page 74<br />
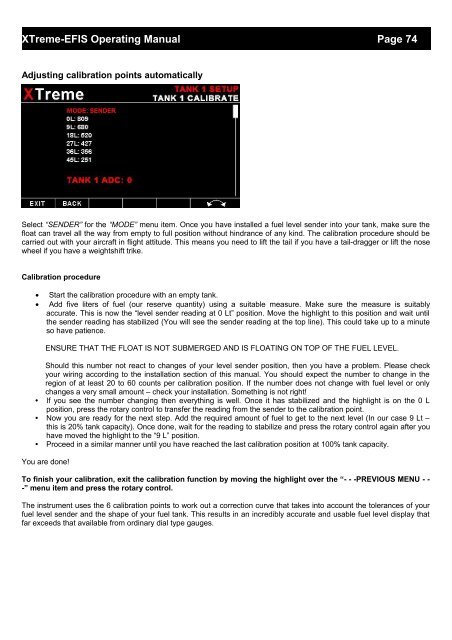
Adjusting calibration points automatically<br />
Select “SENDER” for the “MODE” menu item. Once you have installed a fuel level sender into your tank, make sure the<br />
float can travel all the way from empty to full position without hindrance of any kind. The calibration procedure should be<br />
carried out with your aircraft in flight attitude. This means you need to lift the tail if you have a tail-dragger or lift the nose<br />
wheel if you have a weightshift trike.<br />
Calibration procedure<br />
• Start the calibration procedure with an empty tank.<br />
• Add five liters of fuel (our reserve quantity) using a suitable measure. Make sure the measure is suitably<br />
accurate. This is now the “level sender reading at 0 Lt” position. Move the highlight to this position and wait until<br />
the sender reading has stabilized (You will see the sender reading at the top line). This could take up to a minute<br />
so have patience.<br />
ENSURE THAT THE FLOAT IS NOT SUBMERGED AND IS FLOATING ON TOP OF THE FUEL LEVEL.<br />
Should this number not react to changes of your level sender position, then you have a problem. Please check<br />
your wiring according to the installation section of this manual. You should expect the number to change in the<br />
region of at least 20 to 60 counts per calibration position. If the number does not change with fuel level or only<br />
changes a very small amount – check your installation. Something is not right!<br />
• If you see the number changing then everything is well. Once it has stabilized and the highlight is on the 0 L<br />
position, press the rotary control to transfer the reading from the sender to the calibration point.<br />
• Now you are ready for the next step. Add the required amount of fuel to get to the next level (In our case 9 Lt –<br />
this is 20% tank capacity). Once done, wait for the reading to stabilize and press the rotary control again after you<br />
have moved the highlight to the “9 L” position.<br />
• Proceed in a similar manner until you have reached the last calibration position at 100% tank capacity.<br />
You are done!<br />
To finish your calibration, exit the calibration function by moving the highlight over the “- - -PREVIOUS MENU - -<br />
-” menu item and press the rotary control.<br />
The instrument uses the 6 calibration points to work out a correction curve that takes into account the tolerances of your<br />
fuel level sender and the shape of your fuel tank. This results in an incredibly accurate and usable fuel level display that<br />
far exceeds that available from ordinary dial type gauges.


