
Create successful ePaper yourself
Turn your PDF publications into a flip-book with our unique Google optimized e-Paper software.
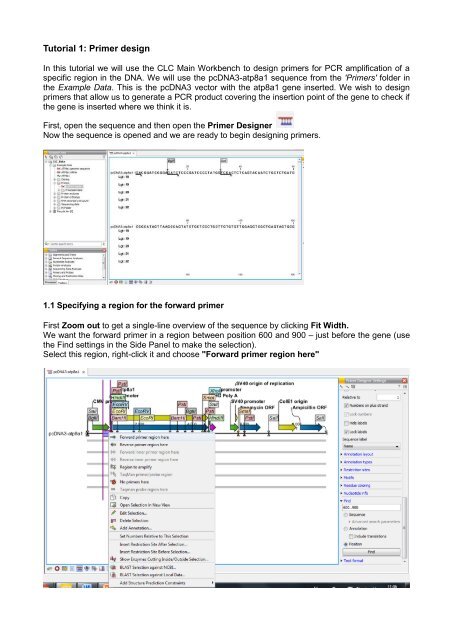
Tutorial 1: Primer design<br />
<strong>In</strong> this tutorial we will use the CLC Main Work<strong>be</strong>nch to design primers for PCR amplification of a<br />
specific region in the DNA. We will use the pcDNA3-atp8a1 sequence from the 'Primers' folder in<br />
the Example Data. This is the pcDNA3 vector with the atp8a1 gene inserted. We wish to design<br />
primers that allow us to generate a PCR product covering the insertion point of the gene to check if<br />
the gene is inserted where we think it is.<br />
First, open the sequence and then open the Primer Designer<br />
Now the sequence is opened and we are ready to <strong>be</strong>gin designing primers.<br />
1.1 Specifying a region for the forward primer<br />
First Zoom out to get a single-line overview of the sequence by clicking Fit Width.<br />
We want the forward primer in a region <strong>be</strong>tween position 600 and 900 – just <strong>be</strong>fore the gene (use<br />
the Find settings in the Side Panel to make the selection).<br />
Select this region, right-click it and choose "Forward primer region here"
This will add an annotation to this region, Forward primer region, (unselect Show in the Restriction<br />
sites settings in the Side Panel to get a more clear view of the annotations) and 5 rows of red and<br />
green dots (you have to zoom in to see the dots: use the 100% button) representing the primer<br />
suggestions. There is a line for each primer length - 18bp through to 22 bp, hence five lines.<br />
1.2 Examining the primer suggestions<br />
Each line consists of a num<strong>be</strong>r of dots, each representing the starting point of a possible primer,<br />
e.g. the first dot on the first line represents a primer starting at the dot's position and with a length<br />
of 18 nucleotides. The primer will anneal to the selected region in the DNA.<br />
Position the mouse cursor over a dot. A box will appear, providing data about this primer.
Clicking the dot will select the region where that primer would anneal. Note that some of the dots<br />
are colored red. This indicates that the primer represented by this dot does not meet the<br />
requirements set in the Primer parameters that you can see in the Side panel on the right:<br />
The default maximum melting temperature is 58. This is the reason why the primer in the figure<br />
<strong>be</strong>low with a melting temperature of 58.55 does not meet the requirements and is colored red.<br />
There is an asterisk (*) <strong>be</strong>fore the melting temperature. This indicates that this primer does not<br />
meet the requirements regarding melting temperature. <strong>In</strong> this way, you can easily see why a<br />
specific primer fails to meet the requirements.
If you raise the maximum melting temperature to 59, the primer will meet the requirements and the<br />
dot <strong>be</strong>comes green.<br />
Below you see that both melting temperature and GC content do not meet the requirements.
By adjusting the Primer parameters in the Side Panel you can define primers to meet your needs.<br />
Since the dots are dynamically updated, you can immediately see how a change in the primer<br />
parameters affects the num<strong>be</strong>r of red and green dots.<br />
Remem<strong>be</strong>r: each dot represents the starting point of a primer: you must look for individual green<br />
dots: they represent primers that meet the requirements. You do not need to look for 18<br />
consecutive green dots: one dot represents a whole primer.<br />
1.3 Calculating a primer pair<br />
Until now, we have <strong>be</strong>en looking only at the forward primer. To mark a region for the reverse primer,<br />
make a selection from position 1200 to 1400 and:<br />
Right-click the selection | Reverse primer region here
Now, you can let CLC Main Work<strong>be</strong>nch calculate all the possible primer pairs based on the Primer<br />
parameters that you have defined:<br />
Click the Calculate button in the Primer Designer Settings<br />
This opens the Calculation parameters window:<br />
You can modify the parameters of the combination of primers. If you leave them unchanged and<br />
you just click 'Calculate' a table is opened showing the possible combinations of primers.
<strong>In</strong> the Side Panel of the view containing the primer pairs you can adjust the Primer Table Settings,<br />
to specify the info you want to display in the table, e.g. Fragment length<br />
Clicking a primer pair in the table will make a corresponding selection on the sequence in the view.<br />
At this point, you can settle on a specific primer pair or save the table for later. If you want to use<br />
the first primer pair for your experiment, right-click the primer pair in the table and save the primers.
You can also mark the position of the primers on the sequence by selecting Mark primer annotation<br />
on sequence in the right-click menu.<br />
This results in two annotations on the sequence in the view.
Tutorial 2: <strong>In</strong> <strong>silico</strong> <strong>cloning</strong> workflow<br />
<strong>In</strong> this chapter, the goal is to virtually PCR-amplify a gene using primers with restriction sites at the<br />
5' ends, and to insert the gene into a multiple <strong>cloning</strong> site of an expression vector. The vector acts<br />
as a carrier for your gene of interest. To ensure that your gene of interest is inserted in the correct<br />
orientation we will use two different restriction enzymes, creating different ends. The multiple<br />
<strong>cloning</strong> site of the vector contains numerous restriction sites allowing us to choose two enzymes<br />
that create different ends and that do not cut in our gene of interest. We start off with a set of<br />
primers, a DNA template sequence and an expression vector loaded into the Work<strong>be</strong>nch.<br />
2.1 Locating the data to use<br />
Open the Example data folder in the Navigation Area. Open the Cloning folder, and inside this<br />
folder, open the Primers folder.<br />
Double-click the ATP8a1 mRNA sequence in the Example Data folder and zoom to Fit Width and<br />
you will see the light green annotation which is the coding part of the gene. This is the part that we<br />
want to insert into the pcDNA4_TO vector in the Cloning folder. The primers have already <strong>be</strong>en<br />
designed using the primer design tool.<br />
2.2 Add restriction sites to primers<br />
First, we add restriction sites to the primers. <strong>In</strong> order to see which restriction enzymes can <strong>be</strong> used,<br />
we create a split view of the vector and the fragment to insert. <strong>In</strong> this way we can easily make a<br />
visual check to find two enzymes from the multiple <strong>cloning</strong> site in the vector that do not cut in the<br />
gene of interest. To create the split view:<br />
double-click the pcDNA4_TO sequence | View | Split Horizontally<br />
For the vector sequence switch to the Circular view.<br />
Zoom in on the multiple <strong>cloning</strong> site downstream of the green CMV promoter annotation. You<br />
should now have a view similar to this:
By looking at the enzymes we can see that HindIII and XhoI cut in the multi-<strong>cloning</strong> site of the vector<br />
and not in the Atp8a1 gene. You can see the ends that are created by these enzymes by going<br />
to the Restriction Sites group in the Side Panel. Select ‘Sort enzymes by overhang type’ ( )<br />
in Sorting and place your cursor over HindIII in the Side Panel. You will see how the enzyme cuts.<br />
Note that you can add more enzymes to the list in the Side Panel by clicking Manage Enzymes<br />
under the Restriction Sites group.
You can do all kinds of restriction analysis. Suppose you want to know which restriction enzymes<br />
will cut the ATP8a1 mRNA sequence exactly once and create a 3’ overhang. Do the following:<br />
Select the ATP8a1 mRNA sequence | Toolbox in the Menu Bar |<br />
Cloning and Restriction Sites | Restriction Site Analysis |<br />
Select ATP8a1 mRNA sequence | Click Next
Select Use existing enzyme list | Click the Browse for enzyme list button ( ) |<br />
Select ’Popular enzymes’ in the Cloning folder under Enzyme lists | click OK<br />
Write 3’ into the left filter | Select all enzymes | Click the Add (<br />
) button
Click Next<br />
<strong>In</strong> this step you specify that you want to use enzymes that cut the sequence only once.<br />
Deselect the Two restriction sites checkbox | click Next<br />
Select Add restriction sites as annotations on sequence | Create restriction map | Finish<br />
You see that there are only two enzymes that fulfill these criteria (SacII and KpnI).
We come back to our in <strong>silico</strong> <strong>cloning</strong> problem. If you have chosen the enzymes that you want to<br />
work with (in our case: HindIII and XhoI), close the views of the vector and the mRNA sequence<br />
and open the ATP8a1 fwd primer sequence. When it opens, double-click the name of the sequence<br />
to make a Selection of the full sequence. If you do not see the whole sequence turn<br />
purple, please make sure you have the Selection Tool chosen.<br />
If the sequence is selected, right-click and choose <strong>In</strong>sert Restriction Site Before Selection<br />
<strong>In</strong> the Filter box enter HindIII and click on it. At the bottom of the dialog, add a few extra bases 5'<br />
of the cut site (this is done to increase the efficiency of the enzyme).
Click OK and the sequence will <strong>be</strong> inserted at the 5' end of the primer.<br />
Perform the same process for the ATP8a1 rev primer, this time using XhoI instead. This time, you<br />
should also add a few bases at the 5' end as was done when inserting the HindIII site to increase<br />
to efficiency of the enzyme.<br />
Note! The ATP8a1 rev primer is designed to match the negative strand, so the restriction site<br />
should <strong>be</strong> added at the 5' end of this sequence as well (using <strong>In</strong>sert Restriction Site <strong>be</strong>fore Selection).<br />
Save the two primers and close the views.<br />
2.3 Simulate PCR to create the fragment<br />
Now, we want to extract the PCR product from the template ATP8a1 mRNA sequence using the<br />
two primers with restriction sites:<br />
Toolbox | Primers and Pro<strong>be</strong>s | Find Binding Sites and Create Fragments
Select the ATP8a1 mRNA sequence | Click Next<br />
Use the Browse button to select the two primer sequences | Click OK<br />
Leave the other parameters at their default values.<br />
The Match criteria determine how well a primer should match the sequence. Exact match specifies<br />
that all positions of the primer must base pair with the sequence. Note that we cannot choose<br />
this option <strong>be</strong>cause we have added non-matching restriction sites to the primers. We have to de-
fine the minimum num<strong>be</strong>r of positions and the num<strong>be</strong>r of consecutive positions in the 3’ end<br />
of the primer that must base pair to the sequence in order to speak of a match.<br />
Note that the num<strong>be</strong>r of mismatches is reported in the output, so you can filter on this afterwards.<br />
Below the Match criteria, you can adjust Concentrations concerning the reaction mixture. This is<br />
used when reporting melting temperatures for the primers.<br />
Click Next | Adjust the output options<br />
Click Finish<br />
You now see the fragment table displaying the PCR product. <strong>In</strong> the Side Panel you can choose to<br />
show information about melting temperature for the primers.<br />
Right-click the fragment and select Open Fragment.
This will create a new sequence representing the PCR product. Save the sequence in the Cloning<br />
folder and close the views. You do not need to save the fragment table.<br />
2.4 Specify restriction sites and perform <strong>cloning</strong><br />
The final step is to insert the fragment into the <strong>cloning</strong> vector:<br />
Toolbox in the Menu Bar | Cloning and Restriction Sites | Cloning<br />
Select the Fragment (ATP8a1 mRNA (ATP8a1 fwd - ATP8a1 rev)) sequence | click Next
Use the Browse button to select pcDNA4_TO <strong>cloning</strong> vector in the Cloning folder | click OK<br />
Click Finish<br />
You now see the <strong>cloning</strong> editor with the pcDNA4_TO vector in a circular view. Press and hold the<br />
Ctrl key while you click first the HindIII site and next the XhoI site.
At the bottom of the view you can now see information about how the vector will <strong>be</strong> cut open. Since<br />
the vector has now <strong>be</strong>en split into two fragments, you can decide which one to use as the target<br />
vector. If you selected first the HindIII site and next the XhoI site, the CLC Main Work<strong>be</strong>nch has<br />
already selected the right fragment as the target vector. If you click one of the vector fragments,<br />
the corresponding part of the sequence will <strong>be</strong> highlighted.
Next step is to cut the fragment. At the top of the view you can switch <strong>be</strong>tween the sequences<br />
used for <strong>cloning</strong> (at this point it says pcDNA4_TO 5.078bp circular vector).<br />
Switch to the fragment sequence and perform the same selection of cut sites as <strong>be</strong>fore while<br />
pressing the Ctrl key.<br />
At the bottom of the view you can again see information about how the fragment will <strong>be</strong> cut. Since<br />
the fragment can split into two fragments, you can decide which one to use as the target fragment.<br />
If you selected first the HindIII site and next the XhoI site, the CLC Main Work<strong>be</strong>nch has already<br />
selected the right fragment. If you click one of the fragments, the corresponding part of the sequence<br />
will <strong>be</strong> highlighted.
When this is done, the Perform Cloning (<br />
) button at the lower right corner of the<br />
view is active <strong>be</strong>cause there is now a valid selection of both fragment and target vector.<br />
Click the Perform Cloning button.<br />
This dialog lets you inspect the overhangs of the cut site, showing the vector sequence on each<br />
side and the fragment in the middle. The fragment can <strong>be</strong> reverse complemented by clicking the<br />
Reverse complement fragment (<br />
your new construct will <strong>be</strong> opened.<br />
) but this is not necessary in this case. Click Finish and<br />
When saving your work, there are two options:<br />
<br />
Save the Cloning Experiment. This is saved as a sequence list, including the specified cut<br />
sites. This is useful if you need to perform the same process again or double-check details.
Save the construct shown in the circular view. This will only save the information on the<br />
particular sequence including details about how it was created (this can <strong>be</strong> shown in the<br />
History view).<br />
You can, of course, save both. <strong>In</strong> that case, the history of the construct will point to the sequence<br />
list in its own history.<br />
2.5 Perform <strong>cloning</strong> using one restriction site in the vector<br />
Suppose you have a system that allows you to insert your fragment in the vector by just cutting the<br />
vector once.<br />
We will take the same vector as in the previous example pcDNA4-T0 and insert the full<br />
atp8a1mRNA sequence. Since this fragment has blunt ends we will cut the vector using a blunt<br />
end cutter. To find a cutter open the vector sequence in circular view, go to the Restriction sites<br />
area in the Side Panel and click Manage Enzymes.<br />
This opens the Manage enzymes window that allows you to select the restriction sites that you<br />
want to display on the view. Filter on “blunt” and select the 4 most popular blunt end cutters.<br />
Click Finish. <strong>In</strong> the same area on the Side Panel select Single cutters and deselect all others.
You see that you can use EcoRV to linearize the vector.<br />
Toolbox | Coning and Restriction Sites | Cloning<br />
Select atp8a1mRNA. Click Next. Select vector pcDNA4-T0. Click Finish. Select EcoRV restriction<br />
site.
Switch to the fragment sequence. Click Add as fragment. Click Clone. Click Finish.<br />
The vector now contains the complete atp8a1mRNA fragment. You see that the process for<br />
working with a signle restriction site is exactly the same as for two restriction sites.
Tutorial 3: Batch processing<br />
Most of the analyses in the Toolbox are able to perform the same analysis on several elements in<br />
one batch. This means that analyzing large amounts of data is easily accomplished. As an example,<br />
if you use the Find Binding Sites and Create Fragments tool and you supply five sequences,<br />
the result table will present an overview of the results for all five sequences.<br />
If you want individual outputs for each sequence, you would need to run the tool five times, or alternatively<br />
use the Batching mode. Batching mode is activated by clicking the Batch checkbox in<br />
dialog where the input data is selected.<br />
Batching simply means that each data set is run separately, just as if the tool has <strong>be</strong>en run manually<br />
for each one. When batching is selected, the data to <strong>be</strong> added is the folder containing the data<br />
you want to batch. When the folder is selected and you click Next, a batch overview is shown.<br />
When you click Next the subsequent dialog allows you to specify the parameters of the Find Binding<br />
Sites and Create Fragments analysis just as in a regular non-batch analysis.
Note that the Work<strong>be</strong>nch is validating a lot of the input and parameters when running in regular<br />
non-batch mode. When running in batch, this validation is not performed, and this means that<br />
some analyses will fail if combinations of input data and parameters are not right. Therefore batching<br />
should only <strong>be</strong> used when the batch units are very homogenous in terms of the type and size of<br />
data.<br />
At the last dialog <strong>be</strong>fore clicking Finish, it is only possible to use the Save option. When a tool is<br />
run in batch mode, it will place the result files in the same folder as the input files.
Tutorial 4: Gateway <strong>cloning</strong><br />
The Work<strong>be</strong>nch allows to perform in <strong>silico</strong> Gateway <strong>cloning</strong>, including Multisite Gateway <strong>cloning</strong>.<br />
<strong>In</strong> the Gateway <strong>cloning</strong> system your gene of interest is inserted into an entry vector. The entry vector<br />
contains attP recombination sites. To insert your gene of interest into the entry vector, you need<br />
to create a PCR product with terminal attB sites, using primers containing a 25-base pair attB sequence,<br />
plus four terminal G's. This PCR product can then <strong>be</strong> inserted in the entry vector using the<br />
BP reaction, resulting in the formation of an entry clone (purple vector at the top) carrying the gene<br />
of interst flanked by attL sites. Once the entry clone has <strong>be</strong>en formed it is available to express your<br />
gene in a variety of other destination vectors (red vector on the top) which contain attR sites using<br />
an LR reaction. The result is an expression clone (red vector at the bottom) with your gene of interest<br />
inserted in the destination vector.<br />
The attB’s, attP’s, attL’s and attR’s are the key component of the Gateway system: they are the<br />
restriction sites. All entry clones have attL's on both sides of their gene of interest. These attL's are<br />
cut to form sticky ends by the Gateway recombination proteins. These sticky ends will then match<br />
up with the sticky ends on a destination vector which contains attR restriction sites. This process is<br />
called a LR reaction. The BP reaction is done similarly using other restriction sites. Note that the<br />
LR reaction creates attB sites again in the expression clone: this makes the Gateway system totally<br />
reversible. You can make more entry vectors from the expression clone using a BP reaction, in<br />
which the attB sites recombine with attP's to form attL's and attR's.<br />
The system has a high transformation efficiency since it uses both antibiotic resistance and the<br />
ccdB gene, which yields a product that is toxic to E. coli, to ensure that only correct clones survive.<br />
The three tools for Gateway <strong>cloning</strong> mimic the procedure followed in the lab:<br />
1. attB sites are added to a sequence fragment<br />
2. attB-flanked fragment is recombined in an entry vector (BP reaction) to construct an entry clone<br />
3. target fragment from the entry clone is recombined into a destination vector (LR reaction) to<br />
construct an expression clone.<br />
For Multisite Gateway <strong>cloning</strong>, multiple entry clones can <strong>be</strong> created that can recombine in the LR<br />
reaction. To perform these analyses in the CLC Main Work<strong>be</strong>nch, you need to import donor and<br />
expression vectors. These can <strong>be</strong> downloaded from <strong>In</strong>vitrogen’s web site and directly imported into<br />
the Work<strong>be</strong>nch: http://igene.invitrogen.com/products/selector/vectors.
4.1 Add attB sites<br />
The first step is to amplify the target sequence with primers including the so-called attB sites. Suppose<br />
you want to clone the CDS of ATP8a1. First you open the ATP8a1 mRNA sequence in the<br />
Main Area. <strong>In</strong> the Sequence Settings tab of the Side Panel open the Annotation types settings and<br />
deselect Gene.<br />
Select the CDS. Right click the CDs and choose Open Annotation in New View.<br />
Save the CDS as ATP8a1 CDS and add attB sites to the ATP8a1 CDS sequence fragment in this<br />
way:<br />
Toolbox | Cloning and Restriction Sites | Gateway Cloning | Add attB Sites
This will open a dialog where you can select on or more sequences.<br />
When you have selected your fragment(s), click Next.
This will allow you to choose which attB sites you wish to add to each end of the fragment. If you<br />
have selected several fragments and wish to add different combinations of sites, you will have to<br />
run this tool once for each combination.<br />
Clicking Next allows you to extend the fragment with additional sequences by extending the primers<br />
5’ of the template-specific part of the primer (<strong>be</strong>tween the template specific part and the attB<br />
site). For example you can add a Shine-Dalgarno site <strong>be</strong>tween the attB and the gene of interest.<br />
Press Shift – F1 and you will see a list of possible additions from which you can choose.<br />
This list shows you the most common additions, but of course you can manually type or paste<br />
whatever sequence that you want to add. Use the up and down arrow keys to select a tag and<br />
press Enter. This will insert the selected sequence in the primer.<br />
At the bottom of the dialog, you can see a preview of what the final PCR product looks like. <strong>In</strong> the<br />
middle is the sequence of interest (i.e. the sequence you selected as input). <strong>In</strong> the <strong>be</strong>ginning is the<br />
attB1 site and at the end the attB2 site. The primer additions you have inserted are shown in color.<br />
Note that the four terminal G’s are automatically added to the attB sites.<br />
Clicking Next allows you to specify the length of the template-specific part of the primers.
The Work<strong>be</strong>nch is not doing any primer design. You specify the length of the part of the primers<br />
that should base pair with the ATP8a1 CDS, together with the attB sites and optional primer additions,<br />
and these are the primers. The Work<strong>be</strong>nch will not check the compatibility of the primers, the<br />
annealing temperatures or the GC-content.<br />
Click Next.<br />
Click Finish.<br />
The main output is the input sequence now including attB sites and primer additions. The attB sites,<br />
the primer additions and the primer regions are annotated in the final result. There will <strong>be</strong> one output<br />
sequence for each sequence you have selected for adding attB sites.
You also get a list of primers. Again deselect Gene from Annotation types settings.<br />
Save the resulting sequence as it will <strong>be</strong> the input to the next part of the Gateway <strong>cloning</strong> workflow.<br />
When you open the sequence again, you may need to switch on the relevant annotation types to<br />
show the sites and primer additions.<br />
4.2 Create entry clones (BP)<br />
The next step in the Gateway <strong>cloning</strong> workflow is to recombine the attB-flanked sequence of interest<br />
into an entry vector to create an entry clone, the so-called BP reaction. First, you have to download<br />
the entry vector (pDONR221) from <strong>In</strong>vitrogen’s web site (in the MultiSite Gateway® Three-<br />
Fragment Vector Construction Kit; http://igene.invitrogen.com/products/selector/vectors) and import<br />
it into the CLC Main Work<strong>be</strong>nch if it’s not yet present in the Cloning vector library folder in the<br />
Cloning folder in the Navigation Area.<br />
Expand the Cloning vector library folder and you see pDONR221 at the bottom of the list.
Make sure that you circularize the vector and save it <strong>be</strong>fore you proceed with the actual <strong>cloning</strong>.<br />
Toolbox | Cloning and Restriction Sites | Gateway Cloning | Create Entry Clone<br />
Now you can select one or more sequences that will <strong>be</strong> the sequence of interest to <strong>be</strong> recombined<br />
into your entry vector. Note that the sequences you select should <strong>be</strong> flanked with attB sites. You<br />
can select more than one sequence as input, and the corresponding num<strong>be</strong>r of entry clones will <strong>be</strong><br />
created. When you have selected your sequence(s), click Next.
Next you have to specify the entry or donor vector that you are going to use.<br />
Clicking the Browse button opens a dialog where you can select a donor vector.<br />
Click Next, choose to Open the results and click Finish.
The Work<strong>be</strong>nch looks for the attP sites in the sequences of the entry vector that you select in this<br />
dialog so you should make sure that the attP sites are present in the entry vector that you choose.<br />
It only checks that valid attP sites are found - it does not check that they correspond to the attB<br />
sites of the selected fragments at this step. If the right combination of attB and attP sites is not<br />
found, no entry clones will <strong>be</strong> produced.<br />
The output is one entry clone per sequence selected. The attB and attP sites have <strong>be</strong>en used for<br />
the recombination, and the entry clone is now equipped with attL sites. The by-product of the BP<br />
recombination is not part of the output. Save the results since you will need them for the subsequent<br />
LR reaction.<br />
4.3 Create expression clones (LR)<br />
The final step in the Gateway <strong>cloning</strong> workflow is to recombine the entry clone into a destination<br />
vector to create an expression clone, the so-called LR reaction:<br />
Toolbox | Cloning and Restriction Sites | Gateway Cloning | Create Expression Clone<br />
This will open a dialog where you can select on or more entry clones. If you wish to perform separate<br />
LR reactions with multiple entry clones, you should run the Create Expression Clone in<br />
batch mode.
When you have selected your entry clone(s), click Next.<br />
Now you can select a destination vector. You can download destination vectors from <strong>In</strong>vitrogen’s<br />
web site: http://igene.invitrogen.com/products/selector/vectors and import them into the Work<strong>be</strong>nch.<br />
Follow exactly the same procedure as for the entry vector. Don’t forget to circularize the<br />
vector and save it.<br />
The Work<strong>be</strong>nch looks for the specific sequences of the attR sites in the sequences that you select<br />
in this dialog. The Work<strong>be</strong>nch only checks that valid attR sites are found - it does not check that<br />
they correspond to the attL sites of the selected fragments at this step. If the right combination of<br />
attL and attR sites is not found, no entry clones will <strong>be</strong> produced.
When performing multi-site Gateway <strong>cloning</strong>, the CLC Main Work<strong>be</strong>nch will insert the fragments<br />
(contained in entry clones) by matching the sites that are compatible. If the sites have <strong>be</strong>en defined<br />
correctly, an expression clone containing all the fragments will <strong>be</strong> created.<br />
Click Next if you wish to adjust how to handle the results. If not, click Finish.<br />
The output is a num<strong>be</strong>r of expression clones depending on how many entry clones and destination<br />
vectors that you selected. The attL and attR sites have <strong>be</strong>en used for the recombination, and the<br />
expression clone is now equipped with attB sites. You can choose to create a sequence list with<br />
the by-products as well.