on page 37 - Aja
on page 37 - Aja
on page 37 - Aja

Create successful ePaper yourself
Turn your PDF publications into a flip-book with our unique Google optimized e-Paper software.
KUMO Installati<strong>on</strong> and Operati<strong>on</strong> Manual — Setup and C<strong>on</strong>trol from a<br />
7<br />
Safari Browser—<br />
Type in KUMO<br />
Static IP Address<br />
KUMO also offers a factory default static IP address, allowing a direct and fail-safe way<br />
to c<strong>on</strong>nect via a Mac computer c<strong>on</strong>nected to KUMO either directly or via a LAN<br />
c<strong>on</strong>necti<strong>on</strong>. The default static IP address is temporary and is intended <strong>on</strong>ly to allow an<br />
initial c<strong>on</strong>necti<strong>on</strong>. Once you’ve c<strong>on</strong>nected using the static IP, you can then enter a<br />
desired network c<strong>on</strong>figurati<strong>on</strong> using KUMO's Network tab.<br />
Note: The default static address is temporary and will be disabled the next time KUMO<br />
restarts. Any changes in the Network c<strong>on</strong>figurati<strong>on</strong> will be saved up<strong>on</strong> restart.<br />
To set KUMO to its default static IP address:<br />
1. Power up KUMO and wait for it to boot normally.<br />
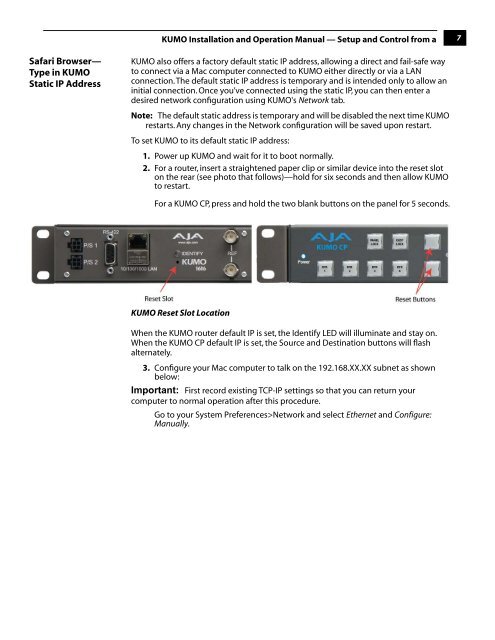
2. For a router, insert a straightened paper clip or similar device into the reset slot<br />
<strong>on</strong> the rear (see photo that follows)—hold for six sec<strong>on</strong>ds and then allow KUMO<br />
to restart.<br />
1<br />
For a KUMO CP, press and hold the two blank butt<strong>on</strong>s <strong>on</strong> the panel for 5 sec<strong>on</strong>ds.<br />
KUMO Reset Slot Locati<strong>on</strong><br />
When the KUMO router default IP is set, the Identify LED will illuminate and stay <strong>on</strong>.<br />
When the KUMO CP default IP is set, the Source and Destinati<strong>on</strong> butt<strong>on</strong>s will flash<br />
alternately.<br />
3. C<strong>on</strong>figure your Mac computer to talk <strong>on</strong> the 192.168.XX.XX subnet as shown<br />
below:<br />
Important: First record existing TCP-IP settings so that you can return your<br />
computer to normal operati<strong>on</strong> after this procedure.<br />
Go to your System Preferences>Network and select Ethernet and C<strong>on</strong>figure:<br />
Manually.