


You also want an ePaper? Increase the reach of your titles
YUMPU automatically turns print PDFs into web optimized ePapers that Google loves.
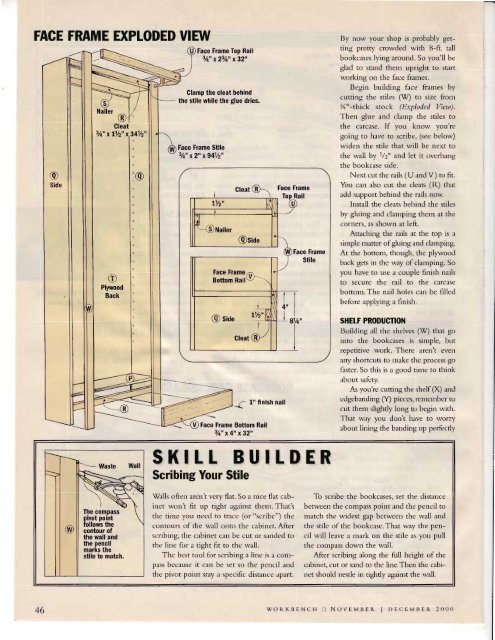
FAGE FRAM EXPTODED VIEW<br />
Face Frame Top Rail<br />
314,, a23/4', x32',<br />
Glamp the cleat behind<br />
the stile while the glue dries.<br />
Face Frame Stile<br />
3/q" x2" xg41/2"<br />
Face Frame<br />
Face Frame<br />
Stile<br />
By now your shop is probably getting<br />
prery<br />
crowded with 8-<strong>ft</strong>. tall<br />
<strong>bookcase</strong>s lying around. So you'll be<br />
glad to stand them upright to start<br />
working on the face frames.<br />
Begin building face frames by<br />
<strong>cutting</strong> the stiles (W) to size from<br />
%"-thick stock (Exploded View).<br />
Then glue and clamp the stiles to<br />
the carcase. If you know<br />
you're<br />
going to have to scribe, (see below)<br />
widen the stile that will be next to<br />
the wall by t/2" and let it overhang<br />
the <strong>bookcase</strong> side.<br />
Next cut the rails (U and V ) to fit.<br />
You can also cut the cleats (R) that<br />
add support behind the rails now.<br />
Install the cleats behind the stiles<br />
by gluing and clamping them at the<br />
corners, as shown at le<strong>ft</strong>.<br />
Attaching the rails at the top is a<br />
sirnple matter of gluing and clamping.<br />
At the bottom, though, the plyrvood<br />
back ges in the way of clamping. So<br />
you have to use a couple finish nails<br />
to secure the rail to the carcase<br />
bottom. The nail holes can be filled<br />
before applying a finish.<br />


![Til]tl](https://img.yumpu.com/45878240/1/190x245/tiltl.jpg?quality=85)


