


Create successful ePaper yourself
Turn your PDF publications into a flip-book with our unique Google optimized e-Paper software.
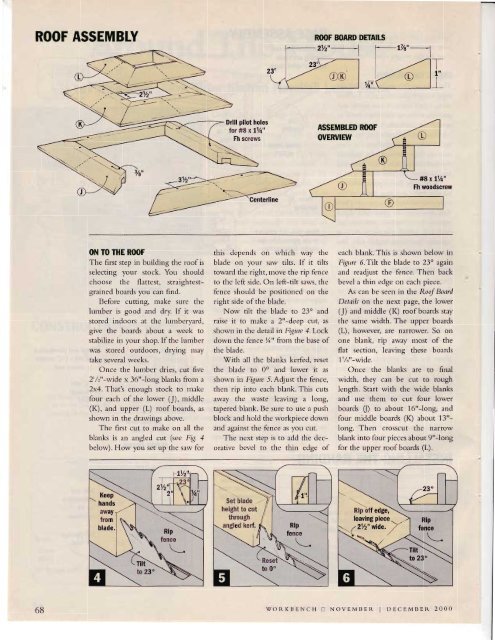
ROOF ASSEMBLY<br />
R(NF BOAR DETAIUi<br />
Drill pilot holes<br />
lor #8x11/q"<br />
Fh screws<br />
ASSEI YIBLED Rfi)F<br />
OVER<br />
r/tEw<br />
O<br />
o<br />
o<br />
@<br />
- #8xtl/a tl$x!1A"<br />
Fh woodscrew<br />
ON TO T}IE Rfi)F<br />
The first step in building the roof is<br />
selecting your stock. You should<br />
choose the flattest, straightestgrained<br />
boards you can find.<br />
Before <strong>cutting</strong>, make sure the<br />
lurnber is good and dry. If it w.ls<br />
stored indoors at the lumberYard,<br />
give the boards about a week to<br />
stabilize in your shop. If the lumber<br />
was stored outdoors, drying maY<br />
take several weeks.<br />
Once the lumber dries, cut five<br />
2'/2"-wide x 36"-long blanks from a<br />
2x4. That's enough stock to make<br />
four each of the lower (J), middle<br />
(K), and upper (L) roof boards, as<br />
shown in the drawings above.<br />
The first cut to make on all the<br />
blanks is an angled cut (see Fr3. 4<br />
below). How you set up the saw for<br />
this depends on which<br />
way the<br />
blade on your saw tilts. If it tilts<br />
toward the right, move the rip fence<br />
to the le<strong>ft</strong> side. On le<strong>ft</strong>-tilt saws, the<br />
fence should be positioned on the<br />
right side of the blade.<br />
Now tilt the blade to 23o and<br />
raise it to make a 2"-deeP cut, as<br />
shown in the detail tn Figure 4.Lock<br />
down the fence %" from the base of<br />
the blade.<br />
With all the blanks kerfed, reset<br />
the blade to 0o and lower it as<br />
shown in Figure S.Adjust the fence,<br />
then rip into each blank. This cuts<br />
away the waste leaving a long,<br />
tapered blank. Be sure to use a push<br />
block and hold the workpiece down<br />
and against the fence as you cut.<br />
The next step is to add the decorative<br />
bevel to the thin edge of<br />
each blank. This is shown below in<br />
Figurc 6.Trlt the blade to 23" again<br />
and readjust the fence. Then back<br />
bevel a thin edge on each piece.<br />
As can be seen in the Roof Boatd<br />
Details on the next Page, the lower<br />
(J) and middle (K) roof boards staY<br />
the same width. The uPPer boards<br />
(L), however, are narrower. So on<br />
one blank, rip away most of the<br />
flat section, leaving these boards<br />
17l."-wide.<br />
Once the blanks are to final<br />
width, they can be cut to rough<br />
length. Start with the wide blanks<br />
and use them to cut four lower<br />
boards (f to about 16"-long, and<br />
four middle boards (K) about 13"-<br />
long. Then crosscut the narrow<br />
blank into four pieces about 9"-long<br />
for the upper roofboards (L).<br />
Keep<br />
hands<br />
away<br />
from<br />
Set blade .<br />
heighto cut<br />
through<br />
angled kerf.<br />
;h-;b<br />
leaving plece<br />
68<br />
WORKBENCH tr NOVEMBER I DECEMBER 2OOO


![Til]tl](https://img.yumpu.com/45878240/1/190x245/tiltl.jpg?quality=85)


