


Create successful ePaper yourself
Turn your PDF publications into a flip-book with our unique Google optimized e-Paper software.
lnThe Sh<br />
Tune Up Your Table Saw for Better Guts<br />
When you consider how much<br />
you use your table saw, shouldn't it<br />
be in top working order? With<br />
some simple tools and the techniques<br />
below, you can have your<br />
saw <strong>cutting</strong> straight and true in less<br />
than an hour.<br />
Before making any adjustments,<br />
unplug the saw (and leave it that<br />
way) and vacuum out the inside of<br />
the housing. A blast of comPressed<br />
air can get sawdust out of the hard<br />
to reach areas.<br />
Apply graphite, paraffin wax, or<br />
white lithium grease to the internal<br />
moving parts (such as the blade<br />
height and tilt adjusting screws).<br />
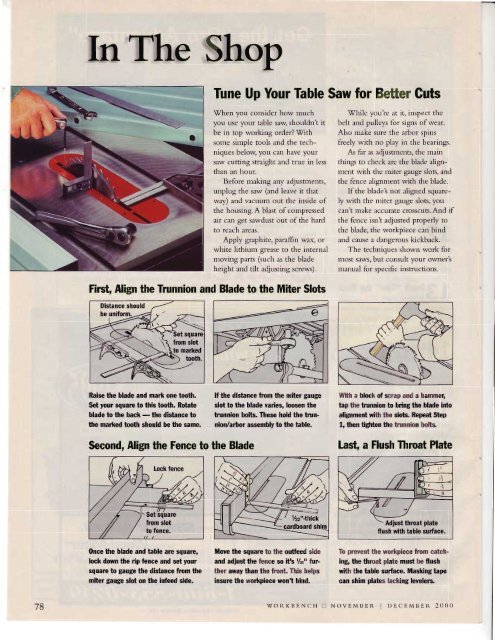
Filst, Ahgn the Tnrnnion and Blade to the Miter Slots<br />
'While you're at it, inspect the<br />
belt and pulleys for signs of wear.<br />
Also make sure the arbor spins<br />
freely with no play in the bearings.<br />
As far as adjustments, the main<br />
things to check are the blade alignment<br />
with the miter gauge slots, and<br />
the fence alignment with the blade.<br />
If the blade's not aligned squarely<br />
with the miter gauge slots, you<br />
can't make accurate crosscuts.And if<br />
the fence isn't adjusted proper\ to<br />
the blade, the workpiece can bind<br />
and cause a dangerous kickback.<br />
The techniques shown work for<br />
most saws, but consult your owner's<br />
manual for specific instructions.<br />
fiom slot<br />
to marked<br />
Raise the blade and mark one tooth.<br />
Set your square to this tooth. Rotate<br />
blade to the back - the distance to<br />
the nar<strong>ft</strong>ed tooth should be the same.<br />
Second, Align the Fence to the Blade<br />
lf the distance from the miter gauge<br />
slot to the blade varies, loosen the<br />
trunnion bolls. These hold the trun'<br />
niory'arbor assembly to the table.<br />
Wth a block of scrap and a hammer'<br />
tap the trunnion to bring the blade irto<br />
alignment with the slots. Repeat Step<br />
1, then tiglrten the trunnion bolls.<br />
[ast, a Flush Thrcat Plate<br />
flush with table surface.<br />
Once the blade and table are squarc'<br />
lock down the rip fence and set your<br />
square to gauge the distance fion the<br />
miter gauge slot on the infeed side.<br />
Move the square to the outfued side<br />
and adiust the fence m itb Y'" fur'<br />
ther away than the front. This helps<br />
insure the workpiece won't bind.<br />
Iio prcvert the workpiece frum catching,<br />
the throat plate must be flush<br />
with the table surface. Masking tape<br />
can shim plates lacking levelers.<br />
78<br />
WORKBENCH<br />
! NOVEMBER I DECEMBER 2OOO


![Til]tl](https://img.yumpu.com/45878240/1/190x245/tiltl.jpg?quality=85)


