


Create successful ePaper yourself
Turn your PDF publications into a flip-book with our unique Google optimized e-Paper software.
hold the base to the floor.You'll also<br />
have to extend a hole through the<br />
floor for the weight cord.<br />
GREATE IIIE OOtUiIl{S<br />
The columns (G) are cutfrorr,Za"-lD<br />
rigid copper plumbing pipe. I advise<br />
using a pipe cutter. It cuts square and<br />
smooth, meaning theret no need to<br />
sand or file the ends.<br />
'With the columns cut, it's time<br />
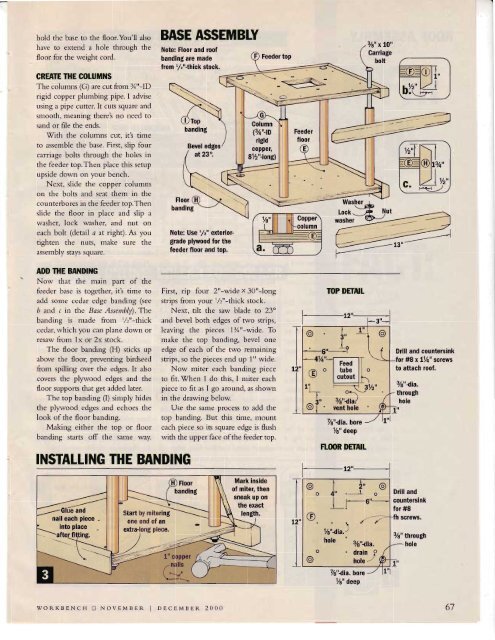
BAiE AiSEMBLY<br />
Note: Floor and roof<br />
banding are made<br />
from 2"-11;s1 r1o.*.<br />
Top<br />
Feeder top<br />
3/a" xl0"<br />
Carrlage<br />
bolt<br />
to assemble the base. First, slip four<br />
carriage bolts through the holes in<br />
the feeder top.Then place this setup<br />
upside down on your bench.<br />
Next, slide the copper columns<br />
on the bolts and seat them in the<br />
counterbores in the feeder top.Then<br />
slide the floor in place and slip a<br />
washer, lock washer, and nut on<br />
each bolt (detail a at right). As you<br />
tighten the nuts, make sure the<br />
assembly stays square.<br />
Floor<br />
BeYel edges<br />
Note: Use /z" exterlorgrade<br />
plywood for the<br />
feeder floor and top.<br />
lock<br />
ADD IHE BAI{DII{G<br />
Now that the main part of the<br />
feeder base is together, itt time to<br />
add some cedar edge banding (see<br />
b and c in the Base Assembly).The<br />
banding is made from rZ"-thick<br />
First, rip four 2"-wide x 30"-long<br />
strips from your t/:"-thick stock.<br />
Next, rik rhe saw blade to 23o<br />
and bevel both edges of two strips,<br />
leaving the pieces 1%"-wide. To<br />
make the top banding, bevel one<br />
edge of each of the two remaining<br />
cedar, which you can plane down or<br />
resaw from 1x or 2x stock.<br />
The floor banding (H) sticks up<br />
above the floor, preventing birdseed strips, so the pieces end up 1" wide.<br />
from spilling over the edges. It also Now miter each banding piece<br />
covers the pl1'wood edges and the to fit. When I do this, I miter each<br />
floor supports that get added later. piece to fit as I go around, as shown<br />
The top banding (I) simply hides in the drawing below.<br />
the plywood edges and echoes the Use the same process to add the<br />
look o<strong>ft</strong>he floor banding.<br />
top banding. But this rime, mount<br />
Making either the top or floor each piece so its square edge is flush<br />
banding starts off the same way. with the upper face of the Geder top.<br />
INSTATTING THE BANDING<br />
nall each plece<br />
Into place<br />
Start by mlterlng<br />
one end of an<br />
extr&long plece.<br />
Mark Inslde<br />
of mlter. then<br />
sneak up on<br />
the exact<br />
12"<br />
f__<br />
TIIP DETAIL<br />
@ . l"<br />
_+rA,_f;;;;|l<br />
7/s"4la. bore<br />
1/g" deep<br />
H.|nN DETAIT<br />
12',___l<br />
@ | i" @<br />
o4tt.lo<br />
I r_."_<br />
@ ,----7<br />
Drlll and countelslnk<br />
#8 x 17+" screws<br />
to attach roof.<br />
s/g"4la.<br />
through<br />
hole<br />
Drlll and<br />
counterslnk<br />
for #8<br />
\tf<br />
1/e"4la.)<br />
hofe s/s,,41a. hole<br />
o .tatng/<br />
@ norc/ @<br />
7/e"41a.borc<br />
1/a" ileep<br />
woRKBENcH tr NovEMBER I DEcEMBER 2000<br />
'i<br />
1;\ o I tube llo<br />
fi F -11<br />
'-T<br />
372"<br />
\-<br />
^ - in i"<br />
Ve"4la/<br />
I I Yent hole<br />
@<br />
3/e" througlh<br />
67


![Til]tl](https://img.yumpu.com/45878240/1/190x245/tiltl.jpg?quality=85)


