


You also want an ePaper? Increase the reach of your titles
YUMPU automatically turns print PDFs into web optimized ePapers that Google loves.
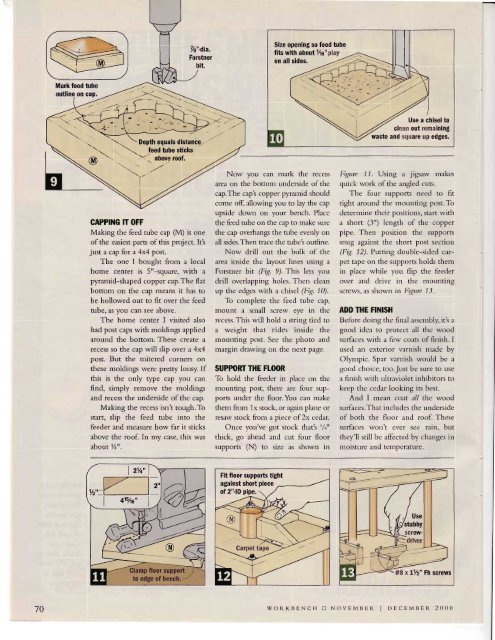
7/g"41a.<br />
Forstner<br />
bit.<br />
Size opening so feed tube<br />
fits with about %0" play<br />
Mark feed tube<br />
outllne on cap.<br />
-5<br />
-\ \r -\-<br />
@<br />
\<br />
GAPPING IT OFF<br />
Making the feed tube cap (M) is one<br />
of the easiest parts of this project. It's<br />
just a cap for a 4x4 post.<br />
The one I bought from a local<br />
home center is 5"-square, with a<br />
pyramid-shaped copper cap.The flat<br />
bottom on the cap means it has to<br />
be hollowed out to fit over the feed<br />
tube, as you can see above.<br />
The home center I visited also<br />
had post caps with moldings applied<br />
around the bottom. These create a<br />
recess so the cap will slip over a 4x4<br />
post. But the mitered corners on<br />
these moldings were pretry lousy. If<br />
this is the only rype caP You can<br />
find, simply remove the moldings<br />
and recess the underside o<strong>ft</strong>he cap.<br />
Making the recess isn't tough.To<br />
start, slip the feed tube into the<br />
feeder and measure how far it sticks<br />
above the roof. [n my case, this was<br />
about /2".<br />
\ Depth equals distance.-<br />
J; tube sticks<br />
abovg roof.<br />
- ----<br />
Now<br />
you can lnark the recess<br />
area on the bottorl underside of the<br />
cap.The cap's copper pyranrid should<br />
come o{1, allowing you to lay the cap<br />
upside down on your bench. Place<br />
the feed tube on the cap to make sure<br />
the cap overhangs the tube evenly on<br />
all sides.Then trace the tube'.s outline.<br />
Now drill out the bulk of the<br />
area inside the layout lines trsing e<br />
Forstner btt (Fig. 9). This lets you<br />
drill overlapping holes. Then clean<br />
up the edges with a chisel (Fig. 10).<br />
To complete the feed tube caP,<br />
mount a small screw eye in the<br />
recess.This will hold a string tied to<br />
a weight that rides inside the<br />
mounting post. See the photo and<br />
margin drawing on the next page.<br />
SUPPORT THE FLOOR<br />
To hold the Geder in place on the<br />
mounting post, there are four suPports<br />
under the floor.You can t]lake<br />
them from lx stock, or again plar-re or<br />
resaw stock frorn a piece of2x cedar.<br />
Once you've got stock that's t/0"<br />
thick, go ahead and cut four floor<br />
supports (N) to size as shown in<br />
Use a chisel to<br />
waste and square up ed$es.<br />
Figure 11. Using a jigsaw nakes<br />
quick work of the angled cuts.<br />
The four supports need to fit<br />
tight around the mounting post. To<br />
determine tl-reir positions, start with<br />
a short (3") length of the coPPer<br />
pipe. Then position the suPPorts<br />
snug against the short post sectiolt<br />
(Fig 12). Putting double-sided carpet<br />
tape on the suPPorts holds them<br />
in place while you flip the feeder<br />
over arrd drive in the rrrotrnting<br />
screws, as shown in Fi,4trc 13.<br />
ADD THE FINISH<br />
llefore doir-rg the final assenrbly, it's a<br />
good idea to protect all the wood<br />
surfaces with a few coats of finish. I<br />
used an exterior varnish made bY<br />
Olympic. Spar varnish would be a<br />
good choice, too.Just be sure to use<br />
a finish with ultraviolet inhibitors to<br />
keep the cedar looking its best.<br />
And I mean cort all the wood<br />
surfaces.That includes the underside<br />
of both the floor and roof. These<br />
surfaces wort't cvcr see rrin, but<br />
they'll still be affected by changes in<br />
moisture and temperature.<br />
,r""-7-1tr<br />
#8 x l1/2" Fh screws<br />
70<br />
woRKBENCH tr NovEMBER I DEcEMBER 2000


![Til]tl](https://img.yumpu.com/45878240/1/190x245/tiltl.jpg?quality=85)


