


You also want an ePaper? Increase the reach of your titles
YUMPU automatically turns print PDFs into web optimized ePapers that Google loves.
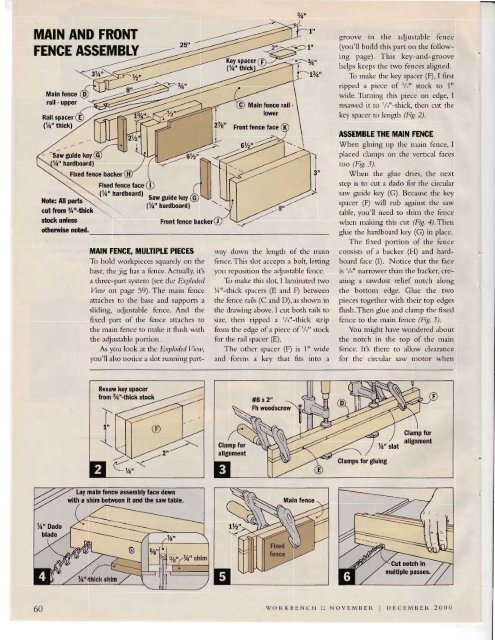
MAIN AND FRONT<br />
FENGE ASSEMBLY<br />
Main fence<br />
rail - upper<br />
Rail spacer<br />
(7o" thick)<br />
'Saw guide key<br />
hardboard)<br />
Note: All pads<br />
cut from %"-thick<br />
stock unless<br />
othenvise noted.<br />
Fixed fence backet<br />
Fixed fence face<br />
(To" hatdboard) Saw guide key<br />
(7+" hardboard)<br />
Front fence backet<br />
MAr{ FENCE, MULTIPLE PIECES<br />
To holc'l workpicces squarcly on thc<br />
b:rse, the jie hls a fetrcc. Acturlly, it'.s<br />
a threc-part systettr (see d'c Explodr:d<br />
ViL'u, on page 59). Tl-re rrilirt fertcc<br />
attrcl-res to the base atrcl supports a<br />
sliclirrg, acljr.rstable fence. Ancl thc<br />
fixed prrt of the fence lttlches tcr<br />
+\3/4"<br />
l3/+"<br />
the nuin fence to nrlke it fltrsh with<br />
the :rcljr,rst:rble portion.<br />
As you look at thc Dxplodcd Viur,,<br />
you'll .rlso l)oticc il slot rtrrrrrirtu p:trtrvrry<br />
clolvn tl-rc lenqth of the trtlilt<br />
fencc.This slot rcccpts :r bolt, letting<br />
yor,r rcposition thc' :rcljustrble lcrtcc.<br />
To nrrrke this slot, I hrttitutecl twcr<br />
%"-thick spirccrs (E arrd F) between<br />
the fencc' r':rils (O md l)),ls shorvtt itt<br />
thc clrawinq rtbove. I cttt both r:rils tcr<br />
size, thcn rippccl r<br />
'/,"-thick strip<br />
frrrnr the cc-lge of rt piece of '/r" stock<br />
tbr the rril spaccr (E).<br />
Tl're othe'r spact'r' (F) is 1" wide<br />
rrnd fornrs :r key that flts into I<br />
qroove ir.r the adjustable fence<br />
(you'll build this p:rrt on the following<br />
p:rge). This key-and-groove<br />
helps keeps the two fences aligned.<br />
To nr:rke the key spacer (F), I fir'st<br />
rippecl a piece of i/." stock to 1"<br />
widc. Thrning this piece on edge, I<br />
reslwed it to '/."'-thick, then cttt the<br />
key spacer to lenqtl.r (Ftq 2).<br />
ASSEMBTE THE MAIN FENCE<br />
When gluing up thc ttilitr lieltce, I<br />
plececl cllnrps on the veltic:rl fuces<br />
too (Fig. -1l.<br />
When the gl"re dries, thc trext<br />
stcp is to cut a dado for thc' circular<br />
srtw $ride key (G). Because the key<br />
splcer (F) will rub ag:riust the s;uv<br />
tlble, you'll need to shini thc fcltce<br />
whcn niakitrg this cut (Fiq. 'l). Then<br />
qlue thc hardbolrcl key (G) in pl:rce.<br />
The flxc'c1 portion of the fence<br />
(()nsi\t\ ol-:r [r:tckt'r(H) .rrrtl h:rldborrcl<br />
frtce (l). Notice tl'rlt the fice<br />
is '/"" urrtower thalr the backer, cre-<br />
Itinq a slwclust relief notch llong<br />
tl.re bottonr edge. Glue the two<br />
piccc's together with their top edges<br />
flush.Then glue ancl clanrp thc fixed<br />
fencc to the ttraitr fence (Iriq. -l).<br />
You rniqlrt have wottclerccl rbottt<br />
thc notch in tl-re tclp of thc nrain<br />
fi:nce. It'.s there to lllorv clelt'attce<br />
fbr thc circulur s:trv tritttor rvheu<br />
Resaw key spacer<br />
from 3/a"-thick stock<br />
ljl<br />
|\L-1/'"'<br />
(-./<br />
:7a"<br />
-_/,-'-_<br />
Lay main fence assembly face down<br />
with a shim between it and the saw table.<br />
60<br />
WOIIKIJENCH II NOVEMIJEII I)ECEMBElT. 2O0O


![Til]tl](https://img.yumpu.com/45878240/1/190x245/tiltl.jpg?quality=85)


