


Create successful ePaper yourself
Turn your PDF publications into a flip-book with our unique Google optimized e-Paper software.
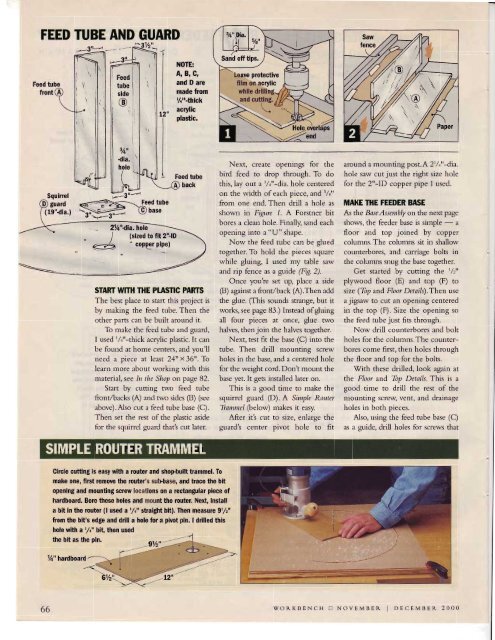
FEED TUBE AND GUARD<br />
Feed tube<br />
front<br />
NOTE:<br />
A, B, C,<br />
and Il arc<br />
made from<br />
%"-thick<br />
acrylic<br />
plastic.<br />
Squlrrel<br />
guard<br />
Feed tube<br />
back<br />
Next, create openings for the<br />
bird feed to drop through. To do<br />
this, lay out a '/."-dia. hole centered<br />
on the width of each piece, and '/r"<br />
from one end. Then drill a hole as<br />
shown in Figure 1. A Forstner bit<br />
bores a clean hole. Finally, sand each<br />
opening into a "U" shaPe.<br />
Now the feed tube can be glued<br />
together. To hold the pieces square<br />
while gluing, I used my table saw<br />
and rip fence as a guide (Fig.2).<br />
Once youte set up, place a side<br />
@) apinst a front/back (A).Then add<br />
START WMI <strong>ft</strong>E PLASNG PARTS<br />
The best place to start this project is the glue. (This sounds strange, but it<br />
by making the feed tube. Then the works, see page 83.) Instead of gluing<br />
other parts can be built around it. all four pieces at once, glue two<br />
To make the feed tube and guard, halves, then join the halves together.<br />
I used '/*"-thick acrylic plastic. It can Next, test fit the base (C) into the<br />
be found at home centers, and You'll tube. Then drill mounting screw<br />
need a piece at least 24" x36". To holes in the base, and a centered hole<br />
learn more about working with this for the weight cord. Dont mount the<br />
material, see In the Shop on Page 82. base yet. [t gets installed later on.<br />
Start by <strong>cutting</strong> nvo feed tube This is a good time to make the<br />
front/backs (A) and two sides (B) G.e squirrel guard (D). A Simple Routet<br />
above).Also cut a feed tube base (C). Tiammel (below) makes it easy.<br />
Then set the rest of the plastic aside A<strong>ft</strong>er it's cut to size, enlarge the<br />
for the squirrel guard that's cut later. guardt center pivot hole to fit<br />
around a mounting post.A 2'/i'-dia.<br />
hole saw cut just the right size hole<br />
for the 2"-ID copper piPe I used.<br />
MAKE IHE FEEDER BASE<br />
As the Basez4ssembly on the next page<br />
shows, the feeder base is simPle - a<br />
floor and top joined by coPPer<br />
columns. The columns sit in shallow<br />
counterbores, and carriage bolts in<br />
the columns snug the base together.<br />
Get started by <strong>cutting</strong> the 1/2"<br />
plywood floor (E) and toP (F) to<br />
size (Tbp and Floor Deralls).Then use<br />
ajigsaw to cut an oPening centered<br />
in the top (F). Size the oPening so<br />
the feed tube just fits through.<br />
Now drill counterbores and bolt<br />
holes for the columns.The counterbores<br />
come first, then holes through<br />
the floor and top for the bolts.<br />
With these drilled, look again at<br />
the Floor and Tbp Details. This is a<br />
good time to drill the rest of the<br />
mounting screw vent, and drainage<br />
holes in both pieces.<br />
Also, using the feed tube base (C)<br />
as a guide, drill holes for screws that<br />
Clrcle cuttlng ls easy wlth a loutel and shoPbullt trammel. To<br />
make one, flrst remove the router' sutsbase' and trace the blt<br />
openlng and mountlng screw locatlons on a lectangular plece of<br />
hardboard. Bore these holes and mounthe router. Next, lnstall<br />
a blt ln the router (l used a %" stralght blt). Ihen measure 9%"<br />
from the bit's edge and dilll a hole for a pivot pln. I drllled thls<br />
hole wlth xr/e" blt, then used<br />
the blt as the pln.<br />
%" hardboard<br />
66<br />
woRKBENcH tr NovEMBER I<br />
DECEMBER 2000


![Til]tl](https://img.yumpu.com/45878240/1/190x245/tiltl.jpg?quality=85)


