


You also want an ePaper? Increase the reach of your titles
YUMPU automatically turns print PDFs into web optimized ePapers that Google loves.
t+<br />
lV2"<br />
HANDTE PLAN VIEW<br />
7a" roundover<br />
(handle sha<strong>ft</strong> only)<br />
I<br />
3"<br />
l<br />
g9<br />
^1-31ail'-!2<br />
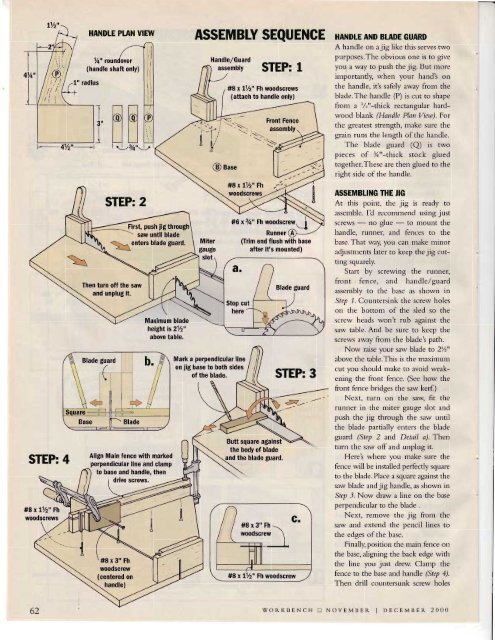
ASSEMBLY SEQUENGE HANDLE<br />
BTADE GUARD<br />
Handle,/Guard<br />
assembly<br />
STEP: 1<br />
#8 x L1/2" Fh woodscrews<br />
(attach to handle only)<br />
A handle on alig like this serves two<br />
pulposes.The obvious one is to give<br />
you a way to push the jig. But t.nore<br />
inrportantly, when your hand'.s on<br />
the handle, iti safely away from the<br />
blade.The handle (P) is cut to shape<br />
fronr a t/r"-thick rectangular hardwood<br />
blank (Handlc Plart Victr,).For<br />
the greatest strength, tnake sure the<br />
grain runs the length o<strong>ft</strong>he handle.<br />
The bhde guard (Q) is two<br />
pieces of %"-thick stock glued<br />
together.These are then gltted to the<br />
rigl.rt side of the l.randle.<br />
STEP: 4<br />
#8xtVz" Fh<br />
woodscrews<br />
STEP: 2<br />
Maximum blade<br />
height is 272"<br />
above table.<br />
Ul'r-/<br />
Souare<br />
Base<br />
laenters<br />
Then turn off the saw<br />
fi-\ Blade<br />
First, push iig through<br />
blade guard'<br />
Align Main fence with marked<br />
perpendicular line and clamp<br />
to base and handle, then<br />
drive screws.<br />
Mark a perpendicular line<br />
on jig base to both sides<br />
of the blade.<br />
(Trim end flush with base<br />
a<strong>ft</strong>er it's mounted)<br />
Butt square against<br />
the body of blade<br />
the blade guard.<br />
#8x3"Fh.-t.'<br />
woodscrew \<br />
STEP: 3<br />
-'/<br />
?/'<br />
G'<br />
#8 x LVz" Fh woodscrew<br />
ASSEMBLING THE IIG<br />
At this point, the jig is ready to<br />
lssenrble. I'd rccotrrtnettd using just<br />
screws - r-ro glttc - to t-uount the<br />
handle, runner, artd fertces to the<br />
brsc. That way, you can trtake urinor<br />
:rdjrrstnrcnts lltcr ro keep thejig ctrttinu<br />
squarely.<br />
Start by screwit-tg the runner,<br />
front fe'ce, a'd I'randle,/guard<br />
asscnrbly to the brrse as shown in<br />
SlrTr /. Countersirtk the screw holes<br />
ou the bottonr of the sled so the<br />
screw heacls wou't rub against the<br />
saw table. Artd be stlre to keep the<br />
screws awxy fronr the blade\ path.<br />
Now raise your srw bltde to 2Yz"<br />
above the table.This is the rttaxttt.ttttlr<br />
cut yoll should rnake to avoid weakening<br />
the fior.rt fcnce. (See how the<br />
front fence briclges tlre s:rw kerf.)<br />
Next, tutn ou the saw fit the<br />
runnel in thc nriter eauge slot and<br />
pusll tl.re jig through the saw until<br />
the blade partially enters the blade<br />
guard (Stcp 2 md Dctail a). Then<br />
turn the srw offand unplug it.<br />
Here'.s where you tnake sure the<br />
ferrce will be installed perfectly square<br />
to the blade. Phce a square asainst the<br />
s:rw bhde rnd jig handle, as shown in<br />
StrTr J. Now draw a line on the base<br />
perpendicular to the blade .<br />
Next, retrtove the jig fronr the<br />
saw and extend the pencil lines to<br />
the edges o<strong>ft</strong>he base.<br />
Finally, position the t.uain fence ot.t<br />
the base, aligning the back edge with<br />
the line yor-r just drew. Clamp the<br />
fence to the base and handle (Step 4).<br />
Then drill countersunk screw holes<br />
62<br />
woIIKBENCH tr NOVEMIIEII I l)E(lEM1lEn 2000


![Til]tl](https://img.yumpu.com/45878240/1/190x245/tiltl.jpg?quality=85)


