Download Manual - Silvan Australia
Download Manual - Silvan Australia
Download Manual - Silvan Australia

Create successful ePaper yourself
Turn your PDF publications into a flip-book with our unique Google optimized e-Paper software.
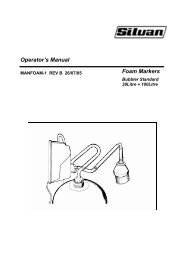
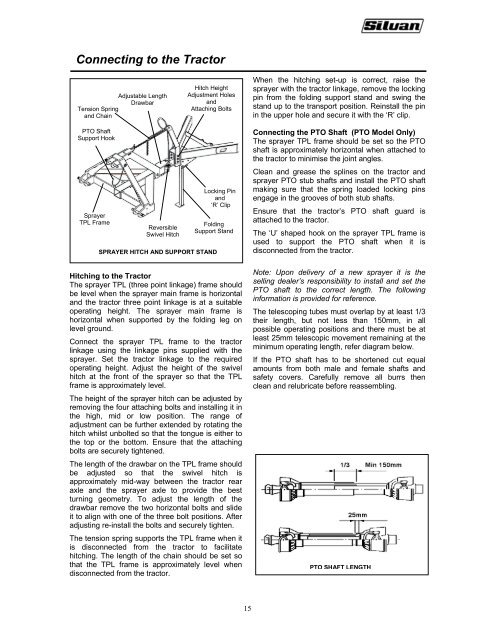
Connecting to the Tractor<br />
Adjustable Length<br />
Drawbar<br />
Tension Spring<br />
and Chain<br />
Hitch Height<br />
Adjustment Holes<br />
and<br />
Attaching Bolts<br />
When the hitching set-up is correct, raise the<br />
sprayer with the tractor linkage, remove the locking<br />
pin from the folding support stand and swing the<br />
stand up to the transport position. Reinstall the pin<br />
in the upper hole and secure it with the ‘R’ clip.<br />
PTO Shaft<br />
Support Hook<br />
Sprayer<br />
TPL Frame<br />
Reversible<br />
Swivel Hitch<br />
SPRAYER HITCH AND SUPPORT STAND<br />
Locking Pin<br />
and<br />
‘R’ Clip<br />
Folding<br />
Support Stand<br />
Hitching to the Tractor<br />
The sprayer TPL (three point linkage) frame should<br />
be level when the sprayer main frame is horizontal<br />
and the tractor three point linkage is at a suitable<br />
operating height. The sprayer main frame is<br />
horizontal when supported by the folding leg on<br />
level ground.<br />
Connect the sprayer TPL frame to the tractor<br />
linkage using the linkage pins supplied with the<br />
sprayer. Set the tractor linkage to the required<br />
operating height. Adjust the height of the swivel<br />
hitch at the front of the sprayer so that the TPL<br />
frame is approximately level.<br />
The height of the sprayer hitch can be adjusted by<br />
removing the four attaching bolts and installing it in<br />
the high, mid or low position. The range of<br />
adjustment can be further extended by rotating the<br />
hitch whilst unbolted so that the tongue is either to<br />
the top or the bottom. Ensure that the attaching<br />
bolts are securely tightened.<br />
The length of the drawbar on the TPL frame should<br />
be adjusted so that the swivel hitch is<br />
approximately mid-way between the tractor rear<br />
axle and the sprayer axle to provide the best<br />
turning geometry. To adjust the length of the<br />
drawbar remove the two horizontal bolts and slide<br />
it to align with one of the three bolt positions. After<br />
adjusting re-install the bolts and securely tighten.<br />
The tension spring supports the TPL frame when it<br />
is disconnected from the tractor to facilitate<br />
hitching. The length of the chain should be set so<br />
that the TPL frame is approximately level when<br />
disconnected from the tractor.<br />
Connecting the PTO Shaft (PTO Model Only)<br />
The sprayer TPL frame should be set so the PTO<br />
shaft is approximately horizontal when attached to<br />
the tractor to minimise the joint angles.<br />
Clean and grease the splines on the tractor and<br />
sprayer PTO stub shafts and install the PTO shaft<br />
making sure that the spring loaded locking pins<br />
engage in the grooves of both stub shafts.<br />
Ensure that the tractor’s PTO shaft guard is<br />
attached to the tractor.<br />
The ‘U’ shaped hook on the sprayer TPL frame is<br />
used to support the PTO shaft when it is<br />
disconnected from the tractor.<br />
Note: Upon delivery of a new sprayer it is the<br />
selling dealer’s responsibility to install and set the<br />
PTO shaft to the correct length. The following<br />
information is provided for reference.<br />
The telescoping tubes must overlap by at least 1/3<br />
their length, but not less than 150mm, in all<br />
possible operating positions and there must be at<br />
least 25mm telescopic movement remaining at the<br />
minimum operating length, refer diagram below.<br />
If the PTO shaft has to be shortened cut equal<br />
amounts from both male and female shafts and<br />
safety covers. Carefully remove all burrs then<br />
clean and relubricate before reassembling.<br />
PTO SHAFT LENGTH<br />
15