

1-2066FA INSTALL INSTRUCTIONS - Classic Auto Air
1-2066FA INSTALL INSTRUCTIONS - Classic Auto Air
1-2066FA INSTALL INSTRUCTIONS - Classic Auto Air

Create successful ePaper yourself
Turn your PDF publications into a flip-book with our unique Google optimized e-Paper software.
PAGE<br />
31<br />
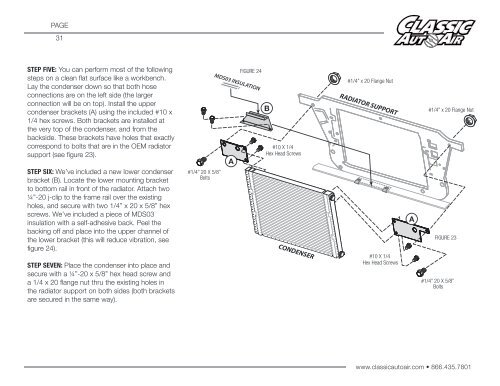
STEP FIVE: You can perform most of the following<br />
steps on a clean flat surface like a workbench.<br />
Lay the condenser down so that both hose<br />
connections are on the left side (the larger<br />
connection will be on top). Install the upper<br />
condenser brackets (A) using the included #10 x<br />
1/4 hex screws. Both brackets are installed at<br />
the very top of the condenser, and from the<br />
backside. These brackets have holes that exactly<br />
correspond to bolts that are in the OEM radiator<br />
support (see figure 23).<br />
STEP SIX: We’ve included a new lower condenser<br />
bracket (B). Locate the lower mounting bracket<br />
to bottom rail in front of the radiator. Attach two<br />
¼”-20 j-clip to the frame rail over the existing<br />
holes, and secure with two 1/4” x 20 x 5/8” hex<br />
screws. We’ve included a piece of MDS03<br />
insulation with a self-adhesive back. Peel the<br />
backing off and place into the upper channel of<br />
the lower bracket (this will reduce vibration, see<br />
figure 24).<br />
STEP SEVEN: Place the condenser into place and<br />
secure with a ¼”-20 x 5/8” hex head screw and<br />
a 1/4 x 20 flange nut thru the existing holes in<br />
the radiator support on both sides (both brackets<br />
are secured in the same way).<br />
#1/4” 20 X 5/8”<br />
Bolts<br />
FIGURE 24<br />
MDS03 INSULATION<br />
A<br />
B<br />
#10 X 1/4<br />
Hex Head Screws<br />
CONDENSER<br />
#1/4” x 20 Flange Nut<br />
RADIATOR SUPPORT<br />
#10 X 1/4<br />
Hex Head Screws<br />
A<br />
#1/4” x 20 Flange Nut<br />
FIGURE 23<br />
#1/4” 20 X 5/8”<br />
Bolts<br />
www.classicautoair.com • 866.435.7801


