

1-2066FA INSTALL INSTRUCTIONS - Classic Auto Air
1-2066FA INSTALL INSTRUCTIONS - Classic Auto Air
1-2066FA INSTALL INSTRUCTIONS - Classic Auto Air

Create successful ePaper yourself
Turn your PDF publications into a flip-book with our unique Google optimized e-Paper software.
PAGE<br />
32<br />
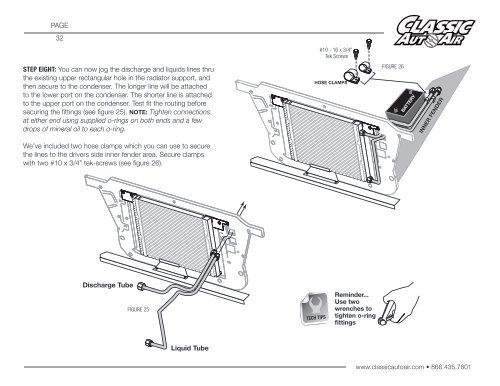
#10 - 16 x 3/4"<br />
Tek Screws<br />
STEP EIGHT: You can now jog the discharge and liquids lines thru<br />
the existing upper rectangular hole in the radiator support, and<br />
then secure to the condenser. The longer line will be attached<br />
to the lower port on the condenser. The shorter line is attached<br />
to the upper port on the condenser. Test fit the routing before<br />
securing the fittings (see figure 25). NOTE: Tighten connections<br />
at either end using supplied o-rings on both ends and a few<br />
drops of mineral oil to each o-ring.<br />
HOSE CLAMPS<br />
FIGURE 26<br />
BATTERY<br />
INNER FENDER<br />
We’ve included two hose clamps which you can use to secure<br />
the lines to the drivers side inner fender area. Secure clamps<br />
with two #10 x 3/4” tek-screws (see figure 26).<br />
Discharge Tube<br />
FIGURE 25<br />
TECH TIPS<br />
Reminder...<br />
Use two<br />
wrenches to<br />
tighten o-ring<br />
fittings<br />
Liquid Tube<br />
www.classicautoair.com • 866.435.7801


