

1-2066FA INSTALL INSTRUCTIONS - Classic Auto Air
1-2066FA INSTALL INSTRUCTIONS - Classic Auto Air
1-2066FA INSTALL INSTRUCTIONS - Classic Auto Air

You also want an ePaper? Increase the reach of your titles
YUMPU automatically turns print PDFs into web optimized ePapers that Google loves.
PAGE<br />
33<br />
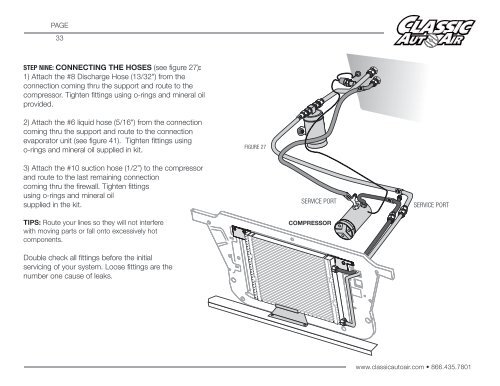
STEP NINE: CONNECTING THE HOSES (see figure 27):<br />
1) Attach the #8 Discharge Hose (13/32") from the<br />
connection coming thru the support and route to the<br />
compressor. Tighten fittings using o-rings and mineral oil<br />
provided.<br />
2) Attach the #6 liquid hose (5/16") from the connection<br />
coming thru the support and route to the connection<br />
evaporator unit (see figure 41). Tighten fittings using<br />
o-rings and mineral oil supplied in kit.<br />
FIGURE 27<br />
3) Attach the #10 suction hose (1/2”) to the compressor<br />
and route to the last remaining connection<br />
coming thru the firewall. Tighten fittings<br />
using o-rings and mineral oil<br />
supplied in the kit.<br />
TIPS: Route your lines so they will not interfere<br />
with moving parts or fall onto excessively hot<br />
components.<br />
Double check all fittings before the initial<br />
servicing of your system. Loose fittings are the<br />
number one cause of leaks.<br />
SERVICE PORT<br />
COMPRESSOR<br />
SERVICE PORT<br />
www.classicautoair.com • 866.435.7801


