Installation & Operation Manual - Phase-A-Matic, Inc.
Installation & Operation Manual - Phase-A-Matic, Inc.
Installation & Operation Manual - Phase-A-Matic, Inc.

Create successful ePaper yourself
Turn your PDF publications into a flip-book with our unique Google optimized e-Paper software.
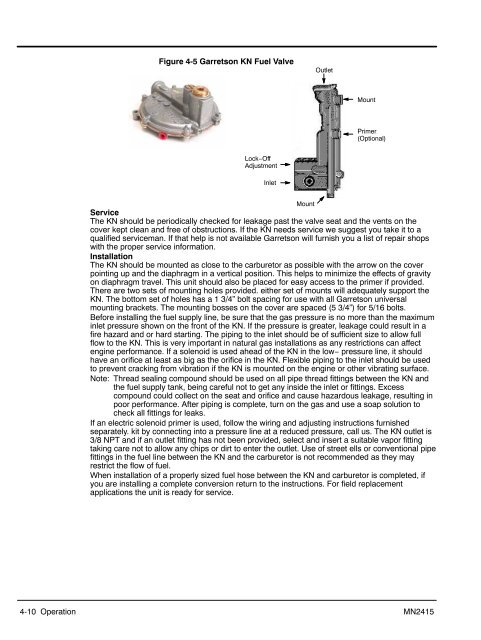
Figure 4-5 Garretson KN Fuel Valve<br />
Outlet<br />
Mount<br />
Primer<br />
(Optional)<br />
Lock−Off<br />
Adjustment<br />
Inlet<br />
Mount<br />
Service<br />
The KN should be periodically checked for leakage past the valve seat and the vents on the<br />
cover kept clean and free of obstructions. If the KN needs service we suggest you take it to a<br />
qualified serviceman. If that help is not available Garretson will furnish you a list of repair shops<br />
with the proper service information.<br />
<strong>Installation</strong><br />
The KN should be mounted as close to the carburetor as possible with the arrow on the cover<br />
pointing up and the diaphragm in a vertical position. This helps to minimize the effects of gravity<br />
on diaphragm travel. This unit should also be placed for easy access to the primer if provided.<br />
There are two sets of mounting holes provided. either set of mounts will adequately support the<br />
KN. The bottom set of holes has a 1 3/4” bolt spacing for use with all Garretson universal<br />
mounting brackets. The mounting bosses on the cover are spaced (5 3/4”) for 5/16 bolts.<br />
Before installing the fuel supply line, be sure that the gas pressure is no more than the maximum<br />
inlet pressure shown on the front of the KN. If the pressure is greater, leakage could result in a<br />
fire hazard and or hard starting. The piping to the inlet should be of sufficient size to allow full<br />
flow to the KN. This is very important in natural gas installations as any restrictions can affect<br />
engine performance. If a solenoid is used ahead of the KN in the low− pressure line, it should<br />
have an orifice at least as big as the orifice in the KN. Flexible piping to the inlet should be used<br />
to prevent cracking from vibration if the KN is mounted on the engine or other vibrating surface.<br />
Note: Thread sealing compound should be used on all pipe thread fittings between the KN and<br />
the fuel supply tank, being careful not to get any inside the inlet or fittings. Excess<br />
compound could collect on the seat and orifice and cause hazardous leakage, resulting in<br />
poor performance. After piping is complete, turn on the gas and use a soap solution to<br />
check all fittings for leaks.<br />
If an electric solenoid primer is used, follow the wiring and adjusting instructions furnished<br />
separately. kit by connecting into a pressure line at a reduced pressure, call us. The KN outlet is<br />
3/8 NPT and if an outlet fitting has not been provided, select and insert a suitable vapor fitting<br />
taking care not to allow any chips or dirt to enter the outlet. Use of street ells or conventional pipe<br />
fittings in the fuel line between the KN and the carburetor is not recommended as they may<br />
restrict the flow of fuel.<br />
When installation of a properly sized fuel hose between the KN and carburetor is completed, if<br />
you are installing a complete conversion return to the instructions. For field replacement<br />
applications the unit is ready for service.<br />
4-10 <strong>Operation</strong> MN2415