Remeha Avanta Plus
Remeha Avanta Plus
Remeha Avanta Plus

You also want an ePaper? Increase the reach of your titles
YUMPU automatically turns print PDFs into web optimized ePapers that Google loves.
<strong>Remeha</strong> <strong>Avanta</strong> <strong>Plus</strong><br />
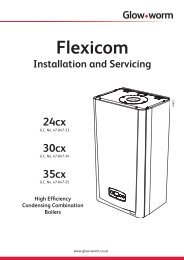
3. Dismantling the front plate of the heat exchanger<br />
4x<br />
4<br />
3<br />
2<br />
1<br />
• Release the ignition transformer mounting plate and remove<br />
it completely.<br />
• Disconnect the electrical connection on the gas block.<br />
• Release the union nut from the gas pipe on the outlet to the<br />
gas block.<br />
• Release the four nuts on the heat exchanger front plate<br />
• Carefully pull the front plate assembly c/w fan, gas block,<br />
venturi pipe and burner unit away from the heat exchanger<br />
by approx. 10 cm.<br />
• Disconnect the electrical plug on the back of the fan, so it<br />
becomes accessible.<br />
• Remove the front plate assembly completely.<br />
7<br />
fi g. 58<br />
Dismantling the front plate of the heat exchanger<br />
LT.AL.W7H.000.060<br />
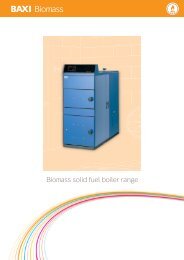
4. Maintenance to the burner<br />
• Carefully clean the burner with pressured air (do not keep<br />
the nozzle to close to the surface).<br />
• Visual inspection of the burner for any damages or cracks<br />
on the surface. If you see any damages, then replace the<br />
burner.<br />
fi g. 59<br />
Checking the burner<br />
LT.AL.W7H.000.061<br />
48