direct-vent fireplace (natural/propane/lp) - Desa
direct-vent fireplace (natural/propane/lp) - Desa
direct-vent fireplace (natural/propane/lp) - Desa

Create successful ePaper yourself
Turn your PDF publications into a flip-book with our unique Google optimized e-Paper software.
BHDV34NA, PA<br />
®<br />
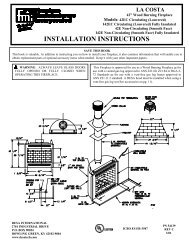
DIRECT-VENT FIREPLACE (NATURAL/PROPANE/LP)<br />
PRE-INSTALLATION<br />
PREPARATION<br />
LOCATION AND SPACE<br />
REQUIREMENTS<br />
Determine the safest and most efficient location<br />
for your Vanguard <strong>direct</strong>-<strong>vent</strong> <strong>fireplace</strong>.<br />
Make sure that rafters and wall studs are not<br />
in the way of the <strong>vent</strong>ing system. Choose a<br />
location where the heat output is not affected<br />
by drafts, air conditioning ducts, windows or<br />
doors. Figure 2 shows some common locations.<br />
Read all <strong>vent</strong>ing information in this<br />
manual. Be aware of all restrictions and<br />
precautions before deciding the exact location<br />
for your <strong>fireplace</strong>.<br />
When deciding the location of your <strong>fireplace</strong>,<br />
follow these rules:<br />
1. Do not connect this <strong>fireplace</strong> to a chimney<br />
flue serving a separate solid-fuel<br />
burning <strong>fireplace</strong> or appliance.<br />
2. Due to high temperatures, do not locate<br />
this <strong>fireplace</strong> in high traffic areas<br />
or near furniture or draperies.<br />
3. Proper clearances must be maintained.<br />
4. If your <strong>fireplace</strong> is to be installed <strong>direct</strong>ly<br />
on carpeting, vinyl tile, or any<br />
combustible material other than wood,<br />
it must be installed on a metal or wood<br />
panel extending the full width and<br />
depth of the <strong>fireplace</strong>. See Figure 3.<br />
CLEARANCES<br />
Minimum clearances to combustibles for<br />
the <strong>fireplace</strong> are as follows:<br />
Back, and sides<br />
0"/mm<br />
Perpendicular walls 6" (152mm)<br />
Floor<br />
0"/mm<br />
Ceiling to louver opening 42" (1067mm)<br />
Front<br />
36" (914mm)<br />
Top of Standoffs 0"/mm<br />
See General Venting on page 5 for specific<br />
<strong>vent</strong>ing clearances.<br />
FRAMING AND FINISHING<br />
Figures 4 and 5 show typical framing of this<br />
<strong>fireplace</strong>. Figure 6 on page 5 shows framing<br />
for corner installation. All minimum clearances<br />
must be met. Do not install <strong>fireplace</strong><br />
<strong>direct</strong>ly on carpeting, vinyl tile, or any combustible<br />
material other than wood. The <strong>fireplace</strong><br />
must set on a metal or wood panel<br />
extending the full width and depth of the<br />
<strong>fireplace</strong>.<br />
See Accessories on pages 34 and 35 for<br />
mantel kits available for this <strong>fireplace</strong>. If you<br />
are using a separate combustible mantel piece,<br />
refer to Figure 7 on page 5 for proper installation<br />
height. You can install noncombustible<br />
mantels at any height above the <strong>fireplace</strong>.<br />
Note: Noncombustible mantels may discolor!<br />
Must maintain a minimum<br />
1" clearance to combustibles<br />
34"<br />
20"<br />
5/8" for drywall facing<br />
Figure 5 - Framing Clearances for Typical<br />
Fireplace Installation<br />
Flush with a wall<br />
Through exterior wall<br />
enclosed in a chase<br />
Figure 2 - Common Fireplace Locations<br />
D<br />
RW<br />
FW<br />
Corner<br />
installation<br />
Fireplace size D x FW x RW<br />
34" 18 1 /2" 34 3 /8" 14"<br />
34 1 /4"<br />
34 3 /4"<br />
20" Vertical Termination<br />
19" Horizontal Termination<br />
Figure 3 - Fireplace Bottom Dimensions<br />
Figure 4 - Framing Clearances for Installation Against an Exterior Wall<br />
4 105981