Hydro-Gear ZT-5400 transaxles manual - BIBUS France
Hydro-Gear ZT-5400 transaxles manual - BIBUS France
Hydro-Gear ZT-5400 transaxles manual - BIBUS France

You also want an ePaper? Increase the reach of your titles
YUMPU automatically turns print PDFs into web optimized ePapers that Google loves.
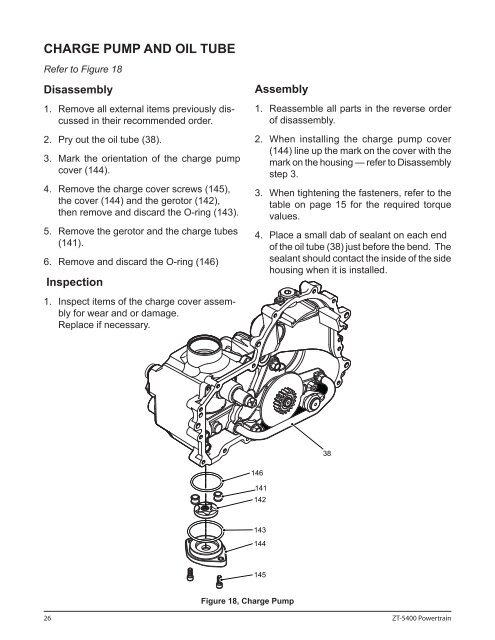
CHARGE PUMP AND OIL TUBE<br />
Refer to Figure 18<br />
Disassembly<br />
1. Remove all external items previously discussed<br />
in their recommended order.<br />
2. Pry out the oil tube (38).<br />
3. Mark the orientation of the charge pump<br />
cover (144).<br />
4. Remove the charge cover screws (145),<br />
the cover (144) and the gerotor (142),<br />
then remove and discard the O-ring (143).<br />
5. Remove the gerotor and the charge tubes<br />
(141).<br />
6. Remove and discard the O-ring (146)<br />
Inspection<br />
Assembly<br />
1. Reassemble all parts in the reverse order<br />
of disassembly.<br />
2. When installing the charge pump cover<br />
(144) line up the mark on the cover with the<br />
mark on the housing — refer to Disassembly<br />
step 3.<br />
3. When tightening the fasteners, refer to the<br />
table on page 15 for the required torque<br />
values.<br />
4. Place a small dab of sealant on each end<br />
of the oil tube (38) just before the bend. The<br />
sealant should contact the inside of the side<br />
housing when it is installed.<br />
1. Inspect items of the charge cover assembly<br />
for wear and or damage.<br />
Replace if necessary.<br />
38<br />
146<br />
141<br />
142<br />
143<br />
144<br />
145<br />
Figure 18, Charge Pump<br />
26 <strong>ZT</strong>-<strong>5400</strong> Powertrain