Create successful ePaper yourself
Turn your PDF publications into a flip-book with our unique Google optimized e-Paper software.
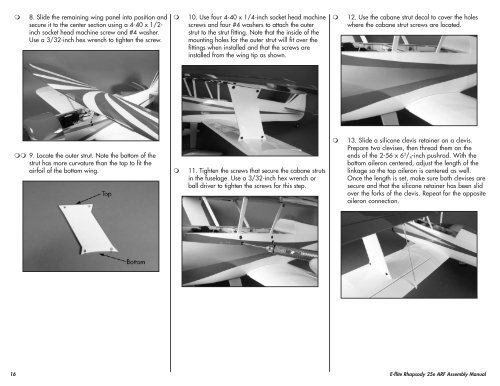
8. Slide the remaining wing panel into position and<br />
secure it to the center section using a 4-40 x 1/2-<br />
inch socket head machine screw and #4 washer.<br />
Use a 3/32-inch hex wrench to tighten the screw.<br />
<br />
10. Use four 4-40 x 1/4-inch socket head machine<br />
screws and four #4 washers to attach the outer<br />
strut to the strut fitting. Note that the inside of the<br />
mounting holes for the outer strut will fit over the<br />
fittings when installed and that the screws are<br />
installed from the wing tip as shown.<br />
<br />
12. Use the cabane strut decal to cover the holes<br />
where the cabane strut screws are located.<br />
9. Locate the outer strut. Note the bottom of the<br />
strut has more curvature than the top to fit the<br />
airfoil of the bottom wing.<br />
<br />
11. Tighten the screws that secure the cabane struts<br />
in the fuselage. Use a 3/32-inch hex wrench or<br />
ball driver to tighten the screws for this step.<br />
<br />
13. Slide a silicone clevis retainer on a clevis.<br />
Prepare two clevises, then thread them on the<br />
ends of the 2-56 x 6 3 / 4 -inch pushrod. With the<br />
bottom aileron centered, adjust the length of the<br />
linkage so the top aileron is centered as well.<br />
Once the length is set, make sure both clevises are<br />
secure and that the silicone retainer has been slid<br />
over the forks of the clevis. Repeat for the opposite<br />
aileron connection.<br />
16 E-<strong>flite</strong> <strong>Rhapsody</strong> <strong>25e</strong> <strong>ARF</strong> Assembly Manual


