


Create successful ePaper yourself
Turn your PDF publications into a flip-book with our unique Google optimized e-Paper software.
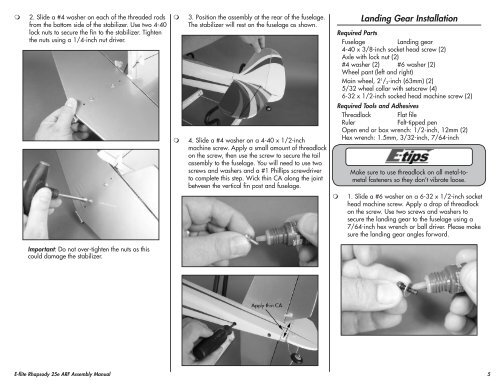
2. Slide a #4 washer on each of the threaded rods<br />
from the bottom side of the stabilizer. Use two 4-40<br />
lock nuts to secure the fin to the stabilizer. Tighten<br />
the nuts using a 1/4-inch nut driver.<br />
<br />
<br />
3. Position the assembly at the rear of the fuselage.<br />
The stabilizer will rest on the fuselage as shown.<br />
4. Slide a #4 washer on a 4-40 x 1/2-inch<br />
machine screw. Apply a small amount of threadlock<br />
on the screw, then use the screw to secure the tail<br />
assembly to the fuselage. You will need to use two<br />
screws and washers and a #1 Phillips screwdriver<br />
to complete this step. Wick thin CA along the joint<br />
between the vertical fin post and fuselage.<br />
Landing Gear Installation<br />
Required Parts<br />
Fuselage<br />
Landing gear<br />
4-40 x 3/8-inch socket head screw (2)<br />
Axle with lock nut (2)<br />
#4 washer (2) #6 washer (2)<br />
Wheel pant (left and right)<br />
Main wheel, 2 1 / 2 -inch (63mm) (2)<br />
5/32 wheel collar with setscrew (4)<br />
6-32 x 1/2-inch socked head machine screw (2)<br />
Required Tools and Adhesives<br />
Threadlock Flat file<br />
Ruler<br />
Felt-tipped pen<br />
Open end or box wrench: 1/2-inch, 12mm (2)<br />
Hex wrench: 1.5mm, 3/32-inch, 7/64-inch<br />
Make sure to use threadlock on all metal-tometal<br />
fasteners so they don’t vibrate loose.<br />
<br />
1. Slide a #6 washer on a 6-32 x 1/2-inch socket<br />
head machine screw. Apply a drop of threadlock<br />
on the screw. Use two screws and washers to<br />
secure the landing gear to the fuselage using a<br />
7/64-inch hex wrench or ball driver. Please make<br />
sure the landing gear angles forward.<br />
Important: Do not over-tighten the nuts as this<br />
could damage the stabilizer.<br />
E-<strong>flite</strong> <strong>Rhapsody</strong> <strong>25e</strong> <strong>ARF</strong> Assembly Manual<br />
5


