Create successful ePaper yourself
Turn your PDF publications into a flip-book with our unique Google optimized e-Paper software.
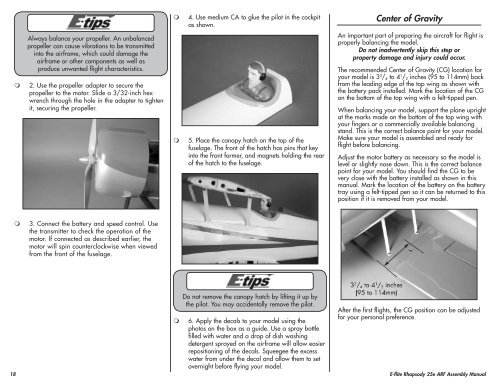
4. Use medium CA to glue the pilot in the cockpit<br />
as shown.<br />
Center of Gravity<br />
<br />
Always balance your propeller. An unbalanced<br />
propeller can cause vibrations to be transmitted<br />
into the airframe, which could damage the<br />
airframe or other components as well as<br />
produce unwanted flight characteristics.<br />
2. Use the propeller adapter to secure the<br />
propeller to the motor. Slide a 3/32-inch hex<br />
wrench through the hole in the adapter to tighten<br />
it, securing the propeller.<br />
<br />
5. Place the canopy hatch on the top of the<br />
fuselage. The front of the hatch has pins that key<br />
into the front former, and magnets holding the rear<br />
of the hatch to the fuselage.<br />
An important part of preparing the aircraft for flight is<br />
properly balancing the model.<br />
Do not inadvertently skip this step or<br />
property damage and injury could occur.<br />
The recommended Center of Gravity (CG) location for<br />
your model is 3 3 / 4 to 4 1 / 2 inches (95 to 114mm) back<br />
from the leading edge of the top wing as shown with<br />
the battery pack installed. Mark the location of the CG<br />
on the bottom of the top wing with a felt-tipped pen.<br />
When balancing your model, support the plane upright<br />
at the marks made on the bottom of the top wing with<br />
your fingers or a commercially available balancing<br />
stand. This is the correct balance point for your model.<br />
Make sure your model is assembled and ready for<br />
flight before balancing.<br />
Adjust the motor battery as necessary so the model is<br />
level or slightly nose down. This is the correct balance<br />
point for your model. You should find the CG to be<br />
very close with the battery installed as shown in this<br />
manual. Mark the location of the battery on the battery<br />
tray using a felt-tipped pen so it can be returned to this<br />
position if it is removed from your model.<br />
<br />
3. Connect the battery and speed control. Use<br />
the transmitter to check the operation of the<br />
motor. If connected as described earlier, the<br />
motor will spin counterclockwise when viewed<br />
from the front of the fuselage.<br />
Do not remove the canopy hatch by lifting it up by<br />
the pilot. You may accidentally remove the pilot.<br />
After the first flights, the CG position can be adjusted<br />
for your personal preference.<br />
6. Apply the decals to your model using the<br />
photos on the box as a guide. Use a spray bottle<br />
filled with water and a drop of dish washing<br />
detergent sprayed on the airframe will allow easier<br />
repositioning of the decals. Squeegee the excess<br />
water from under the decal and allow them to set<br />
overnight before flying your model.<br />
18 E-<strong>flite</strong> <strong>Rhapsody</strong> <strong>25e</strong> <strong>ARF</strong> Assembly Manual


