


You also want an ePaper? Increase the reach of your titles
YUMPU automatically turns print PDFs into web optimized ePapers that Google loves.
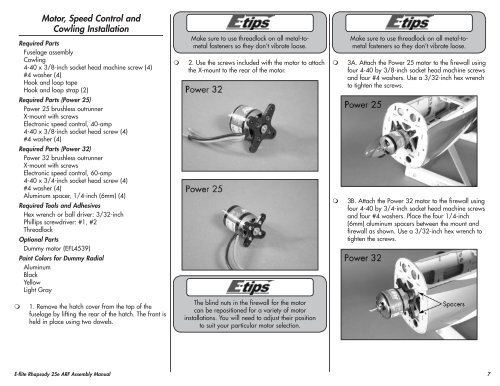
Motor, Speed Control and<br />
Cowling Installation<br />
Required Parts<br />
Fuselage assembly<br />
Cowling<br />
4-40 x 3/8-inch socket head machine screw (4)<br />
#4 washer (4)<br />
Hook and loop tape<br />
Hook and loop strap (2)<br />
Required Parts (Power 25)<br />
Power 25 brushless outrunner<br />
X-mount with screws<br />
Electronic speed control, 40-amp<br />
4-40 x 3/8-inch socket head screw (4)<br />
#4 washer (4)<br />
Required Parts (Power 32)<br />
Power 32 brushless outrunner<br />
X-mount with screws<br />
Electronic speed control, 60-amp<br />
4-40 x 3/4-inch socket head screw (4)<br />
#4 washer (4)<br />
Aluminum spacer, 1/4-inch (6mm) (4)<br />
Required Tools and Adhesives<br />
Hex wrench or ball driver: 3/32-inch<br />
Phillips screwdriver: #1, #2<br />
Threadlock<br />
Optional Parts<br />
Dummy motor (EFL4539)<br />
Paint Colors for Dummy Radial<br />
Aluminum<br />
Black<br />
Yellow<br />
Light Gray<br />
<br />
Make sure to use threadlock on all metal-tometal<br />
fasteners so they don’t vibrate loose.<br />
2. Use the screws included with the motor to attach<br />
the X-mount to the rear of the motor.<br />
<br />
<br />
Make sure to use threadlock on all metal-tometal<br />
fasteners so they don’t vibrate loose.<br />
3A. Attach the Power 25 motor to the firewall using<br />
four 4-40 by 3/8-inch socket head machine screws<br />
and four #4 washers. Use a 3/32-inch hex wrench<br />
to tighten the screws.<br />
3B. Attach the Power 32 motor to the firewall using<br />
four 4-40 by 3/4-inch socket head machine screws<br />
and four #4 washers. Place the four 1/4-inch<br />
(6mm) aluminum spacers between the mount and<br />
firewall as shown. Use a 3/32-inch hex wrench to<br />
tighten the screws.<br />
<br />
1. Remove the hatch cover from the top of the<br />
fuselage by lifting the rear of the hatch. The front is<br />
held in place using two dowels.<br />
The blind nuts in the firewall for the motor<br />
can be repositioned for a variety of motor<br />
installations. You will need to adjust their position<br />
to suit your particular motor selection.<br />
E-<strong>flite</strong> <strong>Rhapsody</strong> <strong>25e</strong> <strong>ARF</strong> Assembly Manual<br />
7


