


Create successful ePaper yourself
Turn your PDF publications into a flip-book with our unique Google optimized e-Paper software.
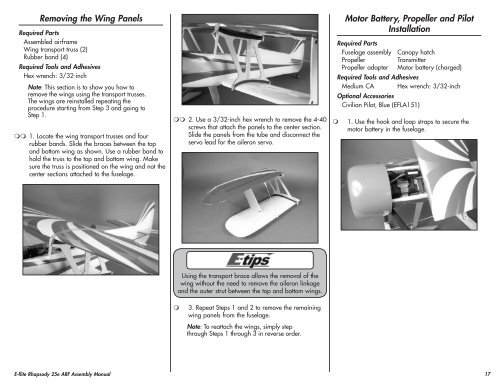
Removing the Wing Panels<br />
Required Parts<br />
Assembled airframe<br />
Wing transport truss (2)<br />
Rubber band (4)<br />
Required Tools and Adhesives<br />
Hex wrench: 3/32-inch<br />
Note: This section is to show you how to<br />
remove the wings using the transport trusses.<br />
The wings are reinstalled repeating the<br />
procedure starting from Step 3 and going to<br />
Step 1.<br />
1. Locate the wing transport trusses and four<br />
rubber bands. Slide the braces between the top<br />
and bottom wing as shown. Use a rubber band to<br />
hold the truss to the top and bottom wing. Make<br />
sure the truss is positioned on the wing and not the<br />
center sections attached to the fuselage.<br />
2. Use a 3/32-inch hex wrench to remove the 4-40<br />
screws that attach the panels to the center section.<br />
Slide the panels from the tube and disconnect the<br />
servo lead for the aileron servo.<br />
<br />
Motor Battery, Propeller and Pilot<br />
Installation<br />
Required Parts<br />
Fuselage assembly Canopy hatch<br />
Propeller<br />
Transmitter<br />
Propeller adapter Motor battery (charged)<br />
Required Tools and Adhesives<br />
Medium CA Hex wrench: 3/32-inch<br />
Optional Accessories<br />
Civilian Pilot, Blue (EFLA151)<br />
1. Use the hook and loop straps to secure the<br />
motor battery in the fuselage.<br />
Using the transport brace allows the removal of the<br />
wing without the need to remove the aileron linkage<br />
and the outer strut between the top and bottom wings.<br />
<br />
3. Repeat Steps 1 and 2 to remove the remaining<br />
wing panels from the fuselage.<br />
Note: To reattach the wings, simply step<br />
through Steps 1 through 3 in reverse order.<br />
E-<strong>flite</strong> <strong>Rhapsody</strong> <strong>25e</strong> <strong>ARF</strong> Assembly Manual<br />
17


