02_Installation Setup.fm - Drake Software Support
02_Installation Setup.fm - Drake Software Support
02_Installation Setup.fm - Drake Software Support

Create successful ePaper yourself
Turn your PDF publications into a flip-book with our unique Google optimized e-Paper software.
<strong>Drake</strong> <strong>Software</strong> User’s Manual<br />
<strong>Software</strong> <strong>Setup</strong><br />
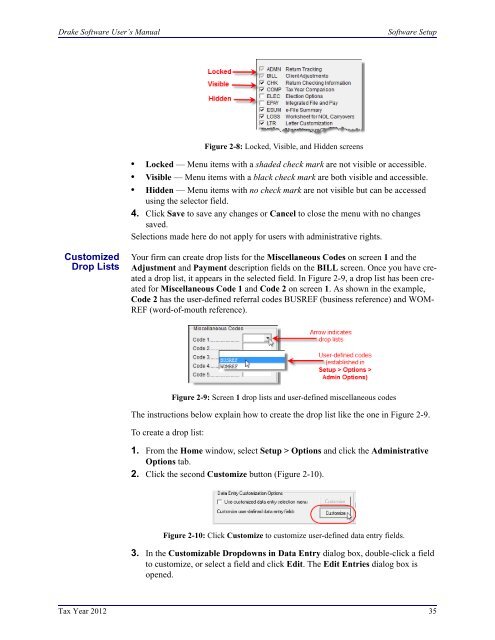
Figure 2-8: Locked, Visible, and Hidden screens<br />
• Locked — Menu items with a shaded check mark are not visible or accessible.<br />
• Visible — Menu items with a black check mark are both visible and accessible.<br />
• Hidden — Menu items with no check mark are not visible but can be accessed<br />
using the selector field.<br />
4. Click Save to save any changes or Cancel to close the menu with no changes<br />
saved.<br />
Selections made here do not apply for users with administrative rights.<br />
Customized<br />
Drop Lists<br />
Your firm can create drop lists for the Miscellaneous Codes on screen 1 and the<br />
Adjustment and Payment description fields on the BILL screen. Once you have created<br />
a drop list, it appears in the selected field. In Figure 2-9, a drop list has been created<br />
for Miscellaneous Code 1 and Code 2 on screen 1. As shown in the example,<br />
Code 2 has the user-defined referral codes BUSREF (business reference) and WOM-<br />
REF (word-of-mouth reference).<br />
Figure 2-9: Screen 1 drop lists and user-defined miscellaneous codes<br />
The instructions below explain how to create the drop list like the one in Figure 2-9.<br />
To create a drop list:<br />
1. From the Home window, select <strong>Setup</strong> > Options and click the Administrative<br />
Options tab.<br />
2. Click the second Customize button (Figure 2-10).<br />
Figure 2-10: Click Customize to customize user-defined data entry fields.<br />
3. In the Customizable Dropdowns in Data Entry dialog box, double-click a field<br />
to customize, or select a field and click Edit. The Edit Entries dialog box is<br />
opened.<br />
Tax Year 2012 35