DMX Operator Pro User Manual (pdf) - Elation Professional
DMX Operator Pro User Manual (pdf) - Elation Professional
DMX Operator Pro User Manual (pdf) - Elation Professional

Create successful ePaper yourself
Turn your PDF publications into a flip-book with our unique Google optimized e-Paper software.
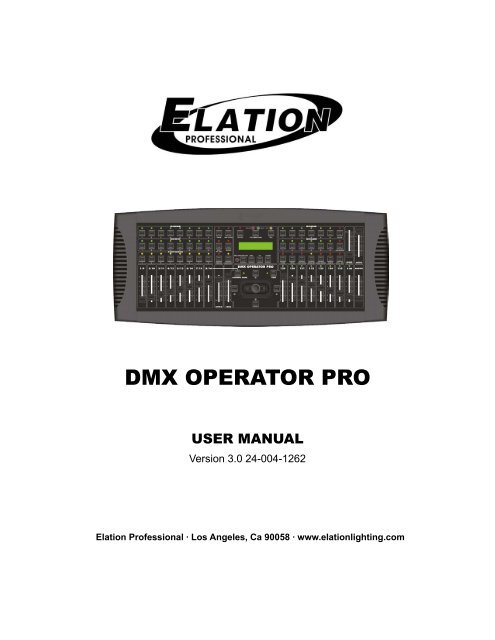
<strong>DMX</strong> OPERATOR PRO<br />
USER MANUAL<br />
Version 3.0 24-004-1262<br />
<strong>Elation</strong> <strong>Pro</strong>fessional · Los Angeles, Ca 90058 · www.elationlighting.com<br />
Table of Contents
<strong>DMX</strong> OPERATOR PRO<br />
Sections:<br />
Table of Contents<br />
1 : General Introduction………………..…………………………………………………………...………3<br />
2 : Safety Information & Maintenance……….………………………..……………………………….... 4<br />
3 : Information Notice…………………..……………..………………………………….………………... 5<br />
4 : Features and Specifications………………………..……………………………………………….... 5<br />
5: Technical Specifications ……………………………………………………………………….…….....6<br />
6: Basic Control Parts……………………………………………………………………………....….…6-9<br />
7: Set Up & Operation……………………..…… ………………………………………………….……9-10<br />
7.1 Connections……………….…………………………………………………………………………..9<br />
7.1.1 Setting <strong>DMX</strong> Address Channels for Moving Lights….……….…………………………..10<br />
7.1.2 Setting <strong>DMX</strong> Address Channels for Dimmer Packs (Par Cans)………………………...11<br />
7.2 Assign Joystick to Pan & Tilt..……………………………….…………..………………….…11-13<br />
7.3 Recording Moving Lights …………………….….…………………………………..…………….14<br />
7.3.1 Record a Moving Light Scene..………………………………………..…………....…14-15<br />
7.3.2 Record a Moving Light Show..… ………………………………….……..……………16-17<br />
7.4 Playback Moving Light Scenes & Shows.………………………………………….….…….…18<br />
7.4.1 Playback Moving Light Scenes. ………………………………..…………………………18<br />
7.4.2 Playback Moving Light Shows.…..………..……………………………………………....19<br />
7.5 Edit Moving Light Shows……………………..…….…………….…………………….……...…20<br />
7.5.1 Add Moving Light Show Steps………….………..…………………..………..……..…20-21<br />
7.5.2 Delete Moving Light Show Steps.……….…………………………………………………21<br />
7.5.3 Delete Moving Light Shows…………………..….………………….………………..…...22<br />
7.6 Recording Par Cans Scenes & Chases…….……..……………………………….……….…...23<br />
7.6.1 Record a Par Can Scene…….…………………………….…………..………..……..23-24<br />
7.6.2 Record a Par Can Chase..………...………………….…………………………..……24-25<br />
7.7 Playback Par Can Scenes & Chases……………..…….……………………..…………………26<br />
7.7.1 Playback Par Can Scenes….……….……………………………………………..…...… 26<br />
7.7.2 Playback Par Can Chases..……….………………………………..….……………….… 27<br />
7.8 Edit a Par Can Chase…………..………………………………………………….……………….28<br />
7.8.1 Add Par Can Chase Steps……………..…..…………………….……………..………28-29<br />
7.8.2 Delete Par Can Chase Steps……….……..………………….………………….……..….29<br />
7.8.3 Delete a Par Can Chase………..………..….…………………………………..….…….. 30<br />
8: Menu Options Set Up…………………………………………………………………….….………... 31<br />
8.1 Access Menu Options……………...…………………………….……………………….…….… 31<br />
8.2 Save to CF Card……………………………………………………………………….....………31-32<br />
8.3 Read CF Card…………………………………………………………………………………….32-33<br />
8.4 Channel Patch…………………..……………………………………..………….…..………... 34-35<br />
8.5 Pan/Tilt Fade Set Up…………………..…………………………………….…………….…… 35-36<br />
8.6 Display Mode Set Up…………………………..……………………………………………..…36-37<br />
2
<strong>DMX</strong> OPERATOR PRO<br />
Table of Contents (Cont.)<br />
8.7 MIDI Channel Set Up…………………………………………………………………….………..…..38<br />
9: MIDI Trigger Chart…………….………………………………………………………….……….….. 39<br />
10: CF Card Important Notice……….….………….………………….……………..…………..…..…. 39<br />
11: Erase All Memory.......................................................................................................................40<br />
Section 1: General introduction<br />
Thank you for choosing the <strong>Elation</strong> <strong>DMX</strong> <strong>Operator</strong> <strong>Pro</strong>. The <strong>DMX</strong> <strong>Operator</strong> <strong>Pro</strong> is a 136 channel hybrid<br />
lighting control device designed for DJ’s, clubs and small touring applications. This controller allows<br />
operators to easily manipulate conventional and moving lights via simple to use buttons and faders. The<br />
<strong>DMX</strong> <strong>Operator</strong> <strong>Pro</strong> puts programming, playback and live manipulation of Scenes and Shows at your<br />
fingertips.<br />
The <strong>DMX</strong> <strong>Operator</strong> <strong>Pro</strong> can control up to 8 moving lights, each consisting up to 16 channels- max 128<br />
channels. Up to 96 programmable Scenes and 8 programmable Shows can be recorded for the moving<br />
light section. Up to 96 programmable Scenes and 6 programmable Shows can be recorded for the<br />
conventional Par Can section. There is also a compact flash slot on the rear for an optional 32MB card so<br />
programs and setting can be saved. The compact flash card is NOT universal- it is a proprietary card that<br />
you must buy from the dealer where you purchased your console. The model number for the optional card<br />
is “32MB CARD”.<br />
Also incorporated are 14 quick access scene buttons, 8 for moving lights and 6 for Par Cans, 8 quick<br />
access Show buttons for moving lights and 6 Show buttons for Par Cans. The <strong>DMX</strong> <strong>Operator</strong> <strong>Pro</strong> also<br />
incorporates an assignable joystick- ideal for pan/tilt control of scanners and moving heads. A master<br />
fader shall be used to control the overall intensity for all 8 Par Can channels. A separate section of 8<br />
independent faders are included so the lighting operator can easily control Par Cans on the fly. Other<br />
features include a Tap Sync button for manual Show override, Step/Mix/Sequence button for Show<br />
playback, Audio button for music trigger (via internal microphone or line level input), Group button to<br />
control more than 1 fixture at a time and four speed and fade faders for manual override of Shows.<br />
Every unit has been thoroughly tested and carefully packed before shipment. Unpack the shipping carton<br />
and inspect thoroughly saving the carton and all packing materials for possible use later. Check carefully<br />
and make sure your product is not damaged and that no included accessory is missing. If your product<br />
appears to be damaged or missing something, please do not use it- contact our customer support staff at<br />
(800) 322.6337 ext-401 for instructions on what to do.<br />
3
<strong>DMX</strong> OPERATOR PRO<br />
Section: 2 Safety Information & Maintenance<br />
Please read all instructions prior to assembling, mounting, and operating your <strong>DMX</strong> OPERATOR PRO. To<br />
protect against fire, electric shock and injury to persons, please follow the safety precautions listed below<br />
and observe all warnings in this manual and warnings printed on the console. The following rules give<br />
important information regarding safety during operation and maintenance for long term use. If you have<br />
any questions regarding operation of this console, please contact our customer support staff at (800)<br />
322-6337 ext-401.<br />
• Use only a source of AC power that complies with local building and electrical codes<br />
and has both overload and ground-fault protection.<br />
• To reduce the risk of fire or electrical shock, do not expose this unit to rain or high<br />
levels of moisture. Do not use this unit near water.<br />
• Refer any service operation not described in this manual to a qualified technician.<br />
• Do not dismantle or modify this unit as there are no user serviceable parts inside. Refer<br />
all service related issues to a qualified technician.<br />
• Use this unit only as described.<br />
• Handle this unit carefully. Any strong shock or vibration may result in malfunction.<br />
• Do not operate this unit when front face panel is removed.<br />
• Any damaged or crimped AC cable should be replaced immediately. <strong>Pro</strong>tect the power<br />
supply cable from being walked on or pinched.<br />
• Do not allow children to play with this unit.<br />
• Keep these instructions for future use.<br />
• Heed all warnings.<br />
• Follow all instructions.<br />
• Clean only with dry cloth.<br />
• Do not install near any heat sources such as heaters, stoves, amplifiers or any other<br />
heat generating apparatus.<br />
• Only use attachments and accessories specified by <strong>Elation</strong> <strong>Pro</strong>fessional.<br />
• Unplug this unit during lighting storms or when unused for long periods of time.<br />
4
<strong>DMX</strong> OPERATOR PRO<br />
Section: 3 Information Notice<br />
Please read through this manual carefully and thoroughly, as it gives important information regarding<br />
safety, use and maintenance. Keep this manual with the unit for possible future reference.<br />
<strong>Pro</strong>duct Modification Warning:<br />
<strong>Elation</strong> <strong>Pro</strong>fessional products are designed and manufactured to meet the requirements of United States<br />
and International safety regulations. Modifications to the product could affect safety and render the<br />
product non-compliant to relevant safety standards.<br />
Updates & Changes:<br />
Information and specifications in this manual are subject to change without notice. <strong>Elation</strong> <strong>Pro</strong>fessional<br />
assumes no responsibility or liability for any errors or inaccuracies that may appear in this manual.<br />
Copyright:<br />
© 2004 <strong>Elation</strong> <strong>Pro</strong>fessional<br />
All rights reserved. No part of this manual may be reproduced, in any form or by any means, without<br />
permission in writing from <strong>Elation</strong> <strong>Pro</strong>fessional.<br />
Section: 4 Features and Specifications<br />
• Hybrid console for 16 lights (8 moving lights and 8 conventional Par Cans).<br />
• 136 total <strong>DMX</strong> channels (128 channels for Moving Lights and 8 for Par Cans ).<br />
• 6 programmable Par Can Chases.<br />
• 8 programmable Moving Light Shows.<br />
• 96 programmable Scenes for Moving Lights.<br />
• 96 programmable Scenes for Par Cans.<br />
• Speed & Fade Time faders.<br />
• Joystick for Pan / Tilt control of Moving Lights.<br />
• 32Mb slot for exchanging data and memory files.<br />
• Fog Machine trigger button.<br />
• Power failure memory back up.<br />
• MIDI Input.<br />
• Audio input and built-in microphone for music synchronization.<br />
5
<strong>DMX</strong> OPERATOR PRO<br />
Section: 5 Technical Specifications<br />
• Model………………………………….<strong>DMX</strong> OPERATOR PRO<br />
• Power Input…………………………..DC 9~15V, 600 mA min.<br />
• LCD……………………………………2×16 characters<br />
• Audio Trigger…………………………Built-in microphone or line in<br />
• <strong>DMX</strong> Output…………………….…….3 PIN female <strong>DMX</strong> connector<br />
• Dimensions…………………………...7” (L) × 3.15” (H) × 19” (W)<br />
• Weight…………………………………14 lbs.<br />
Section: 6 Basic Control Parts<br />
6.1 Front panel<br />
• SCENE buttons:<br />
The Scene buttons are used to playback or store Scenes for Moving Lights and Par Cans.<br />
• SHOW button (Moving Light Section):<br />
This Show button is used to playback or store Shows for Moving Lights.<br />
• Chase button (Par Can Section):<br />
This button is used to playback or store Chases for Par Cans.<br />
• FIXTURE buttons:<br />
The Fixture buttons are used to select moving lights when recording Scenes and Shows or for<br />
manual control.<br />
• DIMMER faders:<br />
The Dimmer faders (channels 129 thru 136) are used to adjust relevant dimming level for each<br />
channel.<br />
• PAGE button:<br />
The Page button is used when selecting between pages for relevant Scenes, Chases and<br />
Shows.<br />
• STEP / MIX / SEQ button:<br />
Used to manually trigger Show steps or switch between the Mix and Sequence mode Show<br />
playback for moving lights.<br />
• TAP SYNC button:<br />
There are two (2) of these buttons that temporarily override the Show and Chase speed rate. Tap<br />
on the button two times to enable and override originally set speeds.<br />
• AUDIO button:<br />
The Audio button will activate the internal microphone or a line level input for music<br />
synchronization when Chases or Shows are played back.<br />
6
<strong>DMX</strong> OPERATOR PRO<br />
Section: 6 Basic Control Parts (Cont.)<br />
• GROUP button:<br />
The Group button is used to control more than one moving light at a time.<br />
• BLACKOUT button:<br />
The Blackout button takes all <strong>DMX</strong> values to zero.<br />
• SETUP button:<br />
The Setup button allows access to the <strong>DMX</strong> <strong>Operator</strong> <strong>Pro</strong>s menu options.<br />
• FOG MACHINE button:<br />
This button will trigger a compatible fog machine when connected to the rear fog input.<br />
• DEL button:<br />
This button is used to delete relevant Scenes, Chases and Show & Chase steps.<br />
• RECORD button:<br />
The Record button is used to record Scenes, Chases and Shows. It also functions as an Enter<br />
button for various menu options.<br />
• ESC button:<br />
This button is used to cancel or escape relevant operation or modes.<br />
• UP/DOWN buttons:<br />
The Up / Down buttons are used to scroll or adjust desired levels during operation.<br />
• CH.PAGE button:<br />
Press this button to switch between Moving Light Channels 1-8 and Channels 9-16. When the LED<br />
above the button is “OFF”, it means channels 1-8 are active, when the LED is “ON “, it means<br />
channels 9-16 are active.<br />
• FINE button:<br />
When the Fine button is pressed, it allows for fine adjustment of PAN / TILT position (16 bit).<br />
•“Arrow” buttons on all sides of joystick:<br />
These buttons are used to manually make fine PAN / TILT adjustments for selected moving lights.<br />
• Joystick:<br />
The joystick is used to control the PAN / TILT movement for selected moving lights.<br />
• STANDBY button:<br />
This button is used to blackout the Par Can channel's (129-136).<br />
• Fade & Speed button:<br />
This button enables and disables fade time for Par Can channels.<br />
• Full On button:<br />
Pressing this button will temporarily activate Par Can channels 129-136 to 100% full intensity.<br />
• Auto button:<br />
The Auto button is used to activate Auto trigger mode for selected Par Can scene pages.<br />
7
<strong>DMX</strong> OPERATOR PRO<br />
Section: 6 Basic Control Parts (Cont.)<br />
• ONE/MIX/SEQ button:<br />
This button is used to select between the three modes for the Par Can section.<br />
• Speed Fader:<br />
This fader is used to adjust a desired hold rate during playback.<br />
• Fade Fader:<br />
This fader is used to adjust a desired fade time during playback.<br />
• Audio Fader:<br />
The Audio fader is used to adjust the internal microphones sensitivity for Par Can Chase playback.<br />
• Master Fader:<br />
The Master fader is used to proportionally control the output for Par Can channels 129-136.<br />
6.2 Rear panel<br />
• POWER ON / OFF :<br />
The Power switch is used to turn the console ON and OFF.<br />
• DC INPUT :<br />
DC 9 ~15V, 500mA min. Power Supply (Included)<br />
• AUDIO LINE INPUT :<br />
0.1V~1Vp-p. RCA line level input.<br />
• <strong>DMX</strong> polarity select<br />
Use this switch to select desired <strong>DMX</strong> polarity (2-,3+ / 2+,3-).<br />
• <strong>DMX</strong> OUT :<br />
3 pin XLR output to send <strong>DMX</strong> data to fixtures.<br />
• MIDI IN :<br />
This input receives MIDI information from a MIDI device.<br />
• FOG MACHINE INPUT :<br />
Connect a compatible fog machine for on board monitoring and triggering.<br />
• CF CARD socket:<br />
The CF card socket is for our optional compact flash card used to store and exchange information.<br />
The model number for the optional CF card is “32MB/CARD”. (The card is proprietary and only<br />
available through any <strong>Elation</strong> <strong>Pro</strong>fessional authorized dealer).<br />
• EXT STEP CONTROL INPUT :<br />
This input is for an optional external foot controller. The model number for the optional foot<br />
controller is “<strong>DMX</strong> PRO-FC”. Available through any <strong>Elation</strong> <strong>Pro</strong>fessional authorized dealer.<br />
8
<strong>DMX</strong> OPERATOR PRO<br />
• MOLDED ENDS:<br />
All surrounding plastic moulds can be removed if you desire to install the controller into a rack.<br />
Simply remove the ten screws that secure the ends to the chassis.<br />
Section: 7 Set Up<br />
7.1 Connections<br />
It is strongly recommended that you use shielded twisted-pair cable for your data runs.<br />
Microphone cable cannot transmit <strong>DMX</strong> data reliably over long runs. Never use a “Y” connector or<br />
any other means to split the link. If you need to branch out in different directions, use a dedicated<br />
Opto-isolated splitter such as the <strong>Elation</strong> Opto Branch-4 or <strong>DMX</strong> Branch-4. It is also important to<br />
not overload a link. For best results, it is suggested that you run up to 32 fixtures on a single link.<br />
Always, terminate the link by installing a termination plug into the output socket of the last fixture<br />
in line. In most cases, a terminator consist of a male 3 pin XLR connector with a quarter watt 120<br />
ohm resistor soldered across pins 2 & 3. Ask your local <strong>Elation</strong> dealer for <strong>DMX</strong> compliant cables,<br />
branches and terminators designed for lighting control.<br />
(1) With an XLR male to female cable, connect the XLR male end into the <strong>DMX</strong> <strong>Operator</strong><br />
<strong>Pro</strong>s output socket.<br />
(2) With the opposite end of the same cable, connect the female XLR end into the input of<br />
your first moving light fixture or dimmer pack in the link.<br />
(3) With another XLR cable, connect the male XLR end into the output of your first moving<br />
light or dimmer pack and the female XLR end into the input of your second moving light or<br />
dimmer pack in the link.<br />
(4) In a daisy chain manner, continue to connect the remainder of your moving lights and<br />
dimmer packs and install a terminator into the output of the last fixture in the link.<br />
9
<strong>DMX</strong> OPERATOR PRO<br />
7.1.1 Setting <strong>DMX</strong> Address Channels for Moving Lights<br />
Every fixture in the link must be assigned a <strong>DMX</strong> address channel, also known as a start channel,<br />
which is the first channel the controller uses to send information to the fixtures. The <strong>DMX</strong><br />
<strong>Operator</strong> <strong>Pro</strong> allows for control of up to 8 individual fixtures each occupying 16 <strong>DMX</strong> channels.<br />
Fixtures of the same type can share the same address and will mimic each others behavior. There<br />
is no fixture library incorporated into the <strong>DMX</strong> <strong>Operator</strong> <strong>Pro</strong>. Each fixture is automatically<br />
assigned sixteen <strong>DMX</strong> channels regardless of how may channels it uses. Therefore, the starting<br />
address channel for each fixture has been predefined. Please see below for additional<br />
instructions on assigning your fixtures.<br />
(1) Set the starting <strong>DMX</strong> address channel on your first moving light fixture to one (1).<br />
(2) Set the <strong>DMX</strong> channel on your second moving light fixture to seventeen (17).<br />
(3) Set the <strong>DMX</strong> channel on your third fixture to thirty three (33).<br />
(4) Set the <strong>DMX</strong> channel on your fourth fixture to forty nine (49).<br />
(5) Continue to address the remainder of your fixtures according to the chart below.<br />
Fixture # 1 2 3 4 5 6 7 8<br />
<strong>DMX</strong><br />
Channel 1 17 33 49 65 81 97 113<br />
10
<strong>DMX</strong> OPERATOR PRO<br />
7.1.2 Setting <strong>DMX</strong> Address Channels for Dimmer Packs (Par Cans)<br />
The <strong>DMX</strong> <strong>Operator</strong> <strong>Pro</strong> allows for control of up to eight independent dimmer channels via two<br />
channel dimmer packs such as the <strong>Elation</strong> DP-415 or DP-<strong>DMX</strong>20L. Dimmer packs can share the<br />
same address and will mimic each others behavior. The eight dimmer channels shall be<br />
controlled via eight independent channel faders. The <strong>DMX</strong> <strong>Operator</strong> <strong>Pro</strong> reserves <strong>DMX</strong> channels<br />
129 to 136 for the par section. To set two four channel dimmer packs for operation with the <strong>DMX</strong><br />
<strong>Operator</strong> <strong>Pro</strong>, follow these steps:<br />
(1) Set the starting <strong>DMX</strong> address channel on your first dimmer pack in the link to (129)- dip<br />
switches 1 & 8 ON.<br />
(2) Set the <strong>DMX</strong> channel on your second dimmer pack in the link to (133)- dip switches 1,3 &<br />
8 ON.<br />
(3) Additional packs may be linked and assigned to these address settings- 129 or 136. All<br />
packs assigned the same address channels will mimic each other.<br />
7.2 Assign Joystick to Pan & Tilt<br />
(1) Press and hold down the "SETUP" button for three (3) seconds or until the green<br />
LED above the SETUP button comes on. The LCD will display the following with a<br />
cursor box flashing over the # 1 option.<br />
1. CF CARD ↓<br />
2. ASSIGN CH.<br />
(2) Press the "DOWN" button one (1) time so that the cursor is now flashing over the # 2<br />
"ASSIGN CH." option. The LCD will display the following with the cursor box now<br />
flashing over the # 2 option.<br />
1. CF CARD ↓<br />
2. ASSIGN CH.<br />
11
<strong>DMX</strong> OPERATOR PRO<br />
7.2 Assign Joystick to Pan & Tilt (Cont.)<br />
(3) Press the "Record" button to enter the assign channel option. The LCD will display<br />
the following:<br />
CHANNEL01>OUT01<br />
OK ESC SEL ADJ<br />
(4) Press the "UP" button sixteen (16) times or until your LCD display reads "PAN<br />
>NONE" on the top line as displayed below.<br />
PAN >NONE<br />
OK ESC SEL ADJ<br />
(5) Next, press the "DOWN" button until the LCD display's the Pan channel # for your<br />
fixture. You will have to refer to the <strong>DMX</strong> chart that came with your light to input this<br />
information. For example, if the Pan channel of your light is channel # 1, then you<br />
would set your controller up as displayed below.<br />
PAN >CH01<br />
OK ESC SEL ADJ<br />
(6) Press the "UP" button one (1) time so that your LCD display’s "TILT >NONE" on the<br />
top line as displayed below.<br />
TILT >NONE<br />
OK ESC SEL ADJ<br />
(7) Next, press the "DOWN" button until the LCD display's the tilt channel # for your<br />
fixture. Once again, please refer to the <strong>DMX</strong> chart that came with your light for this<br />
information. For example, if the Tilt channel of your light is channel # 2, then you<br />
would set your controller up as displayed below.<br />
TILT >CH02<br />
OK ESC SEL ADJ<br />
12
<strong>DMX</strong> OPERATOR PRO<br />
7.2 Assign Joystick to Pan & Tilt (Cont.)<br />
(8) If your lights incorporate Pan Fine and Tilt Fine channels, repeat steps 4 thru 7.<br />
(9) Next, press and hold down the "GROUP" button and simultaneously select<br />
the "FIXTURE" number buttons to select the lights you wish to assign the<br />
joystick to. All selected fixtures will have the LED above the buttons flashing.<br />
(10) Now that you’ve assigned your Pan and Tilt channels to the joystick, you need to<br />
confirm and save these settings to memory. To do this, press the "RECORD" button<br />
one (1) time. The LCD display will momentarily read "GOOD". You can now exit menu<br />
mode by pressing the "ESC" button two (2) times. You now should have control of<br />
the pan and tilt using the joystick for all assigned lights.<br />
13
<strong>DMX</strong> OPERATOR PRO<br />
7.3 Recording Moving Lights<br />
7.3.1 Record a Moving Light Scene<br />
This section takes you through the necessary steps to record moving light Scenes. You will be<br />
using the section for moving lights which is located on the left side of your console or all buttons to<br />
the left of the LCD display- including buttons in the LCD display section. The Scene buttons you<br />
will be recording to- are located on the upper top left section of your console numbered 1 through<br />
8. Scenes can be played back one of two ways. The first way is to manually trigger each desired<br />
scene and the second is to include the desired group of scenes into a Show for automatic<br />
sequential playback.<br />
(1) Press and hold down the "RECORD" button for three (3) seconds or until the green<br />
LED next to the RECORD button comes on. The LCD will display the following:<br />
SELECT A SCENE<br />
OR SHOW! PAGE01<br />
(2) If this is your first time recording Scenes, you should start saving them on Page #01-<br />
please go to step #3 now. If you want to select a different page number from what is<br />
displayed, press the “PAGE” button so that the red LED above the Page button<br />
comes ON and then use the “UP” and “DOWN” buttons to scroll through to the other<br />
pages. To select the new page, simply stop on the desired page and go to step #3.<br />
There are a total of 12 pages.<br />
(3) Select the “SCENE” button where you wish to record to. The selected Scene LED<br />
will flash repeatedly. For example, if you are on Page #01 and you select Scene #1,<br />
the LED above the #1 Scene button will flash repeatedly and your LCD will display the<br />
following:<br />
EDIT SCENE1/PG01<br />
SAVE ESC PAGE01<br />
14
<strong>DMX</strong> OPERATOR PRO<br />
7.3.1 Record a Moving Light Scene (Cont.)<br />
(4) Select the “FIXTURE” or fixtures that you wish to include into the selected scene.<br />
The selected fixture will have its LED flashing above the button. To select more than<br />
one fixture at a time, simultaneously press and hold down the “GROUP” button and<br />
select the fixture #’s that you want grouped. In this case, all selected fixtures will have<br />
their LED’s flashing in tandem.<br />
(5) Next, use the faders to set your moving lights to the look you desire. To control<br />
channels 1-8 of your moving lights, make sure the “CH.PAGE” LED is OFF. To<br />
control channels 9-16, make sure the “CH.PAGE” LED is ON.<br />
(6) Once your look is set, press the “RECORD” button to SAVE. All LED’s will flash once<br />
confirming that your scene has been saved. Your LCD will once again display the<br />
following:<br />
SELECT A SCENE<br />
OR SHOW! PAGE01<br />
(7) To record additional Scenes, repeat steps 3 thru 6.<br />
(8) To exit record mode, press the “ESC” button one time.<br />
15
<strong>DMX</strong> OPERATOR PRO<br />
7.3.2 Record a Moving Light Show<br />
These next steps will guide you on how to record Shows for your moving lights. Shows are a<br />
sequence of Scenes that incorporate separate hold and fade times- the hold times work in<br />
conjunction with the SPEED fader, the fade time’s work in conjunction with the FADE fader. It is<br />
suggested that you record several Scenes before attempting to record a Show. As previously<br />
explained in the Record Scenes section, you will once again be using the moving light and LCD<br />
display sections to record Shows. There are eight Shows that you can record up to 99 steps each<br />
into.<br />
(1) Press and hold down the "RECORD" button for three (3) seconds or until the green<br />
LED next to the RECORD button comes on. The LCD will display the following:<br />
SELECT A SCENE<br />
OR SHOW! PAGE01<br />
(2) Select the “SHOW” button 1-8, where you wish to record to. The selected SHOW<br />
LED will flash repeatedly. For example, if you select SHOW #1, the LED above the #1<br />
SHOW button will flash repeatedly and your LCD will display the following:<br />
EDIT SHOW1/TL00<br />
ADD ESC STEP00<br />
(3) If you previously programmed Scenes into page #01, the LED’s above each button<br />
containing a scene, will be on. At this point, you may select one of those Scenes or<br />
press the “PAGE” button so that the red LED above the Page button comes on and<br />
then use the “UP” and “DOWN” buttons to scroll through the other pages. Select the<br />
“SCENE” # that you wish to have as your first Show step. The LED above the<br />
selected Scene # will then be flashing. (NOTE: YOU CAN ALSO SELECT FIXTURES,<br />
SET THEIR PARAMETERS AND RECORD THEM INTO SHOWS ON THE FLY.<br />
HOWEVER, IF YOU ARE NEW TO <strong>DMX</strong> OR PROGRAMMING THIS CONSOLE, IT<br />
IS STRONGLY RECOMMENDED THAT YOU SELECT PRE PROGRAMMED<br />
SCENES TO RECORD SHOWS).<br />
16
<strong>DMX</strong> OPERATOR PRO<br />
7.3.2 Record a Moving Light Show (Cont.)<br />
(4) Next, set your desired hold and fade time for your first Show step by using the<br />
“SPEED” fader for your HOLD time and the “FADE” fader for your FADE time. The<br />
hold and fade time range is five tenths of a second to ten minutes. Therefore, the<br />
maximum times that can be set to hold or fade a selected scene step is 10 minutes<br />
and the minimum time is .5 second. Note: When adjusting the speed fader, “S”<br />
represents “Speed” followed by the set hold time- .05 to 59.00S (Seconds), after 59<br />
seconds, the LCD will display “1M00S”, “M” represents minutes and can be adjusted<br />
up to 10M00S (10 minutes and 0 seconds). “F” represents Fade time.<br />
(5) Once your scene is selected and your speed and fade times have been set, press the<br />
“RECORD” button, all of the LED’s will flash one (1) time and your Show step will<br />
advance one (1) time as well. The LCD will display the following:<br />
EDIT SHOW1/TL01<br />
ADD ESC STEP01<br />
• “TL” represents total Show steps and “STEP” represents current Show step. This<br />
becomes important when wanting to edit your Show later (See Editing Moving<br />
Light Shows in section 7.5 on page 18).<br />
(6) Repeat steps 3-5 to continue recording additional steps into your Show. Each time<br />
you record a new scene into your Show, the Show step will advance by one (1). You<br />
can store up to 99 steps maximum per Show.<br />
(7) Once you’ve completed recording your Show, press the “ESC” button two (2) times<br />
to exit record mode.<br />
17
<strong>DMX</strong> OPERATOR PRO<br />
7.4 Playback Moving Light Scenes and Shows<br />
7.4.1 Playback Moving Light Scenes<br />
(1) Press the “PAGE” button so the red LED above the Page button comes on.<br />
(2) Locate the page which contains the scene that you wish to playback by using the “UP<br />
& DOWN” buttons. You will notice the Page numbers changing on the top left corner<br />
of the LCD display as you press either the UP or DOWN buttons. (Note: As you are<br />
scrolling through pages, the green Scene LED’s may come on and off. When an LED<br />
is ON, this means that there is a Scene stored there- when the LED is OFF, it means<br />
that the location is empty or has no scene stored there).<br />
(3) Once you’ve located the page containing the scene that you want to playback, press<br />
the desired “SCENE” # 1-8 button. The selected scene LED will begin to flash and<br />
the scene will come ON. The green FIXTURE LED’s for fixtures which are included<br />
into the selected scene will also come ON. You can manually select any fixture and<br />
control it on the fly while the other fixtures continue to run the selected scene.<br />
(4) To turn the selected scene OFF, press the same scene button or press<br />
“BLACKOUT”. You may also select another scene in which case the originally<br />
selected scene will turn OFF and the newly selected scene will come ON and its LED<br />
will flash.<br />
18
<strong>DMX</strong> OPERATOR PRO<br />
7.4.2 Playback Moving Light Shows<br />
Shows can be played back in MIXED or SEQUENCE modes. On the console MIXED is<br />
abbreviated by “MIX” and SEQUENCE by “SEQ”. In MIXED mode, selected Show LED’s will flash<br />
simultaneously and all selected Shows will run at the same time. If a fixture or fixtures are<br />
included into more than one (1) Show, the last selected Show will be the one to take precedence.<br />
In SEQUENCE mode, selected Shows will playback one at a time in the order they were selected.<br />
The relevant Show LED’s will flash when running while the other Show’s LED’s remain steadily<br />
ON.<br />
(1) Select the desired playback mode by pressing the “MIX/SEQ” button. When the LED<br />
above the MIX/SEQ button is steadily ON, playback will take place in MIXED mode.<br />
When the LED above the MIX/SEQ button is flashing, playback will take place in<br />
SEQUENCE mode.<br />
(2) Select the “SHOW” button that you wish to playback. The selected Show or Shows<br />
will begin to run immediately including the originally set speed and fade times.<br />
However, the selected Show speed and fade times can manually be adjusted on the<br />
fly by simultaneously pressing the “SHOW” # button followed by the<br />
“STEP/MIX/SEQ” button. A rapidly flashing Show LED indicates that you can<br />
manually override the preset speed and fade times by adjusting the “SPEED” and<br />
“FADE” faders- the “TAP SYNC” function will also be enabled (see Tap Sync on<br />
Pg-6) . A slow flashing Show LED indicates that the Show is running at its<br />
preprogrammed speed and fade times. Adjusting the Speed and Fade fader at this<br />
time, will have no effect. You can also manually trigger Show steps by tapping on the<br />
“STEP/MIX/SEQ” when desired.<br />
(To synchronize your Show to sound, simply press the “AUDIO” button so the red<br />
LED above the Audio button comes ON. Any set FADE TIMES will not work in<br />
Audio mode. The “TAP SYNC” LED will flash when ever sound is detected via an<br />
internal microphone.)<br />
19
<strong>DMX</strong> OPERATOR PRO<br />
7.5 Edit Moving Light Shows<br />
7.5.1 Add Moving Light Show steps<br />
(1) Press and hold down the "RECORD" button for three (3) seconds or until the green<br />
LED next to the RECORD button comes ON. The LCD will display the following:<br />
SELECT A SCENE<br />
OR SHOW! PAGE01<br />
(2) Select the “SHOW” button 1-8, that you wish to edit. The selected SHOW LED will<br />
flash repeatedly. For example, if you select SHOW #1, the LED above the #1 SHOW<br />
button will flash repeatedly and your LCD will display the following:<br />
EDIT SHOW1/TLXX<br />
ADD ESC STEP00<br />
• TLXX = Total Show steps.<br />
(3) Press the “PAGE” button so that the LED above its button goes OFF. Use the “UP”<br />
and “DOWN” buttons to scroll through your Show steps. Stop where you wish to add<br />
a step. For example, Show #1 contains 15 total steps and I wish to add a step after<br />
step #7. The LCD should display the following:<br />
EDIT SHOW1/TL15<br />
ADD ESC STEP07<br />
(4) Press “RECORD” button one (1) time. Your Show step will advance by one-<br />
“STEP08”. A temporary step will be created which is a copy of your previous step.<br />
(5) Press the “PAGE” button so that the LED above its button comes ON. Use the “UP”<br />
and “DOWN” buttons to scroll through the scene pages. Stop when you locate the<br />
page # that contains the scene you wish to add and select it by pressing the<br />
corresponding Scene # button.<br />
20
<strong>DMX</strong> OPERATOR PRO<br />
7.5.1 Add Moving Light Show steps (Cont.)<br />
(6) Press the “RECORD” button one (1) time to store the new scene.<br />
(7) Press the “PAGE” button one (1) time then press the “DOWN” button one (1) time.<br />
(8) Press the “DEL” button one (1) time to erase the temporary step.<br />
(9) To delete additional steps, repeat steps 3 thru 8. Press “ESC” two (2) times to exit.<br />
7.5.2 Delete Moving Light Show steps<br />
(1) Press and hold down the "RECORD" button for three (3) seconds or until the green<br />
LED next to the RECORD button comes ON. The LCD will display the following:<br />
SELECT A SCENE<br />
OR SHOW! PAGE01<br />
(2) Select the “SHOW” button 1-8, that you wish to delete steps out of. The selected<br />
SHOW LED will flash repeatedly. For example, if you select SHOW #1, the LED<br />
above the #1 SHOW button will flash repeatedly and your LCD will display the<br />
following:<br />
EDIT SHOW1/TLXX<br />
ADD ESC STEP00<br />
• TLXX = Total Show steps.<br />
(3) Press the “PAGE” button so that the LED above its button goes OFF. Use the “UP”<br />
and “DOWN” buttons to scroll through your Show steps. Stop at the step that you<br />
wish to delete.<br />
(4) Press the “DEL” button one (1) time. All LED’s on you the Moving Light section of the<br />
console will flash and your Show step will decline by one. The step has been deleted.<br />
To delete additional steps, repeat steps 3 & 4.<br />
(5) Press “ESC” two (2) times to exit.<br />
21
<strong>DMX</strong> OPERATOR PRO<br />
7.5.3 Delete Moving Light Shows<br />
(1) Press and hold down the "RECORD" button for three (3) seconds or until the green<br />
LED next to the RECORD button comes on. The LCD will display the following:<br />
SELECT A SCENE<br />
OR SHOW! PAGE01<br />
(2) Select the “SHOW” button 1-8, that you wish to delete. The selected SHOW LED will<br />
flash repeatedly. For example, if you select SHOW #1, the LED above the #1 SHOW<br />
button will flash repeatedly and your LCD will display the following:<br />
EDIT SHOW1/TLXX<br />
ADD ESC STEPXX<br />
• TLXX = Total Show steps.<br />
(3) Press and hold down the same “SHOW” button then press the “DEL” button one (1)<br />
time. The LCD will momentarily display “DEL ONE PROGRAM PLEASE WAIT….”<br />
Once the Show has been deleted from memory, the LCD will display the following:<br />
EDIT SHOW1/TL00<br />
ADD ESC STEP00<br />
• TL00 = Indicates that there are zero (0) steps in this Show.<br />
(4) At this point you can record a new Show on the same Show button or press “ESC”<br />
one (1) time and repeat steps 2 & 3 to delete additional Shows.<br />
(5) To exit Show delete mode, press “ESC” two (2) times.<br />
22
<strong>DMX</strong> OPERATOR PRO<br />
7.6 Recording Par Can Scenes and Chases<br />
7.6.1 Record a Par Can Scene<br />
This next section will take you through the necessary steps to record Par Can Scenes. You will be<br />
using the Par Can section which is located on the right side of your console or all buttons and<br />
faders to the right of the LCD display- including buttons in the LCD display section. The Scene<br />
buttons you will be recording to- are located on the upper top right section of your console<br />
numbered 1 through 6. The faders that you will use to set your Scenes are labeled 129-136.<br />
Scenes can be played back one of two ways. The first way is to manually trigger each desired<br />
scene and the second is to include the desired group of Scenes into a Chase for automatic<br />
sequential playback. Please refer to section 7.1.2 for dimmer pack set up.<br />
(1) Press and hold down the "RECORD" button for three (3) seconds or until the green<br />
LED next to the RECORD button comes on. The LCD will display the following:<br />
SELECT A SCENE<br />
OR CHASE! PAGE01<br />
(2) If this is your first time recording Scenes, you should start saving them on Page #01-<br />
please go to step #3 now. If you want to select a different page number from what is<br />
displayed, press the “PAGE” button so that the red LED above the Page button<br />
comes ON and then use the “UP” and “DOWN” buttons to scroll through to the other<br />
pages. To select the new page, simply stop on the desired page and go to step #3.<br />
There are a total of 16 pages.<br />
(3) Select the “SCENE” button where you wish to record to. The selected Scene LED<br />
will flash repeatedly. For example, if you are on Page #01 and you select Scene #1,<br />
the green LED above the #1 Scene button will flash repeatedly and your LCD will<br />
display the following:<br />
EDIT SCENE1/PG01<br />
SAVE ESC PAGE01<br />
23
<strong>DMX</strong> OPERATOR PRO<br />
7.6.1 Record a Par Can Scene (Cont.)<br />
(4) Adjust the “MASTER” fader all the way up to ten (10). The LCD will display the<br />
following:<br />
MSTR255<br />
SAVE ESC PAGE01<br />
(5) Next, use the eight (8) faders, labeled 129-136, to set your desired Par Can scene.<br />
(6) Once your look is set, press the “RECORD” button to SAVE. All LED’s will flash once<br />
confirming that your scene has been saved. Your LCD will once again display the<br />
following:<br />
SELECT A SCENE<br />
OR CHASE! PAGE01<br />
(7) To record additional Scenes, please repeat steps 3 thru 6.<br />
(8) To exit record mode, press the “ESC” button one time.<br />
7.6.2 Record a Par Can Chase<br />
(1) Press and hold down the "RECORD" button for three (3) seconds or until the green<br />
LED next to the RECORD button comes on. The LCD will display the following:<br />
SELECT A SCENE<br />
OR CHASE! PAGE01<br />
(2) Select the “CHASE” button 1-6, where you wish to record to. The selected Chase<br />
LED will flash repeatedly. For example, if you select CHASE #1, the LED above the<br />
#1 CHASE button will flash repeatedly and your LCD will display the following:<br />
EDIT CHASE1/TL00<br />
ADD ESC STEP00<br />
24
<strong>DMX</strong> OPERATOR PRO<br />
7.6.2 Record a Par Can Chase (Cont.)<br />
(3) If you previously programmed Scenes into page #01, the green LED’s above each<br />
button containing a scene, will be ON. At this time, you may select one of those<br />
Scenes or press the “PAGE” button so that the red LED above the Page button<br />
comes ON and then use the “UP” and “DOWN” buttons to scroll through the other<br />
pages. Select the “SCENE” # that you wish to have as your first Chase step by<br />
pressing the corresponding button. The LED above the selected Scene # will then be<br />
flashing. (NOTE: YOU CAN ALSO SET FADERS MANUALLY AND RECORD THEM<br />
INTO A CHASE ON THE FLY. HOWEVER, IF YOU ARE NEW TO <strong>DMX</strong> OR<br />
PROGRAMMING THIS CONSOLE, IT IS STRONGLY RECOMMENDED THAT YOU<br />
SELECT PRE PROGRAMMED SCENES TO RECORD CHASES).<br />
(4) Once your scene is selected or set, press the “RECORD” button, all of the LED’s will<br />
flash one (1) time and your Chase step will advance one (1) as well. The LCD will<br />
display the following:<br />
EDIT CHASE1/TL01<br />
ADD ESC STEP01<br />
• “TL” represents total Chase steps and “STEP” represents current Chase step.<br />
This becomes important when wanting to edit your Chase later (See Editing Par<br />
Can Chases).<br />
(5) Repeat steps 3-4 to continue recording additional steps into your Chase. Each time<br />
you record a new scene into your Chase, the Chase step will advance by one (1). You<br />
can store up to 99 steps maximum per Chase.<br />
(6) Once you’ve completed recording your Chase, press the “ESC” button two (2) times<br />
to exit record mode.<br />
25
<strong>DMX</strong> OPERATOR PRO<br />
7.7 Playback Par Can Scenes and Chases<br />
7.7.1 Playback Par Can Scenes<br />
(1) Press the “PAGE” button so the red LED above the Page button comes on.<br />
(2) Locate the page which contains the scene that you wish to playback by using the “UP<br />
& DOWN” buttons. You will notice the Page numbers changing on the top left corner<br />
of the LCD display as you press either the UP or DOWN buttons. (Note: As you are<br />
scrolling through pages, the green Scene LED’s may come on and off. When an LED<br />
is ON, this means that there is a Scene stored there- when the LED is OFF, it means<br />
that the location is empty or has no scene stored there).<br />
(3) Once you’ve located the page containing the scene that you want to playback, press<br />
the desired “SCENE” # 1-6 button. The selected scene LED will begin to flash and<br />
the scene will come ON. The corresponding green LED’s for the channels which are<br />
included into the selected scene will also come ON. (You can manually adjust faders<br />
for channels which were not included into the scene and over ride the output on the fly.<br />
The original scene channels will stay on while the scene is selected.)<br />
(4) To turn the selected scene OFF, press the same scene button or press “STAND BY”.<br />
You may also select another scene in which case the originally selected scene will<br />
turn OFF and the newly selected scene will turn ON and its LED will flash.<br />
(Scenes can also be triggered automatically in sequence. To trigger Scenes automatically<br />
in sequence, select the desired scene page by pressing the “PAGE” button so that the<br />
LED above its button is ON, then use the “UP” AND “DOWN” buttons to scroll through to<br />
desired page. Next, press the “AUTO” button. The Scenes will begin to playback one at a<br />
time according to faders set speed).<br />
26
<strong>DMX</strong> OPERATOR PRO<br />
7.7.2 Playback Par Can Chases<br />
Par Can Chases can be played back in ONE, MIXED or SEQUENCE modes. On the console<br />
MIXED is abbreviated by “MIX” and SEQUENCE by “SEQ”. In ONE mode, Chases playback one<br />
at a time. Each selected Chase will over ride a previously selected Chase. In MIXED mode, all<br />
selected Chase LED’s will flash simultaneously and all selected Chases will run at the same time.<br />
If a channel, 129-136, is included into more than one (1) Chase, the last selected Chase will be<br />
the one to take precedence. In SEQUENCE mode, selected Chases will playback one at a time in<br />
the order they were selected. The relevant Chase LED’s will flash when running while the other<br />
Chase LED’s remain steadily ON in stand by.<br />
(1) Select the desired playback mode by pressing the “One/Mix/SEQ” button. When the<br />
One/Mix/SEQ LED is OFF, you are in “One” mode. When the LED above the<br />
One/Mix/SEQ button is steadily ON, playback will take place in MIXED mode. When<br />
the LED above the One/Mix/SEQ button is flashing, playback will take place in<br />
SEQUENCE mode.<br />
(2) Select the “CHASE” button that you wish to playback. The selected Chase or<br />
Chases will begin to run immediately at the set speed of your “SPEED” fader. At this<br />
time, you may adjust the “SPEED” fader to your desired setting, use the “TAP SYNC”<br />
button by manually tapping on the button two (2) times- the Chase rate will then<br />
change according to the timing between each tap, or press the “FADE+SPEED” to<br />
get a fade effect incorporated into the selected Chase- the fade time can only be<br />
adjusted using the “SPEED” fader which affects both the speed rate and fade time.<br />
(To synchronize your Chase to sound, simply press the “AUDIO” button so the red<br />
LED above the Audio button comes ON. This will disable the FADE effect. Adjust<br />
the “AUDIO” fader to adjust the sensitivity for the internal microphone. The “TAP<br />
SYNC” LED will flash when ever sound is detected.<br />
27
<strong>DMX</strong> OPERATOR PRO<br />
7.8 Edit a Par Can Chase<br />
7.8.1 Add Par Can Chase steps<br />
(1) Press and hold down the "RECORD" button for three (3) seconds or until the green<br />
LED next to the RECORD button comes ON. The LCD will display the following:<br />
SELECT A SCENE<br />
OR CHASE! PAGE01<br />
(2) Select the “CHASE” button 1-6, that you wish to edit. The selected CHASE LED will<br />
flash repeatedly. For example, if you select CHASE #1, the LED above the #1 CHASE<br />
button will flash repeatedly and your LCD will display the following:<br />
EDIT CHASE1/TLXX<br />
ADD ESC STEP00<br />
• TLXX = Total Chase steps.<br />
(3) Press the “PAGE” button so that the LED above its button goes OFF. Use the “UP”<br />
and “DOWN” buttons to scroll through your Chase steps. Stop where you wish to<br />
add a step. For example, Chase #1 contains 15 total steps and you wish to add a step<br />
after step #7. The LCD should display the following:<br />
EDIT CHASE1/TL15<br />
ADD ESC STEP07<br />
(4) Press the “RECORD” button one (1) time. Your Chase step will advance by one-<br />
“STEP08”. A temporary step will be created which is a copy of your previous step.<br />
(5) Press the “PAGE” button so that the LED above its button comes ON. Use the “UP”<br />
and “DOWN” buttons to scroll through the scene pages. Stop when you locate the<br />
page # that contains the scene you wish to add and select it by pressing the<br />
corresponding Scene # button.<br />
(6) Press the “RECORD” button one (1) time to store the new scene.<br />
28
<strong>DMX</strong> OPERATOR PRO<br />
7.8.1 Add Par Can Chase steps (Cont.)<br />
(7) Press the “PAGE” button one (1) time then press the “DOWN” button one (1) time.<br />
(8) Press the “DEL” button one (1) time to erase the temporary step.<br />
(9) To delete additional steps, repeat steps 3 thru 8. Press “ESC” two (2) times to exit.<br />
7.8.2 Delete Moving Light Chase steps<br />
(1) Press and hold down the "RECORD" button for three (3) seconds or until the green<br />
LED next to the RECORD button comes ON. The LCD will display the following:<br />
SELECT A SCENE<br />
OR CHASE! PAGE01<br />
(2) Select the “CHASE” button 1-6, that you wish to delete steps out of. The selected<br />
CHASE LED will flash repeatedly. For example, if you select CHASE #1, the LED<br />
above the #1 CHASE button will flash repeatedly and your LCD will display the<br />
following:<br />
EDIT CHASE1/TLXX<br />
ADD ESC STEP00<br />
• TLXX = Total Chase steps.<br />
(3) Press the “PAGE” button so that the LED above its button goes OFF. Use the “UP”<br />
and “DOWN” buttons to scroll through your Chase steps. Stop at the step that you<br />
wish to delete.<br />
(4) Press the “DEL” button one (1) time. All LED’s momentarily flash and your Chase<br />
step will decline by one. The step has been deleted. To delete additional steps,<br />
repeat steps 3 & 4.<br />
(5) Press “ESC” two (2) times to exit.<br />
29
<strong>DMX</strong> OPERATOR PRO<br />
7.8.3 Delete a Par Can Chase<br />
(1) Press and hold down the "RECORD" button for three (3) seconds or until the green<br />
LED next to the RECORD button comes on. The LCD will display the following:<br />
SELECT A SCENE<br />
OR CHASE! PAGE01<br />
(2) Select the “CHASE” button 1-6, that you wish to delete. The selected CHASE LED<br />
will flash repeatedly. For example, if you select CHASE #1, the LED above the #1<br />
CHASE button will flash repeatedly and your LCD will display the following:<br />
EDIT CHASE1/TLXX<br />
ADD ESC STEPXX<br />
• TLXX = Total Chase steps.<br />
(3) Press and hold down the same “CHASE” button then press the “DEL” button one (1)<br />
time. The LCD will momentarily display “DEL ONE PROGRAM PLEASE WAIT….”<br />
Once the Chase has been deleted from memory, the LCD will display the following:<br />
EDIT CHASE1/TL00<br />
ADD ESC STEP00<br />
• TL00 = Indicates that there are zero (0) steps in this Chase.<br />
(4) At this point you can record a new Chase on the same Chase button or press “ESC”<br />
one (1) time and repeat steps 2 & 3 to delete additional Chases.<br />
(5) To exit, press the “ESC” button two (2) times.<br />
30
<strong>DMX</strong> OPERATOR PRO<br />
Section: 8 Menu Options Set Up<br />
8.1 Access Menu Options<br />
(1) Press and hold down the "SETUP" button for three (3) seconds or until the green<br />
LED above the SETUP button comes on. The LCD will display the following with a<br />
cursor box flashing over the # 1 option. Once you are here, you can use the “UP” and<br />
“DOWN” buttons to scroll through the menu options.<br />
1. CF CARD ↓<br />
2. ASSIGN CH.<br />
• Menu options include 1. CF CARD, 2. ASSIGN CH., 3. P/T FADE ONLY, 4. DISPLAY MODE,<br />
5. MIDI CH.<br />
8.2 Save to CF Card<br />
(1) Press and hold down the "SETUP" button for three (3) seconds or until the green<br />
LED above the SETUP button comes on. The LCD will display the following with a<br />
cursor box flashing over the # 1 option.<br />
1. CF CARD ↓<br />
2. ASSIGN CH.<br />
(2) Press the "RECORD" button one (1) time so to enter the CF CARD option. The LCD<br />
will display the following with the cursor box now flashing over the # 1 option- “READ<br />
FROM CF”.<br />
1. READ FROM CF<br />
2. STORE TO CF<br />
(3) Press the "DOWN" button one (1) time so the cursor is now flashing over the # 2<br />
option, “STORE TO CF”, and press “RECORD” to enter. The LCD will display the<br />
following:<br />
SETTING<br />
OK ESC UP DOWN<br />
31
<strong>DMX</strong> OPERATOR PRO<br />
8.2 Save to CF Card (Cont.)<br />
(4) Use the “UP” and "DOWN" buttons to scroll through the various save options. The<br />
save options include: “ALL” – if selected, all settings including Scenes, Chases and<br />
Chases will be saved for both the Moving Light and Par Can sections, “(FIXTURE)<br />
SCENE” – if selected, all Moving Light Scenes will be saved, “(FIXTURE)<br />
CHASE1-8” - if selected, corresponding Moving Light Chase will be saved, “(PAR)<br />
SCENE” – if selected, all Par Can Scenes will be saved, “(PAR) CHASE1-6” if<br />
selected, corresponding Par Can Chase will be saved and “SETTING” – if selected,<br />
settings only will be saved.<br />
(5) Once you’ve selected what you want to save, press “RECORD”. Use the “UP” and<br />
“DOWN” buttons to select the location within the CF card to store to, (1-50).<br />
(6) Press the “RECORD” button to save. The LCD will display:<br />
SAVE TO CF CARD<br />
NOW…….<br />
(7) The LCD will then temporarily read “SAVE TO CF CARD” – “SUCCESS” and return to<br />
the main screen. Your information has been saved to the CF Card.<br />
8.3 Read CF Card<br />
(1) Press and hold down the "SETUP" button for three (3) seconds or until the green<br />
LED above the SETUP button comes on. The LCD will display the following with a<br />
cursor box flashing over the # 1 option- “CF CARD”.<br />
1. CF CARD ↓<br />
2. ASSIGN CH.<br />
(2) Press the "RECORD" button one (1) time so to enter the CF CARD option. The LCD<br />
will display the following with the cursor box now flashing over the # 1 option- “READ<br />
FROM CF”.<br />
1. READ FROM CF<br />
2. STORE TO CF<br />
32
<strong>DMX</strong> OPERATOR PRO<br />
8.3 Read CF Card (Cont.)<br />
(3) Press “RECORD” to enter. The LCD will display the following:<br />
ALL<br />
OK ESC UP DOWN<br />
(4) Use the “UP” and "DOWN" buttons to scroll through the various upload options. The<br />
upload options include: “ALL” – if selected, all settings including Scenes and<br />
Chases will be uploaded for both the Moving Light and Par Can sections, “(FIXTURE)<br />
SCENE” – if selected, all Moving Light Scenes will be uploaded, “(FIXTURE)<br />
CHASE1-8” - if selected, corresponding Moving Light Chase will be uploaded, “(PAR)<br />
SCENE” – if selected, all Par Can Scenes will be uploaded, “(PAR) CHASE1-6” if<br />
selected, corresponding Par Can Chase will be uploaded and “SETTING” – if<br />
selected, settings only will be uploaded.<br />
(5) Once you’ve selected what you want to upload, press “RECORD”. Use the “UP”<br />
and “DOWN” buttons to select the file location from within the CF card to upload from,<br />
(1-50).<br />
(6) Press the “RECORD” button to save. The LCD will display:<br />
READ FROM CF<br />
CARD NOW…….<br />
(7) The LCD will then temporarily display “READ FROM CF CARD” – “SUCCESS” and<br />
return to the main screen. Your information has been now been uploaded from the CF<br />
Card.<br />
33
<strong>DMX</strong> OPERATOR PRO<br />
8.4 Channel Patch<br />
(1) Press and hold down the "SETUP" button for three (3) seconds or until the green<br />
LED above the SETUP button comes on. The LCD will display the following with a<br />
cursor box flashing over the # 1 option.<br />
1. CF CARD ↓<br />
2. ASSIGN CH.<br />
(2) Press the "DOWN" button one (1) time so that the cursor is now flashing over the # 2<br />
"ASSIGN CH." option. The LCD will display the following with the cursor box now<br />
flashing over the # 2 option.<br />
1. CF CARD ↓<br />
2. ASSIGN CH.<br />
(3) Press the "Record" button to enter the assign channel option. The LCD will display<br />
the following:<br />
CHANNEL01>OUT01<br />
OK ESC SEL ADJ<br />
(4) Use the "UP" button to scroll through the 16 channels and use the “DOWN” button to<br />
change the corresponding fader output. For example, if I want channel # 1 to be<br />
controlled by fader # 7 on the console, the LCD will display the following:<br />
CHANNEL01>OUT07<br />
OK ESC SEL ADJ<br />
(5) Repeat step 4 until you have patched all desired channels.<br />
34
<strong>DMX</strong> OPERATOR PRO<br />
8.4 Channel Patch (Cont.)<br />
(6) Next, press and hold down the "GROUP" button and simultaneously select<br />
the "FIXTURE" number buttons to select the moving lights that you wish to assign<br />
these settings to. All selected moving lights will have the LED above the buttons<br />
flashing.<br />
(7) Now that you’ve patched all desired channels, you need to confirm and save these<br />
settings to memory. To do this, press the "RECORD" button one (1) time. The LCD<br />
display will momentarily read "GOOD". You can now exit menu mode by pressing the<br />
"ESC" button two (2) times.<br />
8.5 Pan / Tilt Fade Set Up<br />
You can set your pan and tilt channels to be the only channels to respond to set fade times.<br />
Selecting “ALL” means, all channels will incorporate all fade times set for a programmed Chase.<br />
Selecting “ONLY” means, only the pan and tilt channels will incorporate the fade times set for a<br />
programmed Chase. The factory setting is “ALL”. If you wish to change this, follow these steps.<br />
(1) Press and hold down the "SETUP" button for three (3) seconds or until the green<br />
LED above the SETUP button comes on. The LCD will display the following with a<br />
cursor box flashing over the # 1 option.<br />
1. CF CARD ↓<br />
2. ASSIGN CH.<br />
(2) Press the "DOWN" button two (2) times so that the cursor is now flashing over the #<br />
3 "P/T FADE ONLY." option. The LCD will display the following with the cursor box<br />
now flashing over the # 3 option.<br />
2. ASSIGN CH.<br />
3. P/T FADE ONLY<br />
35
<strong>DMX</strong> OPERATOR PRO<br />
8.5 Pan / Tilt Fade Set Up (Cont.)<br />
(3) Press the "Record" button to enter the P/T FADE ONLY option. The LCD will display<br />
the following:<br />
FIXTURE1: ALL<br />
OK ESC SEL ADJ<br />
(4) Use the "UP" button to scroll through the FIXTURE # list and use the “DOWN”<br />
button to change the desired fade setting- “ALL or ONLY”.<br />
(5) Repeat step 4 until you’ve completed the fade settings for all desired fixtures.<br />
(6) Press “RECORD” to confirm and store your new settings.<br />
(7) Press the “ESC” button two (2) times to exit.<br />
8.6 Display Mode Set Up<br />
The Display mode set up allows you to go in and change the way channels read out on the display.<br />
You have two options- one is “MODE:255” and the other is “MODE:100”. MODE:255 will display<br />
channel settings in values- between 0 – 255. MODE:100 will display channel settings in<br />
percentages- between 0 – 100%. The factory setting is “MODE:255”. If you wish to change this,<br />
follow these steps.<br />
(1) Press and hold down the "SETUP" button for three (3) seconds or until the green<br />
LED above the SETUP button comes on. The LCD will display the following with a<br />
cursor box flashing over the # 1 option.<br />
1. CF CARD ↓<br />
2. ASSIGN CH.<br />
36
<strong>DMX</strong> OPERATOR PRO<br />
8.6 Display Mode Set Up (Cont.)<br />
(2) Press the "DOWN" button three (3) times so that the cursor is now flashing over the<br />
# 4 "DISPLAY MODE." option. The LCD will display the following with the cursor box<br />
now flashing over the # 4 option.<br />
3. P/T FADE ONLY<br />
4. DISPLAY MODE<br />
(3) Press the "Record" button to enter the DISPLAY MODE option. The LCD will display<br />
the following:<br />
DISPLAY MODE:255<br />
OK ESC SEL ADJ<br />
(4) Use the "UP" or “DOWN” button to change the mode from 255 to 100 or vice versa.<br />
(5) Once changed, press the “RECORD” button to confirm and store your new setting.<br />
(6) Press the “ESC” button two (2) times to exit.<br />
37
<strong>DMX</strong> OPERATOR PRO<br />
8.7 MIDI Channel Set Up<br />
These settings only need to be set if you are linking a MIDI device to <strong>DMX</strong> <strong>Operator</strong> <strong>Pro</strong>’s MIDI<br />
input. The MIDI channel set up option allows you to set the desired Midi channel into the <strong>DMX</strong><br />
<strong>Operator</strong> <strong>Pro</strong>.<br />
(1) Press and hold down the "SETUP" button for three (3) seconds or until the green<br />
LED above the SETUP button comes on. The LCD will display the following with a<br />
cursor box flashing over the # 1 option.<br />
1. CF CARD ↓<br />
2. ASSIGN CH.<br />
(2) Press the "DOWN" button four (4) times so that the cursor is now flashing over the #<br />
5 "MIDI CH." option. The LCD will display the following with the cursor box now<br />
flashing over the #5 option.<br />
4. DISPLAY MODE<br />
5. MIDI CH.<br />
(3) Press the "Record" button to enter the MIDI channel option. The LCD will display the<br />
following:<br />
MIDI CH. <br />
OK ESC UP DOWN<br />
(4) Use the "UP" or “DOWN” button to change the MIDI channel setting .<br />
(5) Once changed, press the “RECORD” button to confirm and store your new setting.<br />
(6) Press the “ESC” button two (2) times to exit.<br />
38
<strong>DMX</strong> OPERATOR PRO<br />
Section: 9 MIDI Trigger Chart<br />
This unit can receive and transmit MIDI NOTE information according to the relevant channels.<br />
Keep the following chart readily available for future reference.<br />
NOTE NUMBER<br />
FUNCTION<br />
23-34 FIXTURE PAGE 1-12<br />
35-50 PAR PAGE 1-16<br />
51-58 MOVING LIGHT SCENE 1-8<br />
59-66 MOVING LIGHT CHASE 1-8<br />
67-72 PAR SCENE 1-6<br />
73-78 PAR CHASE 1-6<br />
79 PAR STANDBY<br />
80 PAR FADE + SPEED<br />
81 FIXTURE BLACKOUT<br />
82 FIXTURE AUDIO<br />
83 PAR AUDIO<br />
84 PAR AUTO<br />
85 PAR STEP<br />
86 FIXTURE MIX/SEQ<br />
87 PAR ONE/MIX/SEQ<br />
88 PAR FULL ON<br />
Section: 10 CF Card Important Notice<br />
• Never remove the CF card when storing or uploading.<br />
• Once card has been used for <strong>DMX</strong> <strong>Operator</strong> <strong>Pro</strong>, DO NOT attempt to use the card in<br />
another compatible device. Doing so may cause any stored information to be lost and the<br />
card may also become corrupt.<br />
• There is not <strong>DMX</strong> output when attempting to store or upload to the CF card.<br />
• CF card may become hot during use. Please observe caution when removing memory<br />
card from the <strong>DMX</strong> <strong>Operator</strong> <strong>Pro</strong>.<br />
• Keep the CF card in a safe place.<br />
39
<strong>DMX</strong> OPERATOR PRO<br />
Section: 11 Erase Entire Memory<br />
(1) Switch the <strong>DMX</strong> <strong>Operator</strong> <strong>Pro</strong>’s power switch to the OFF position.<br />
(2) On the moving light side, simultaneously hold down Chase buttons 3 & 6 and Fixture<br />
buttons 2 & 7- then turn the power switch to the ON position. The LCD display the<br />
following:<br />
CLEAR MEMORY NOW<br />
PLEASE WAIT…<br />
(3) Release Chase and Fixture buttons. Entire memory will be erased.<br />
40