3 - Big Ass Fans
3 - Big Ass Fans
3 - Big Ass Fans

You also want an ePaper? Increase the reach of your titles
YUMPU automatically turns print PDFs into web optimized ePapers that Google loves.
SMARTSENSE365 <br />
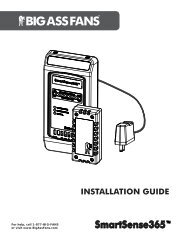
Mounting the SmartSense365 (cont.)<br />
Installing the remote temperature sensor<br />
7<br />
CAUTION: The wall controller and remote temperature sensor contain sensitive electronic PCBs. Use extreme care when<br />
handling! ESD precautions recommended.<br />
Do not lose the rubber grommet during installation.<br />
The remote temperature sensor is designed to be surface mounted in a location near the ceiling. Note: Wiring for the remote sensor<br />
must be completed at the same time the sensor is mounted.<br />
To mount the remote temperature sensor, loosen the (4) screws and remove the cover from the remote sensor. Using the back of<br />
the sensor as a template, mark the (2) screw locations on the mounting surface. Loosely install the mounting screws on the mounting<br />
surface in the hole locations. Slide the remote over the screws, and then tighten the screws. Before reattaching the front cover,<br />
complete the wiring. See p. 9 for details and wiring diagrams. Note: The remote temperature sensor can be mounted in any orientation.<br />
Mounting<br />
Screws<br />
Front<br />
Cover<br />
Screws<br />
WWW.BIGASSFANS.COM ©2011 DELTA T CORP. DBA BIG ASS FAN CO. ALL RIGHTS RESERVED