Mechanized Plasmarc Cutting Torch - ESAB Welding & Cutting ...
Mechanized Plasmarc Cutting Torch - ESAB Welding & Cutting ...
Mechanized Plasmarc Cutting Torch - ESAB Welding & Cutting ...

You also want an ePaper? Increase the reach of your titles
YUMPU automatically turns print PDFs into web optimized ePapers that Google loves.
section 5<br />
Maintenance<br />
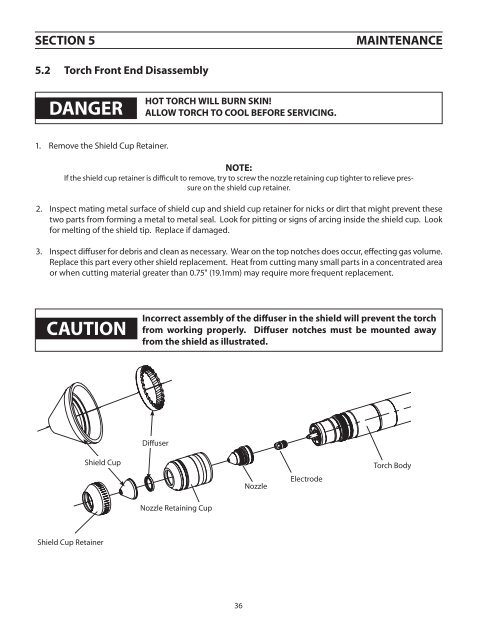
5.2 <strong>Torch</strong> Front End Disassembly<br />
DANGER<br />
Hot <strong>Torch</strong> Will Burn Skin!<br />
Allow torch to cool before servicing.<br />
1. Remove the Shield Cup Retainer.<br />
NOTE:<br />
If the shield cup retainer is difficult to remove, try to screw the nozzle retaining cup tighter to relieve pressure<br />
on the shield cup retainer.<br />
2. Inspect mating metal surface of shield cup and shield cup retainer for nicks or dirt that might prevent these<br />
two parts from forming a metal to metal seal. Look for pitting or signs of arcing inside the shield cup. Look<br />
for melting of the shield tip. Replace if damaged.<br />
3. Inspect diffuser for debris and clean as necessary. Wear on the top notches does occur, effecting gas volume.<br />
Replace this part every other shield replacement. Heat from cutting many small parts in a concentrated area<br />
or when cutting material greater than 0.75" (19.1mm) may require more frequent replacement.<br />
caution<br />
Incorrect assembly of the diffuser in the shield will prevent the torch<br />
from working properly. Diffuser notches must be mounted away<br />
from the shield as illustrated.<br />
Diffuser<br />
Shield Cup<br />
Nozzle<br />
Electrode<br />
<strong>Torch</strong> Body<br />
Nozzle Retaining Cup<br />
Shield Cup Retainer<br />
36