Mechanized Plasmarc Cutting Torch - ESAB Welding & Cutting ...
Mechanized Plasmarc Cutting Torch - ESAB Welding & Cutting ...
Mechanized Plasmarc Cutting Torch - ESAB Welding & Cutting ...

You also want an ePaper? Increase the reach of your titles
YUMPU automatically turns print PDFs into web optimized ePapers that Google loves.
section 5<br />
Maintenance<br />
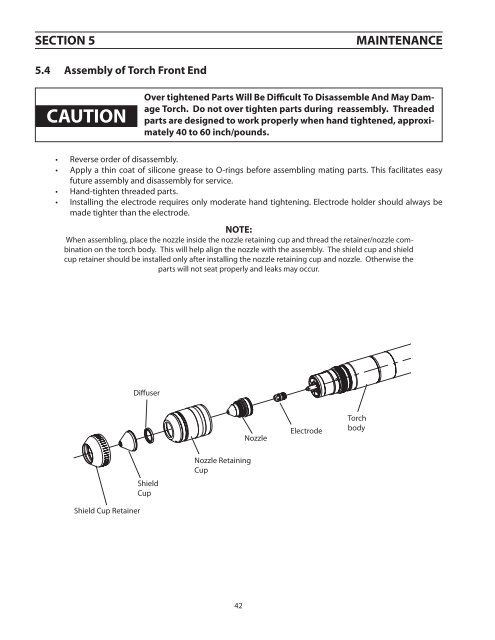
5.4 Assembly of <strong>Torch</strong> Front End<br />
caution<br />
Over tightened Parts Will Be Difficult To Disassemble And May Damage<br />
<strong>Torch</strong>. Do not over tighten parts during reassembly. Threaded<br />
parts are designed to work properly when hand tightened, approximately<br />
40 to 60 inch/pounds.<br />
• Reverse order of disassembly.<br />
• Apply a thin coat of silicone grease to O-rings before assembling mating parts. This facilitates easy<br />
future assembly and disassembly for service.<br />
• Hand-tighten threaded parts.<br />
• Installing the electrode requires only moderate hand tightening. Electrode holder should always be<br />
made tighter than the electrode.<br />
NOTE:<br />
When assembling, place the nozzle inside the nozzle retaining cup and thread the retainer/nozzle combination<br />
on the torch body. This will help align the nozzle with the assembly. The shield cup and shield<br />
cup retainer should be installed only after installing the nozzle retaining cup and nozzle. Otherwise the<br />
parts will not seat properly and leaks may occur.<br />
Diffuser<br />
Nozzle<br />
Electrode<br />
<strong>Torch</strong><br />
body<br />
Shield<br />
Cup<br />
Nozzle Retaining<br />
Cup<br />
Shield Cup Retainer<br />
42