Mechanized Plasmarc Cutting Torch - ESAB Welding & Cutting ...
Mechanized Plasmarc Cutting Torch - ESAB Welding & Cutting ...
Mechanized Plasmarc Cutting Torch - ESAB Welding & Cutting ...

Create successful ePaper yourself
Turn your PDF publications into a flip-book with our unique Google optimized e-Paper software.
section 5<br />
Maintenance<br />
4. Unscrew nozzle retainer and pull nozzle straight out of torch body. Inspect insulator portion of the nozzle<br />
retainer for cracks or chipping. Replace if damaged.<br />
Inspect nozzle for:<br />
• melting or excessive current transfer.<br />
• gouges from internal arcing.<br />
• nicks or deep scratches on the O-ring seating surfaces .<br />
• O-ring cuts, nicks, or wear.<br />
• Remove hafnium particles (from the nozzle) with steel wool.<br />
Replace if any damage is found.<br />
NOTE:<br />
Discoloration of internal surfaces and small black starting marks are normal and do not effect cutting<br />
performance.<br />
If the holder was tightened sufficiently, the electrode may unscrew without being attached to the electrode<br />
holder. When installing the electrode, use only sufficient force to adequately secure the electrode.<br />
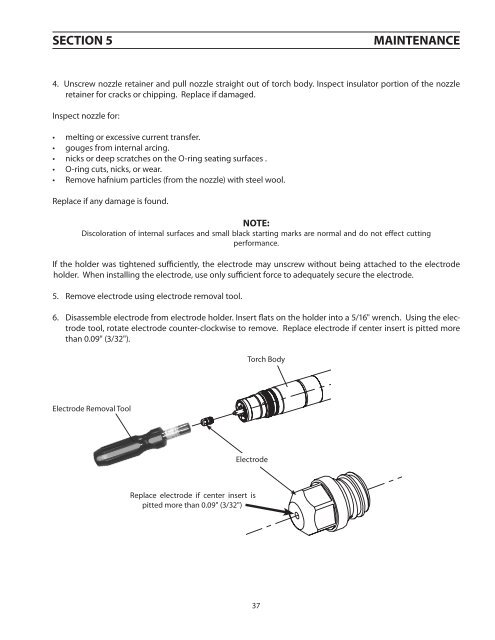
5. Remove electrode using electrode removal tool.<br />
6. Disassemble electrode from electrode holder. Insert flats on the holder into a 5/16" wrench. Using the electrode<br />
tool, rotate electrode counter-clockwise to remove. Replace electrode if center insert is pitted more<br />
than 0.09" (3/32").<br />
<strong>Torch</strong> Body<br />
Electrode Removal Tool<br />
Electrode<br />
Replace electrode if center insert is<br />
pitted more than 0.09" (3/32")<br />
37