

Mlll Pro - Digital readouts, DRO, Magnum Measuring Systems, sargon
Mlll Pro - Digital readouts, DRO, Magnum Measuring Systems, sargon
Mlll Pro - Digital readouts, DRO, Magnum Measuring Systems, sargon

You also want an ePaper? Increase the reach of your titles
YUMPU automatically turns print PDFs into web optimized ePapers that Google loves.
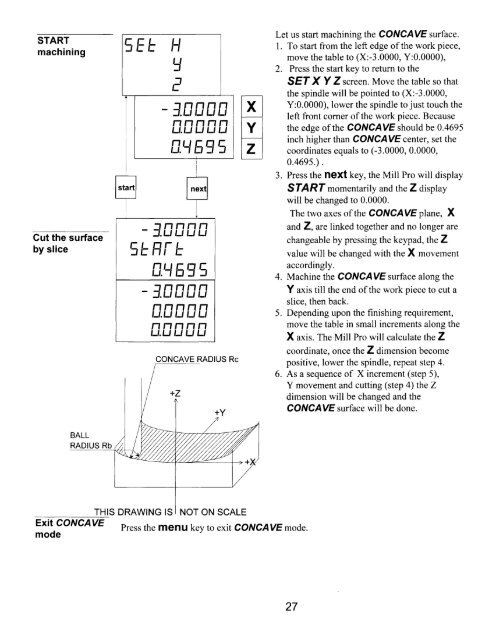
START<br />
machining<br />
Cut the surface<br />
by slice<br />
trtEE 'rl<br />
a<br />
rf<br />
tr<br />
f.[]nnfi<br />
nnnnn<br />
u.uLtuLl<br />
fi.\81',=<br />
J.nnnn<br />
'=L F,[-<br />
'tr<br />
fr.4 83tr_,<br />
J.nnfifr<br />
nnnnn<br />
l-t.Lt L, Ll t-,<br />
nnnnn<br />
lJ.Lt L' t_l Lt<br />
CONCAVE RADIUS Rc<br />
Let us start machining the CONCAVE surface.<br />
I . To start from the left edge of the work piece,<br />
move the table to (X:-3.0000, Y:0.0000),<br />
2. Press the start key to return to the<br />
SEI X Y Z screen Move the table so that<br />
the spindle will be pointed to (X:-3.0000,<br />
Y:0.0000), lower the spindle to just touch the<br />
left front corner of the work piece. Because<br />
the edge of the CONCAVE should be 0.4695<br />
inch higher than CONCAVE center, set the<br />
coordinates equals to (-3.0000, 0.0000,<br />
0.46es .).<br />
3.<br />
4.<br />
Press the hBXt key, the Mill <strong>Pro</strong> will display<br />
SfARf momentarily and the Z display<br />
will be changed to 0.0000.<br />
The two axes of the CONCAVE plane, X<br />
and Z, are linked together and no longer are<br />
changeable by pressing the keyp ad, the Z<br />
value will be changed with the X movement<br />
accordingly.<br />
Machine the CONCAVE surface along the<br />
Y axis till the end of the work piece to cut a<br />
slice, then back.<br />
5. Depending upon the finishing requirement,<br />
move the table in small increments along the<br />
X axis. The Mill <strong>Pro</strong> will calculate the Z<br />
coordinate, once the Z dimension become<br />
positive, lower the spindle, repeat step 4.<br />
6. As a sequence of X increment (step 5),<br />
Y movement and cutting (step 4) the Z<br />
dimension will be changed and the<br />
CONCAVE surface will be done.<br />
Exit CONCAVE<br />
mode<br />
THIS DRAWING IS NOT ON SCALE<br />
Press the ffieflU key to exit CONCAVE mode.<br />
27
