1998 Dishwashers Intro - Whirlpool
1998 Dishwashers Intro - Whirlpool
1998 Dishwashers Intro - Whirlpool

Create successful ePaper yourself
Turn your PDF publications into a flip-book with our unique Google optimized e-Paper software.
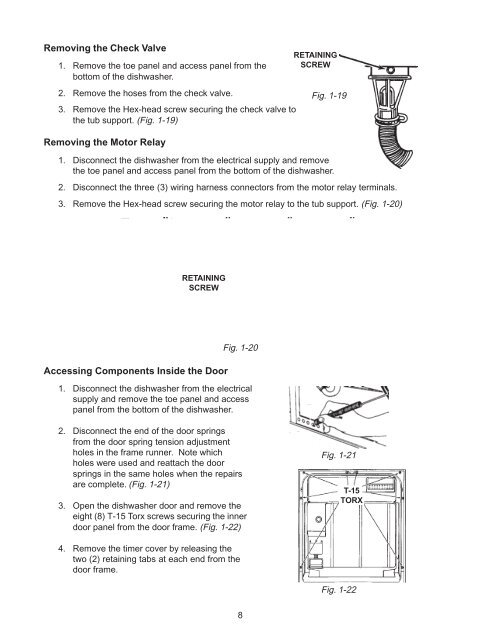
Removing the Check Valve<br />
1. Remove the toe panel and access panel from the<br />
bottom of the dishwasher.<br />
2. Remove the hoses from the check valve.<br />
3. Remove the Hex-head screw securing the check valve to<br />
the tub support. (Fig. 1-19)<br />
Removing the Motor Relay<br />
RETAINING<br />
SCREW<br />
Fig. 1-19<br />
1. Disconnect the dishwasher from the electrical supply and remove<br />
the toe panel and access panel from the bottom of the dishwasher.<br />
2. Disconnect the three (3) wiring harness connectors from the motor relay terminals.<br />
3. Remove the Hex-head screw securing the motor relay to the tub support. (Fig. 1-20)<br />
RETAINING<br />
SCREW<br />
Accessing Components Inside the Door<br />
Fig. 1-20<br />
1. Disconnect the dishwasher from the electrical<br />
supply and remove the toe panel and access<br />
panel from the bottom of the dishwasher.<br />
2. Disconnect the end of the door springs<br />
from the door spring tension adjustment<br />
holes in the frame runner. Note which<br />
holes were used and reattach the door<br />
springs in the same holes when the repairs<br />
are complete. (Fig. 1-21)<br />
3. Open the dishwasher door and remove the<br />
eight (8) T-15 Torx screws securing the inner<br />
door panel from the door frame. (Fig. 1-22)<br />
Fig. 1-21<br />
T-15<br />
TORX<br />
4. Remove the timer cover by releasing the<br />
two (2) retaining tabs at each end from the<br />
door frame.<br />
Fig. 1-22<br />
8