1998 Dishwashers Intro - Whirlpool
1998 Dishwashers Intro - Whirlpool
1998 Dishwashers Intro - Whirlpool

Create successful ePaper yourself
Turn your PDF publications into a flip-book with our unique Google optimized e-Paper software.
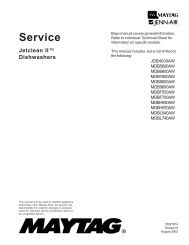
DIAGNOSTICS AND SALES DEMO TIMING CHART<br />
INTERVAL<br />
11<br />
10<br />
9<br />
8<br />
7<br />
6<br />
5<br />
4<br />
3<br />
2<br />
1<br />
0<br />
POTS & PANS<br />
HEAVY<br />
NORMAL<br />
LOW ENERGY<br />
CHINA<br />
QUICK WASH<br />
RINSE ONLY<br />
POWER SCOUR<br />
HIGH TEMP WASH<br />
SANI RINSE<br />
AIR DRY<br />
CANCEL<br />
S<br />
T<br />
A<br />
N<br />
D<br />
B<br />
Y<br />
S<br />
T<br />
A<br />
N<br />
D<br />
B<br />
Y<br />
DELAY 2 HR<br />
DELAY 4 HR<br />
DELAY 6 HR<br />
WASHING LED<br />
ADD-A-DISH LED<br />
WATER HEATING LED NOTE 4<br />
SENSING LED NOTE 3<br />
RINSING LED<br />
DRYING LED<br />
CLEAN LED NOTE 5 6<br />
CONTROL LOCKED LED<br />
SANI COMPLETE LED<br />
(17) (17) (17) (17) (17) (17) (17) (17)<br />
MINUTES<br />
SECONDS<br />
3<br />
2<br />
6<br />
2<br />
TH<br />
2<br />
5<br />
1<br />
55<br />
6<br />
6<br />
VENT (disp., fill, soil enable)<br />
MOTOR<br />
WASH DIRECTION NOTE 2<br />
DRAIN DIRECTION NOTE 2<br />
FILL<br />
DETERGENT DISPENSER<br />
RINSE AGENT DISPENSER<br />
HEATER<br />
SOIL SENSE NOTE 3<br />
REFERENCE NOTES<br />
3<br />
4<br />
WHIRLPOOL ‘98 DIAGNOSTICS<br />
DIAGNOSTICS AND SALES DEMO TIMING CHART NOTES<br />
1. The diagnostics test cycle starts at interval 11 and concludes at interval<br />
2. To initiate the diagnostics test cycle, press the following sequence of<br />
keys within 10 seconds:<br />
High Temp Wash, Air Dry, High Temp Wash, Air Dry<br />
or<br />
Power Scour, Air Dry, Power Scour, Air Dry<br />
illuminated whenever the control detects a resistance of greater than<br />
approximately 45 K-OHMS on the thermistor/ thermostat circuit. This<br />
feature is intended to help determine whether a thermostat or thermistor<br />
is installed. A thermostat with normally open contacts would trigger the<br />
clean LED (until the thermostat is tripped). Under normal operation, the<br />
resistance of the thermistor is always less than 45 K-OHMS and would<br />
not trigger the clean LED.<br />
The diagnostics test cycle may be manually advanced to the next interval<br />
by pressing the pots & pans key. To exit diagnostics, press cancel.<br />
2. The sales demo cycle consists of a single 6-minute wash interval which<br />
starts at interval 1 and concludes at interval 0. To initiate the sales<br />
demo cycle, press the following sequence of keys within 10 seconds:<br />
High Temp Wash, Air Dry, High Temp Wash, Air Dry, High Temp Wash<br />
or<br />
Power Scour, Air Dry, Power Scour, Air Dry, Power Scour<br />
3. The diagnostics test cycle executes a soil sensing interval at interval 9<br />
to test the soil sensing circuit. The sensing LED is illuminated through<br />
out this sense interval.<br />
If the soil sensing pressure switch is tripped at any time during this sense<br />
interval, the control will immediately terminate the sense interval and<br />
proceed with the remainder of the diagnostics cycle.<br />
If the time limit for this sense interval elapses without detecting soil, the<br />
control simply proceeds with the remainder of the diagnostics cycle.<br />
4. The diagnostics cycle suspends cycle timing and executes a thermal<br />
hold at interval 7. The thermal hold interval is terminated and cycle<br />
timing resumes when the water is heated to the desired set point temperature<br />
(60ºC/140ºF). The maximum default time limit elapses (1 hour),<br />
or the cycle is manually advanced to the next interval by pressing the<br />
pots & pans key. The water heating LED is illuminated during the thermal<br />
hold.<br />
5. The clean LED is illuminated at the end of both the diagnostics test cycle<br />
and the sales demo cycle. The clean LED can be extinguished by opening<br />
the door or pressing any key.<br />
6. During intervals 9 through 3 of the diagnostics cycle, the clean LED is<br />
7. The wash and drain auxiliary windings are only “on” when the motor is<br />
being started. When the control has determined that the motor has been<br />
started satisfactorily, the auxiliary winding will be turned “off”.<br />
8. Entering the key sequence high temp wash (or power scour), air dry,<br />
high temp wash (or power scour), air dry, after a cycle has started, will<br />
enable the pots-n-pans key rapid advance feature. This will allow service<br />
to rapidly step to any interval of the currently running cycle.<br />
Other Control Features:<br />
Cancel/Drain:<br />
Terminates current active cycle and clears cycle selections. Executes 2-minute<br />
drain upon first selection if water is likely to be left in sump. Subsequent<br />
selections toggle between 2-minute drains and going to standby.<br />
Control Lock:<br />
The control lock LED is illuminated and all keys of the keyboard are disabled<br />
whenever the control lock feature is invoked by the customer. The control<br />
lock feature (and LED) can be turned on or off by the customer at any time by<br />
holding down the air dry option key for 4 seconds.<br />
Delay Start:<br />
Allows the customer to delay the start of a cycle by up to 6 hours. Each press<br />
of the delay key increases the delay time selection by two hours. The selected<br />
delay period will begin clocking down upon selecting the cycle key. The cycle<br />
selected will begin automatically upon completing the delay period.<br />
Error Messages:<br />
Stuck Key:<br />
If the control detects that a key is stuck in the depressed position, dishwasher<br />
operation will be suspended and the control will flash the LED associated with<br />
that key until the condition is corrected. If a key without an LED is stuck or<br />
multiple keys are stuck, the control will flash the lock-out LED.<br />
42