crossmax slr disc 09 - lesrouleuxdewailly - Free
crossmax slr disc 09 - lesrouleuxdewailly - Free
crossmax slr disc 09 - lesrouleuxdewailly - Free

You also want an ePaper? Increase the reach of your titles
YUMPU automatically turns print PDFs into web optimized ePapers that Google loves.
30<br />
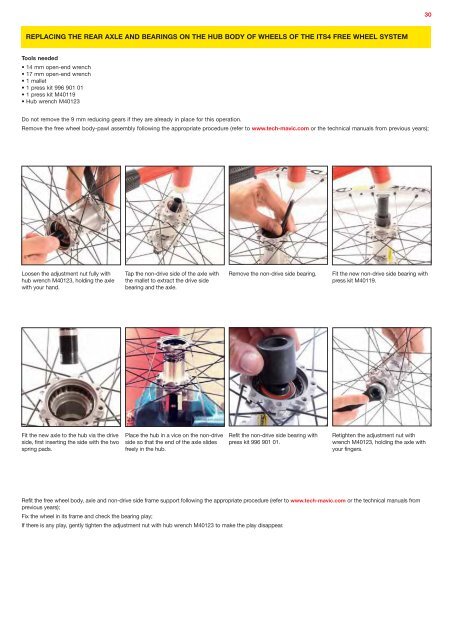
REPLACING THE REAR AXLE AND BEARINGS ON THE HUB BODY OF WHEELS OF THE ITS4 FREE WHEEL SYSTEM<br />
Tools needed<br />
• 14 mm open-end wrench<br />
• 17 mm open-end wrench<br />
• 1 mallet<br />
• 1 press kit 996 901 01<br />
• 1 press kit M40119<br />
• Hub wrench M40123<br />
Do not remove the 9 mm reducing gears if they are already in place for this operation.<br />
Remove the free wheel body-pawl assembly following the appropriate procedure (refer to www.tech-mavic.com or the technical manuals from previous years);<br />
Loosen the adjustment nut fully with<br />
hub wrench M40123, holding the axle<br />
with your hand.<br />
Tap the non-drive side of the axle with<br />
the mallet to extract the drive side<br />
bearing and the axle.<br />
Remove the non-drive side bearing.<br />
Fit the new non-drive side bearing with<br />
press kit M40119.<br />
Fit the new axle to the hub via the drive<br />
side, first inserting the side with the two<br />
spring pads.<br />
Place the hub in a vice on the non-drive<br />
side so that the end of the axle slides<br />
freely in the hub.<br />
Refit the non-drive side bearing with<br />
press kit 996 901 01.<br />
Retighten the adjustment nut with<br />
wrench M40123, holding the axle with<br />
your fingers.<br />
Refit the free wheel body, axle and non-drive side frame support following the appropriate procedure (refer to www.tech-mavic.com or the technical manuals from<br />
previous years);<br />
Fix the wheel in its frame and check the bearing play;<br />
If there is any play, gently tighten the adjustment nut with hub wrench M40123 to make the play disappear.