crossmax slr disc 09 - lesrouleuxdewailly - Free
crossmax slr disc 09 - lesrouleuxdewailly - Free
crossmax slr disc 09 - lesrouleuxdewailly - Free

Create successful ePaper yourself
Turn your PDF publications into a flip-book with our unique Google optimized e-Paper software.
41<br />
REPLACING A SPOKE ON THE DEEMAX <strong>09</strong>, DEEMAX <strong>09</strong> 12X150 AND DEEMAX <strong>09</strong> SSC WHEELS.<br />
Tools needed<br />
• Spoke wrench M40494<br />
• Mavic tensiometer 995 643 01 + tension-reading conversion chart supplied<br />
The Deemax <strong>09</strong> and Deemax <strong>09</strong> SSC hubs incorporate the SRS (Spoke Retention System) design which prevents the spokes from being ejected when subject<br />
to major shocks.<br />
Consequently, the spokes must be assembled on the hub using a special method. When you have to replace a spoke, therefore, it may prove necessary to<br />
remove or release others.<br />
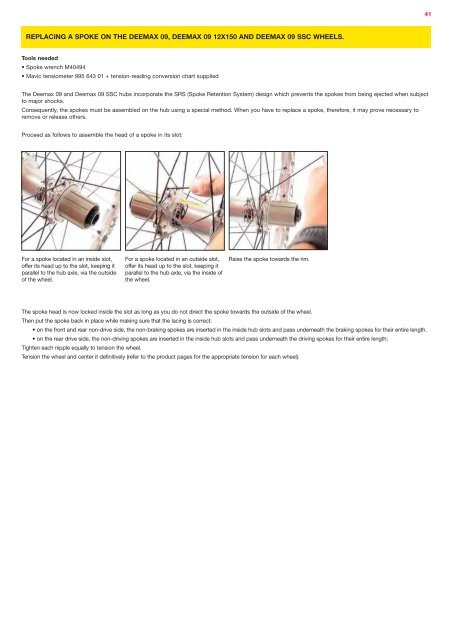
Proceed as follows to assemble the head of a spoke in its slot:<br />
For a spoke located in an inside slot,<br />
offer its head up to the slot, keeping it<br />
parallel to the hub axle, via the outside<br />
of the wheel.<br />
For a spoke located in an outside slot,<br />
offer its head up to the slot, keeping it<br />
parallel to the hub axle, via the inside of<br />
the wheel.<br />
Raise the spoke towards the rim.<br />
The spoke head is now locked inside the slot as long as you do not direct the spoke towards the outside of the wheel.<br />
Then put the spoke back in place while making sure that the lacing is correct:<br />
• on the front and rear non-drive side, the non-braking spokes are inserted in the inside hub slots and pass underneath the braking spokes for their entire length.<br />
• on the rear drive side, the non-driving spokes are inserted in the inside hub slots and pass underneath the driving spokes for their entire length;<br />
Tighten each nipple equally to tension the wheel.<br />
Tension the wheel and center it definitively (refer to the product pages for the appropriate tension for each wheel).